
Bypass FRP Moto G7 Plus Android 9 Without PC
We have easy guideline for you to get back your MOTO device, if you are unable to reach and complete verification process by signing in again with forgotten google account. We will access to device main home-screen directly using (Apex Launcher) application. To do this, you will have to follow up steps from below to Bypass FRP Moto G7 Plus (Android 9) without using PC.
Warning: This method is only for a real device owner, who has lost his/her Gmail account after hard reset. If you are unknown to this phone & trying to gain access, you will be jailed once the device is traced. This is a serious crime & Sin. You must return this phone to its real owner.
Let’s Start to Bypass FRP Moto G7 Plus:
-Connect Wi-Fi in your Moto device.
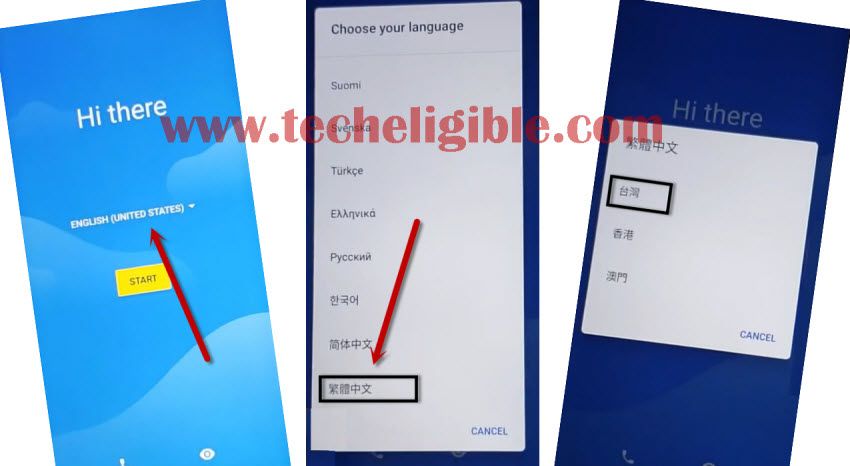
-Get back to very first “Hi There” screen.
-Tap on “English (United State)”, to change language.
-From language list, go to very bottom of the language list, and select last (Language) same as appear in below image.
-From popup window, select “1st option”.
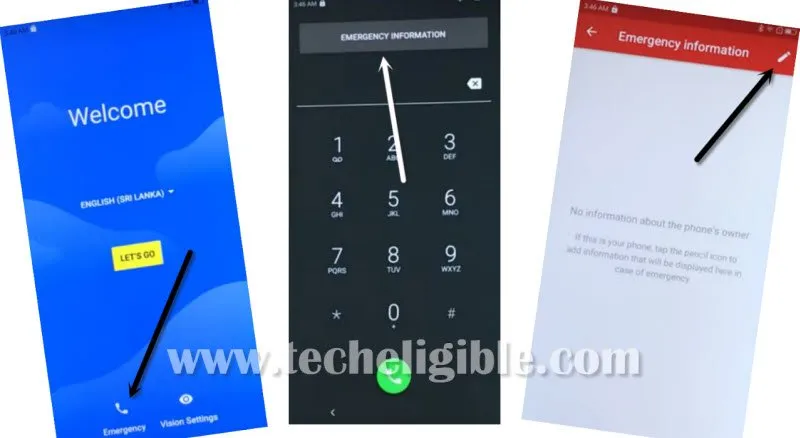
-Again tap on “Emergency call icon”.
-Double tap on Top “Button”.
-Now tap on “Pencil icon” from top right corner & select “1st option”.
![]()
-Now tap on “1st option”.
-Tap on new popup window typed area to bring keyboard.

-Long tap on “Wolrd icon” from the keyboard, and select “Bottom left option” from the new popup window.
![]()
-Tap on “Green bottom” from the bottom.
-Select “3rd option”, and then tap on “Green Button” from bottom right corner.
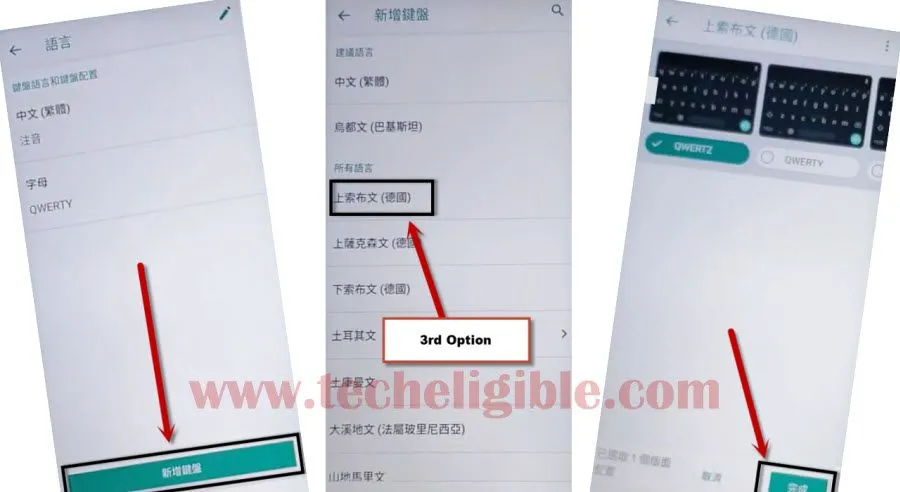
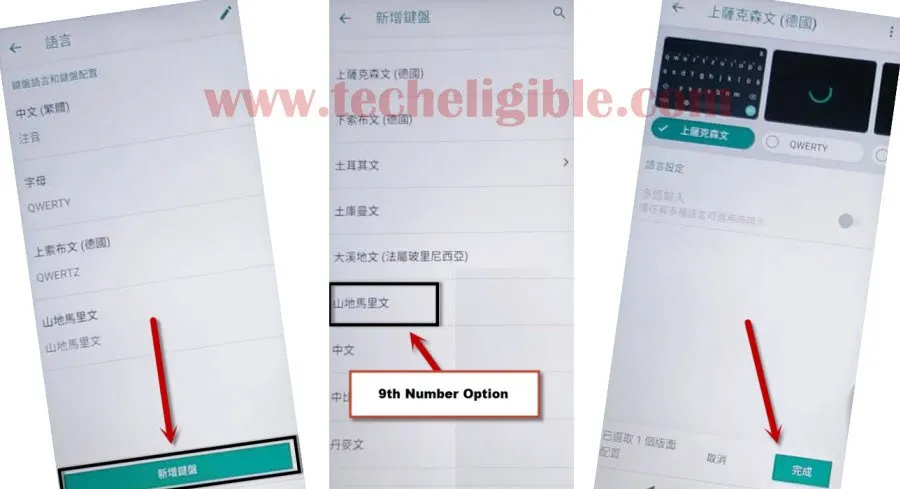
-After that, again tap on “Green Button”.
-Now again tap on “9th Option” from the list, and then tap on “Green Button”
-Tap on “Green Button”, and then select “4th number option” from the list, and then tap on “Green Button” from bottom right corner to Bypass FRP Moto G7 Plus.

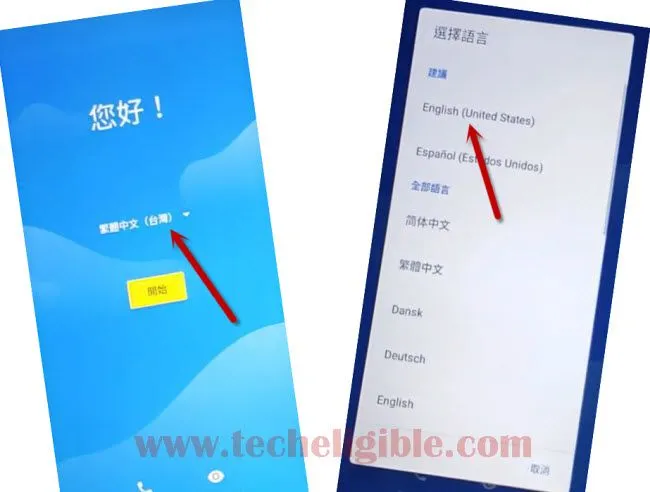
-Go back to very first “Hi there” screen by tapping on back arrow multiple times.
-Change your language to “English”.
-Tap on “Emergency Call”.
-Double tap on “Emergency Information”.
-Afterwards, tap on “Pencil icon” From top right corner.
-Now Tap on “Edit Information”.
-Tap on “NAME”, and then tap on “Typing area” from the popup window to bring keyboard
-Tap on “World icon”, and it will auto change to your keyboard language to the English.
![]()
-Afterwards, long tap on “World icon”, and then tap on “Language Settings” from the popup window.
-Tap on “Add Keyboard”.
-Go down & find “Chinese Language”.

Access to Youtube Video:
-Tap on “Chinese”.
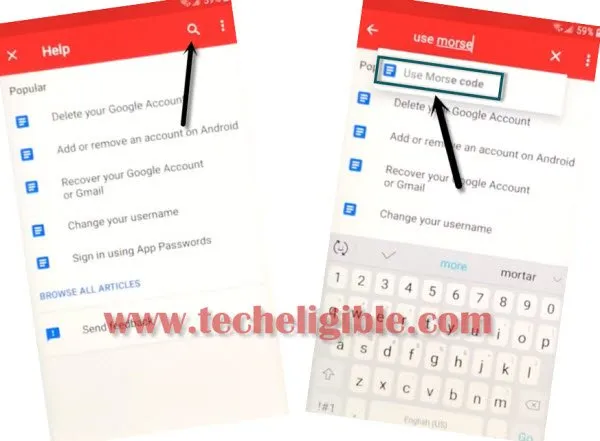
-Tap on “3 dots” from top right corner & select “Help & Feedback”.

-Type “Use Morse code” in search box, and then tap on “Use Morse Code” from the search result.
-Now you will see youtube video, just tap on “Play icon” and wait few seconds after that, you will get some extra option on youtube video.
-Tap on “3 dots” from the youtube video, and then tap on “Share Arrow”, after that again tap on “3 dots”. (Show below image).
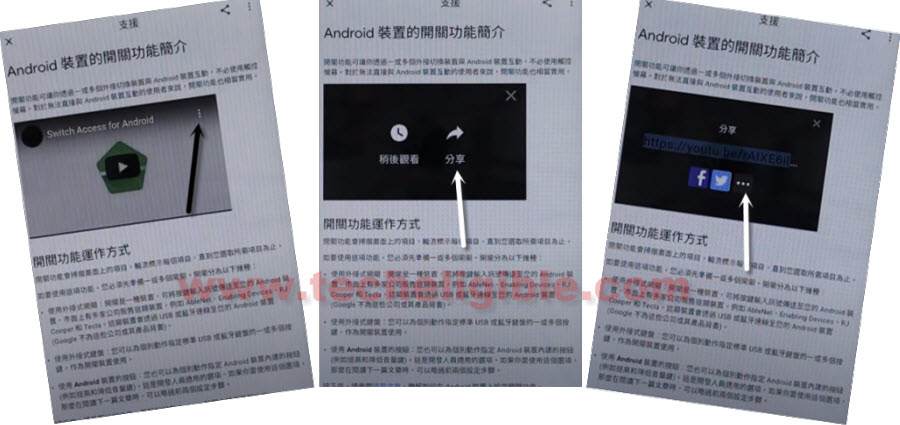
-From the update window, just tap on “2nd option”.
-Just drag down the youtube video, and then tap on “3 dots” from top right corner & select “Terms & Privacy Policy”.
-From the chrome window, just hit on > Accept & Continue > Next > No Thanks.
-Congrats, you have accessed to chrome browser.
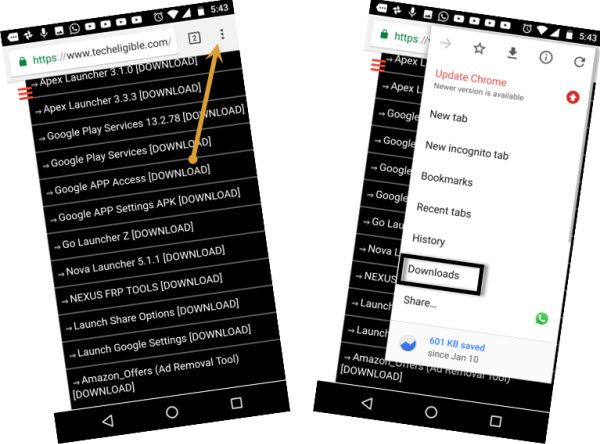
Download FRP Tools:
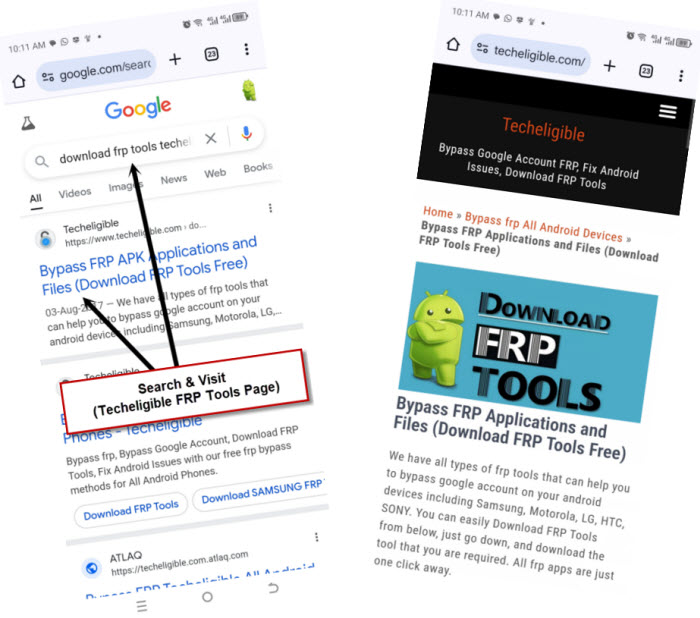
-Type in address bar “Download Frp Tools Techeligible“.
-Visit 1st search result same as shown in below image.
-download from there below 3 apps.
1-Apex Launcher 3.3.3.
2-Google Account Manager 6.
3-Account Login.
-Wait until downloading process, after that go to top of the browser, and then tap on “3 dots” from top right corner & tap on “Downloads”.
-There you will see your downloaded app, just tap on “Apex Launcher”.
-From chrome popup window, just tap on “Settings”, and then enable option “Allow from this sources”.
-Tap on “Back arrow”, and then tap on > Install > Open.
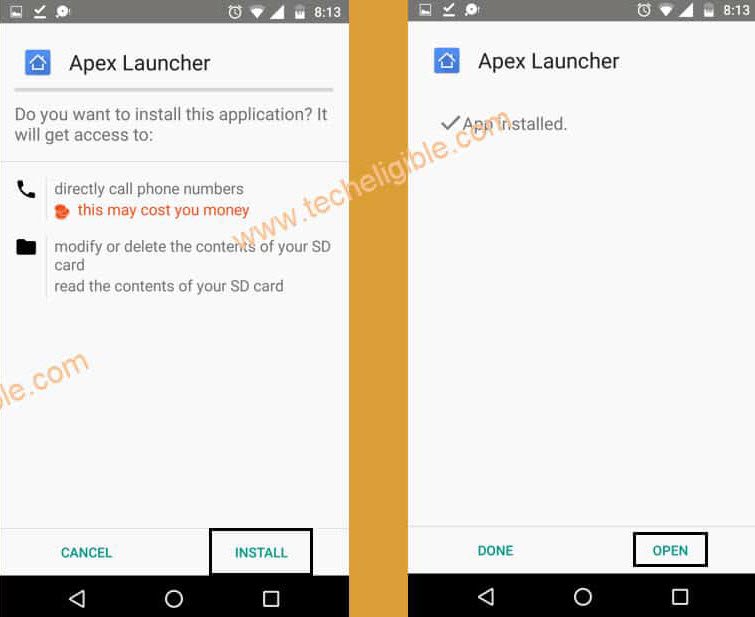
-After that, you will be redirected in your device home screen, we can easily Bypass FRP Moto G7 Plus.
-Now go to your device “Settings”, and then tap on “Security & Location”.
-Tap on “Location”, and then turn on location from there.
-Open “Chrome Browser”.
-Tap on “3 dots” from top right corner of your browser & tap on “Downloads”.
-Tap on > Google Account Manager 6 > Install > Done.
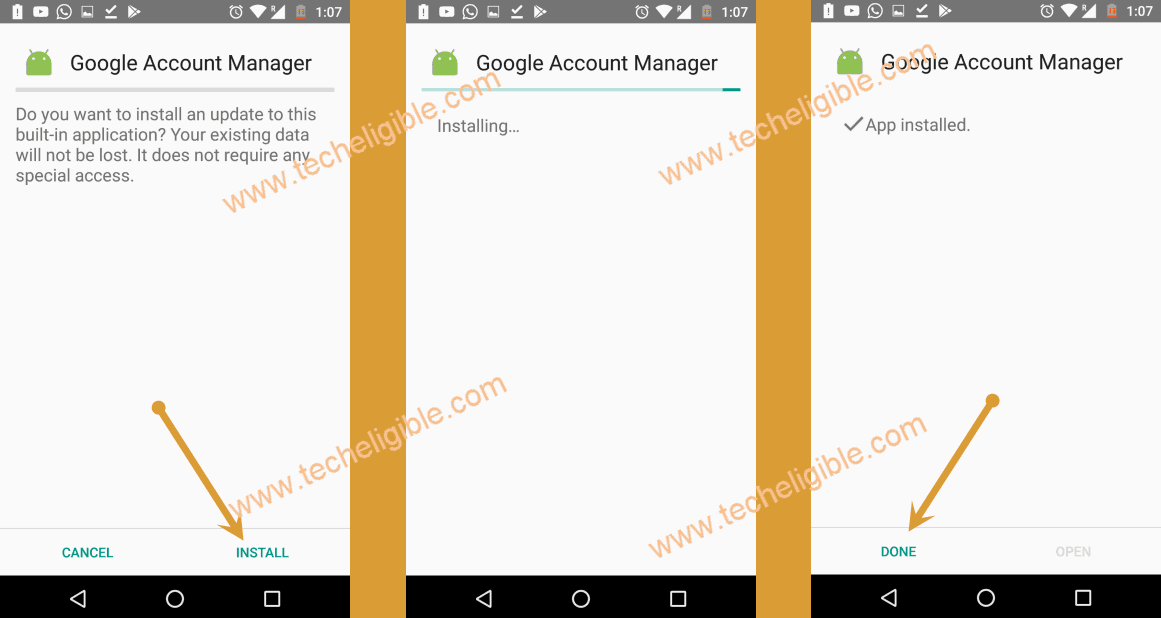
-After that, tap on > Account Login > Install > Open.
Add New Gmail Account:
-You will see “Retype Password” screen.
-Tap on “3 dots” from top right corner & select “Browser Sign-in”.
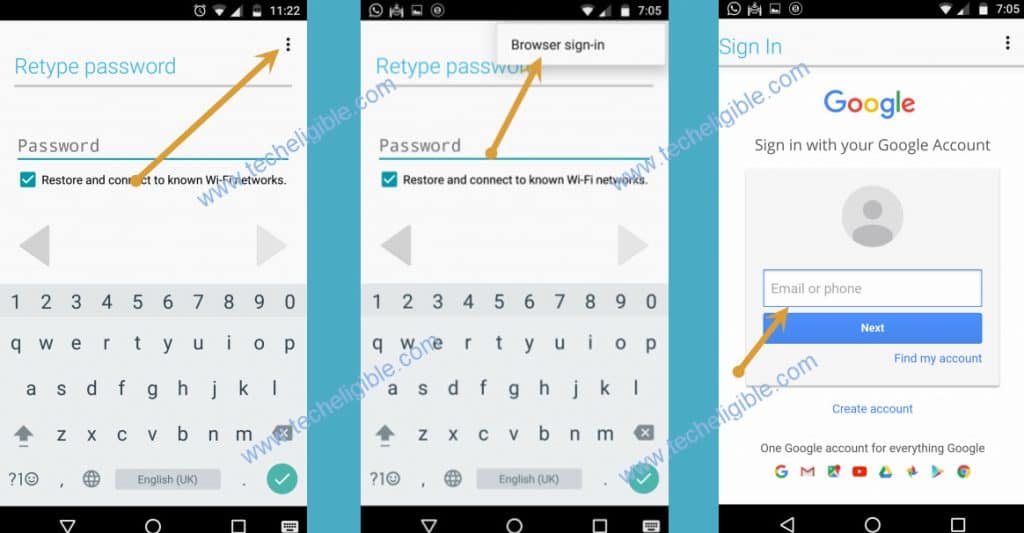
-Enter your any valid Gmail account there to sign and to Bypass FRP Moto G7 Plus.
-Once you signed in successfully, that means you have successfully bypassed google account.
-To verify your new Gmail account whether it’s added or not, just close all chrome window, and get back to your device “HOME SCREEN”.
-Go to > Settings > Accounts, there you will be able to see your newly added Gmail account.
Open Chrome Browser Again:
-Just open chrome browser again.
-Type in search bar “Find My Device Google”.
-Tap on google searched result (Find My Device – Google).
-Just sign in there with the same Gmail account that you previously added.
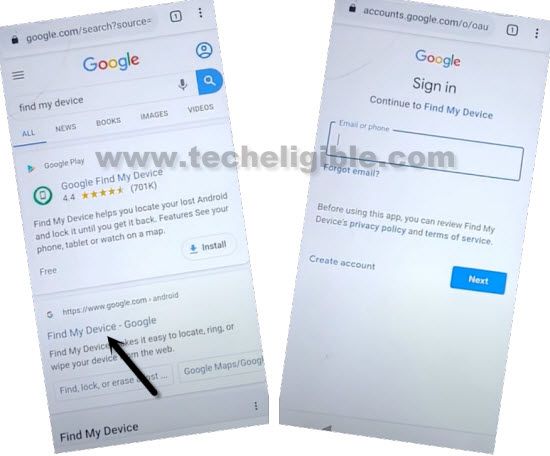
-After entering Gmail id and password, just tap on “NEXT”.
-Tap on “Secure My Device” and setup your desire password there.
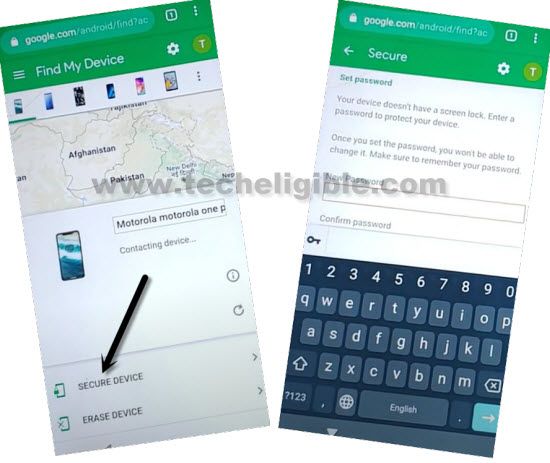
-Once you enter your password, just tap on > Next > OK > Secure Device.
-Your device will auto set lock screen, just press “Power Key”, and then type your password to unlock screen.
-If you wanna make sure that your device has been bypassed from frp successfully, so you can also erase your device, if you are not afraid of losing your data.
-From the “Find My device” screen, just tap on > Erase Device > Erase Device > Sign in > Erase.
-After that, complete initial setup to access your device.