3 Methods to Bypass Google Account Galaxy J3 Without PC
There are total 3 methods available to Bypass Google Account frp Galaxy J3, you can select your best method from below list according to your android version, because the method will work only if your android version is also matching, you can’t apply Galaxy j3 Android 5 frp methods on Galaxy j3 android 8, so make sure you know your android version very well.
You can also check your Galaxy J3 Android version by putting your into android recovery mode, and there you can easily confirm that what android version does your phone have.
3 Ways Available below to Bypass Google FRP:
| Method 1: Samsung Galaxy J3 (Android 5) |
| Method 2: Samsung Galaxy J3 (Android 8) |
| Method 3: Samsung Galaxy J3 (Android 9) |
Method 1: Bypass Google Account Galaxy J3 Android 5
-This method was tested on Samsung Galaxy J3 (2016), Android Version 5.1.1
-Connect Wi-Fi in your galaxy j3 device.
-Remove battery and insert active “SIM CARD”.
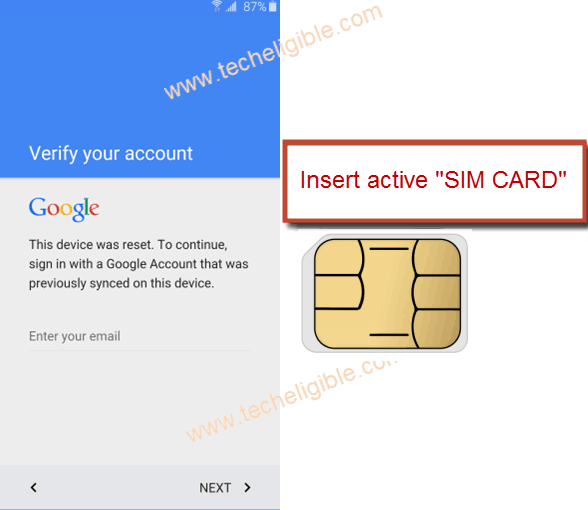
-Switch on your device, select your desire language, tap on “Yellow” icon from welcome screen.
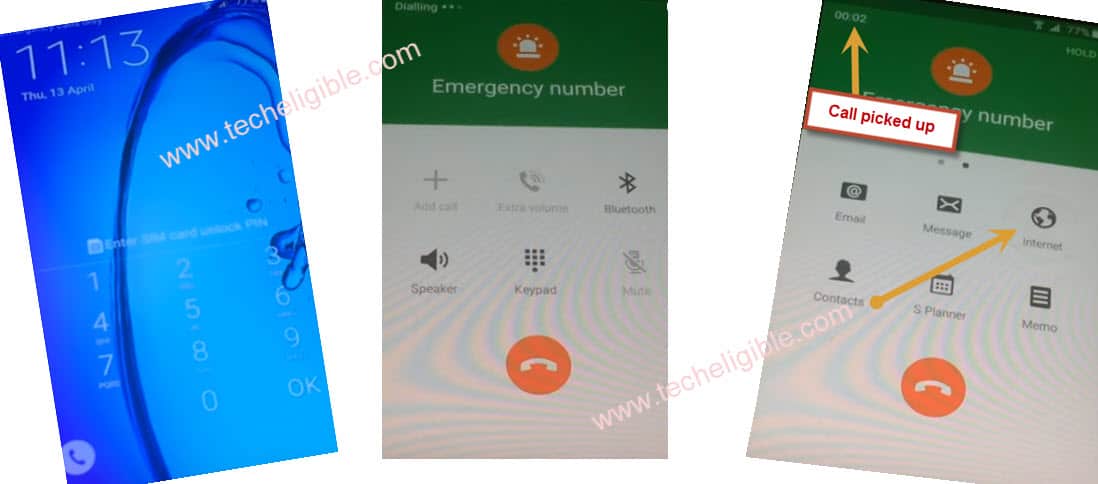
-From “SIM Card unlock PIN” screen, drag up the “Phone Call” icon from corner to make emergency call.
-Dial any emergency number to make call, and wait until call is picked up.
Note: You may have to dial emergency number several time until call is picked up.
-Once call is picked up, “SWIPE LEFT” to go for further options, and tap on “Internet” to open google.
-Enter your “SIM Card unlock PIN” to unlock sim.
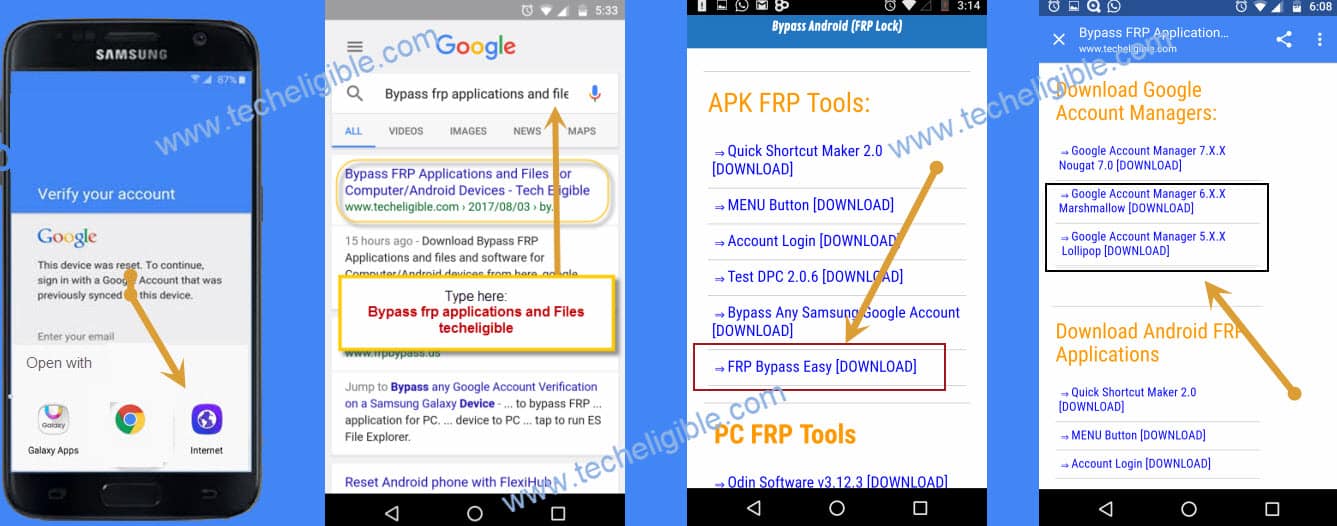
-Tap on “Internet”, then tap on “GOOGLE” to open google in your galaxy device, so that we could surf internet there.
Download “FRP BYPASS EASY” and “Google Account Manager” APP:
-Type there “Bypass FRP Applications and File techeligible“, tap related search result.
-Download from there below 3 apps
1-FRP BYPASS EASY
2-Google Account Manager 6.x.x
3-Goo Account Manager 5.x.x
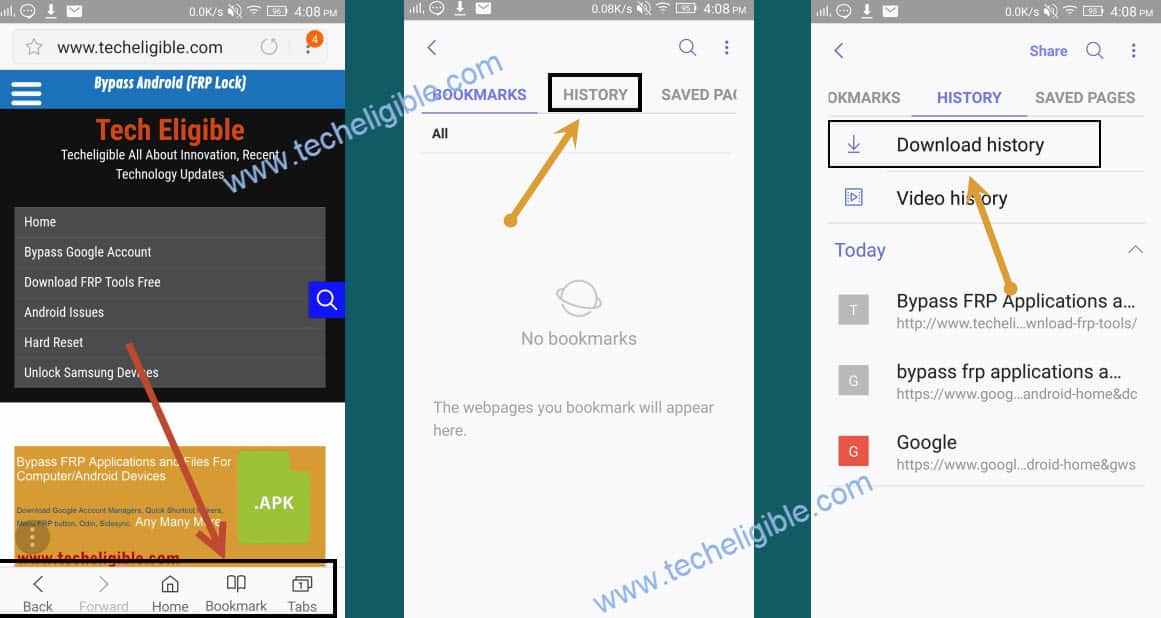
-Once download finish, go to top of the page by swiping up, so that bottom “Bookmarks, Home, Tabs” options display.
-Tap on “Bookmarks”, then tap on “History” and after that, tap on “Download History”.
-There you can see all your downloaded applications.
Install Google Account Manager:
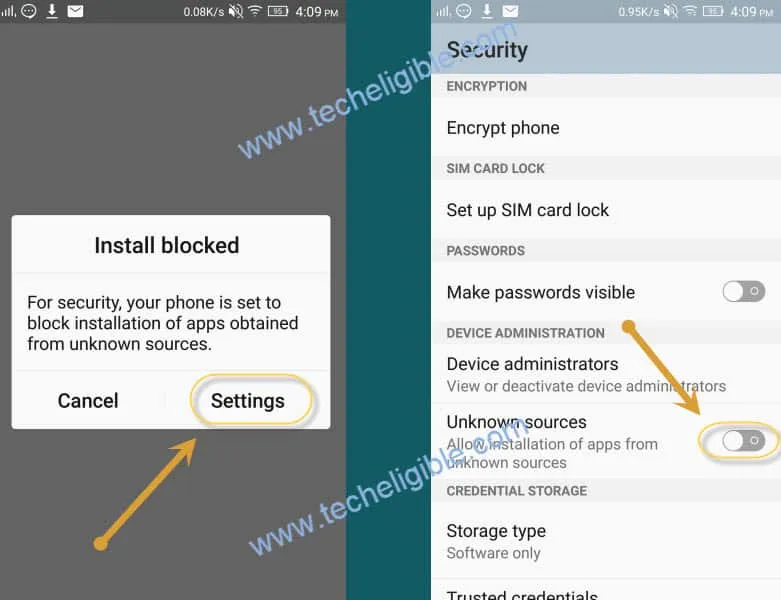
-Tap on “Google Account Manager“, then from “Installation Blocked” popup, tap on “Settings“, and enable “Unknown Sources“, now go back and again install “Google Account Manager” relevant your android version.
Remember: If you don’t know your android version, you can try to install both version of google account manager 5.x.x and 6.x.x.
Let’s Install “FRP BYPASS EASY” Application:
-Once google account manager installation finish, tap on “Done”.
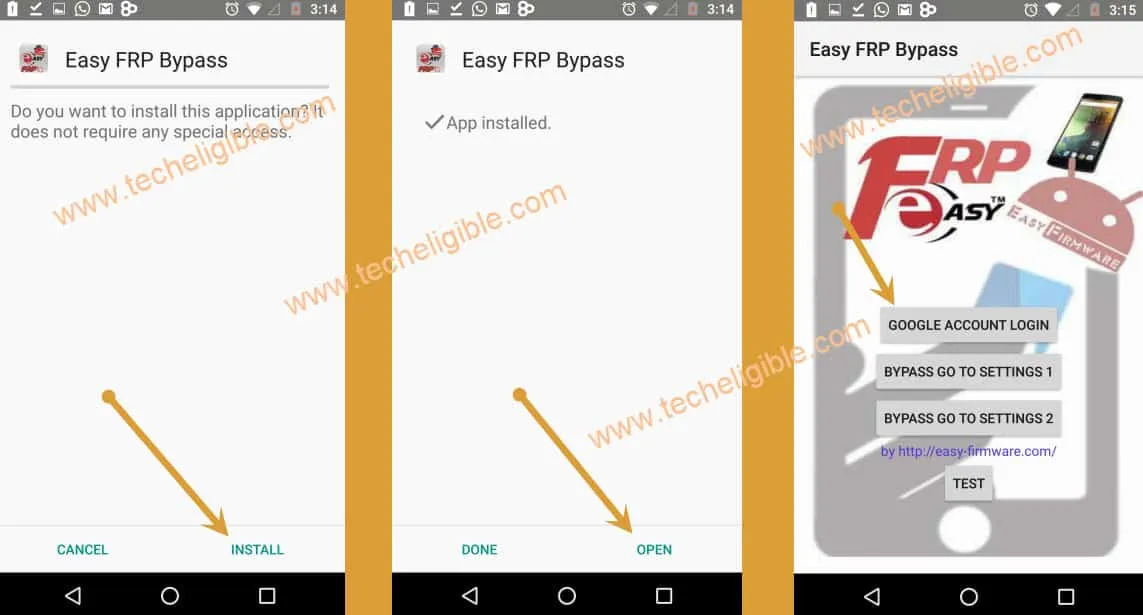
-Now tap on “FRP BYPASS EASY” Application, tap on “Install“, then tap on “Open“.
-Tap on “Google Account Login”.
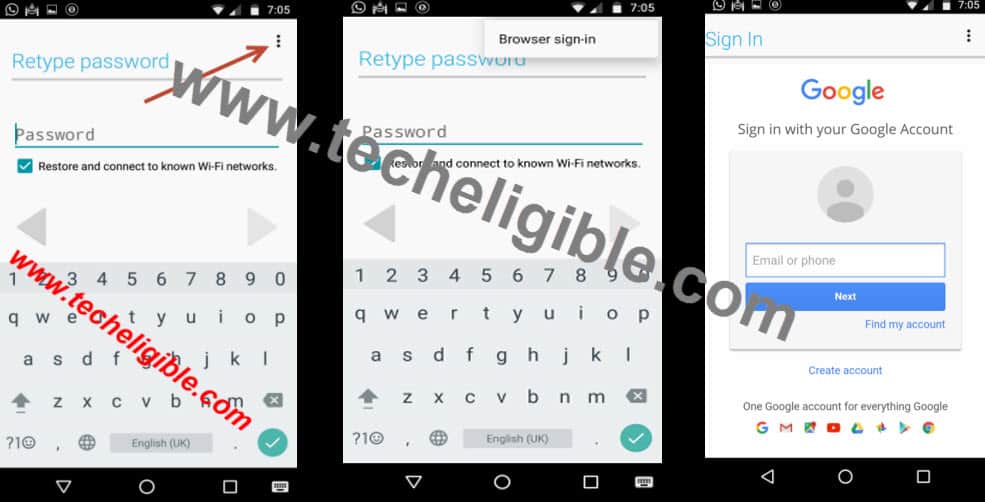
-Tap on “3 dots” from top right corner.
-Then select “Browser Sign-in”, now add your valid gmail account there.
-Restart your device to accomplish Bypass Google Account on Galaxy J3 Android 5 Without PC.
Complete Initial Setup:
-Tap on “Yellow icon” to go for next, enter your “SIM PIN”.
-Connect Wi-Fi.
-Tap on > NEXT > NEXT > AGREE > NEXT > NEXT > SKIP > SKIP ANYWAY > MORE > MORE > NEXT > SKIP > SKIP > FINISH.
-Now you have successfully accessed to your Galaxy J3 device menu, we will do data factory reset to completely Bypass Google Account on Galaxy J3 Android 5.
Factory Data Reset:
-Tap on “Apps”, then go to “Settings”.
-Now tap on “Backup and reset”, after that, tap on “Factory Data Reset”.
-Tap on “Reset settings”, then “reset device”, and at the last tap on “reset everything”.
Now your galaxy J3 device will start erasing everything, after that it will restart, then again you have to complete initial setup.
Method 2: Bypass FRP Galaxy J3 Android 8
Insert any SIM card that has PIN locked, and then you can easily access to your device Home Screen, after that we will add new Gmail account to bypass google account, just follow all steps from below.
Warning: This method is only for Device Owner.
-Connect WiFi first.
-Get back very first “START”.
-Now insert any Active PIN Locked SIM card.
-If your SIM does not have pin lock, you can easily set PIN Code using any other android device.
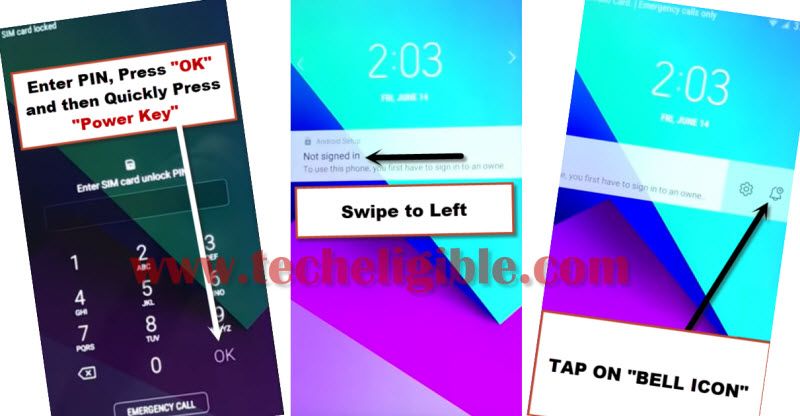
-Once you insert the SIM Card, you will see popup window of “Enter SIM Card Unlock PIN”.
-Now just put 4 digit pin code.
-Tap on “OK”, and then quickly press “Power Key” to turn off screen.
Note: There should be even mini seconds delay in press “Power Key” after you tap on “OK”, so just quickly Hit on “OK”, and then quickly press “POWER KEY”.
-Again press “Power Key” to turn on screen, and you will see popup window of “Not Signed in”.
-Swipe the popup window to the left, and then tap on “Bell icon”.
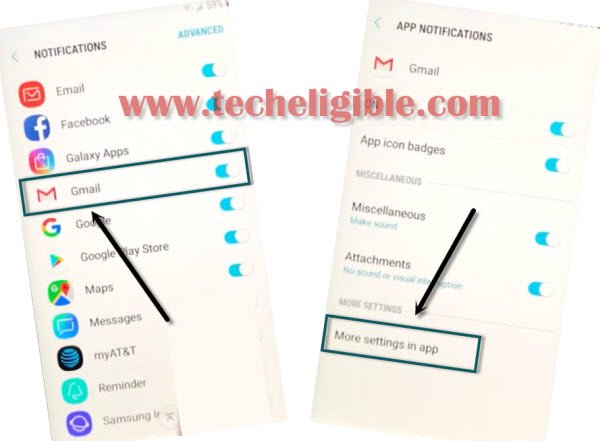
-Tap on “Notification Settings”.
-Go down and tap on “Gmail”, and then tap on “More Settings in the app”.
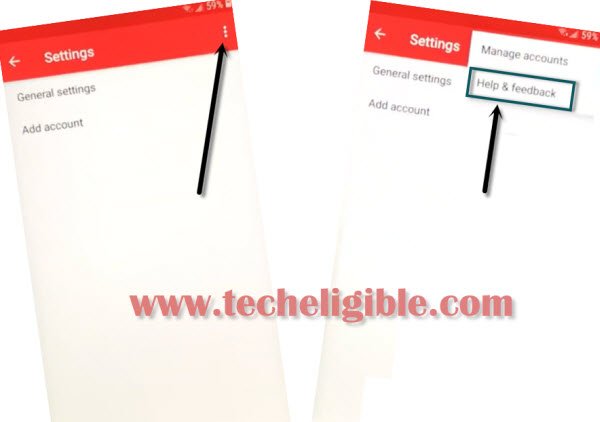
-Tap on “3 dots” from top right corner and select “Help & Feedback”.
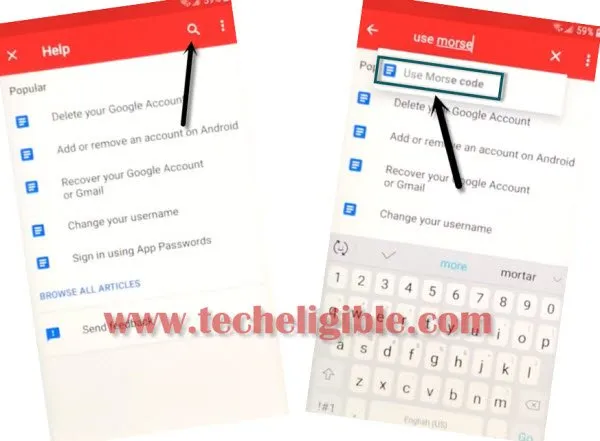
-Tap on “Search icon”, and then type there “Use Morse code”, and then you will see the same search result, just tap on that.
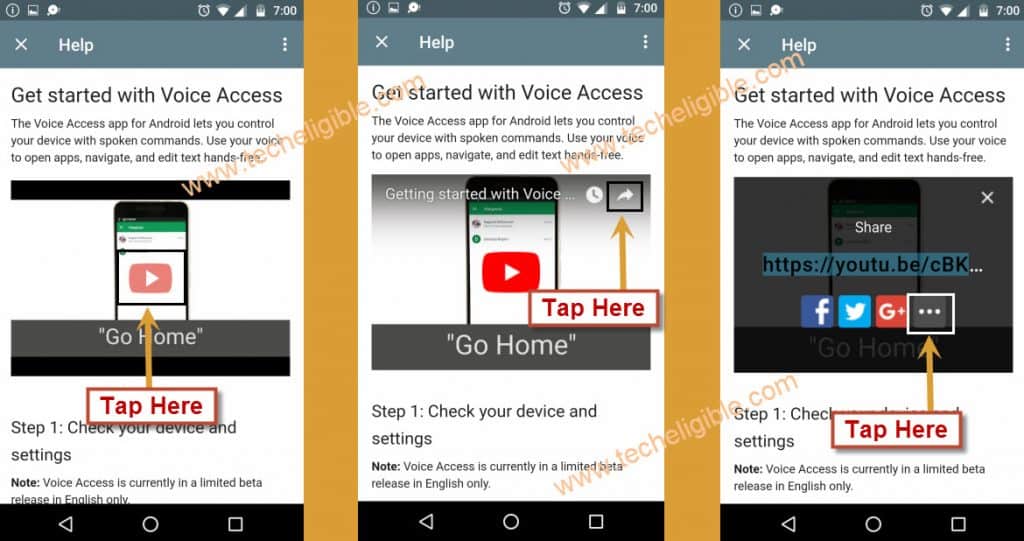
-After that, tap on “Video Play icon” and wait few seconds until you get some extra options on the video.
-Tap on “Share arrow”, and then tap on “3 Dots” to access youtube.com.
-If you update window, just tap on “Not Now”.
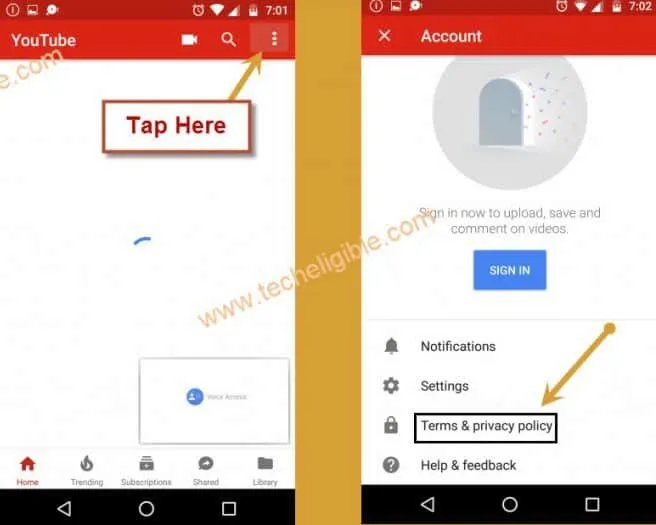
-Drag down the youtube video, and then tap on “3 Dots” from top right corner & select “Terms & Privacy Policy”.
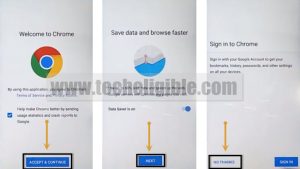
-You will see chrome window, just tap on > Accept & Continue > Next > No Thanks.
-Now we will download only 3 frp tools in free to perform frp bypass task.
Download Galaxy J3 FRP Tools:
-You will see address bar top of your screen.
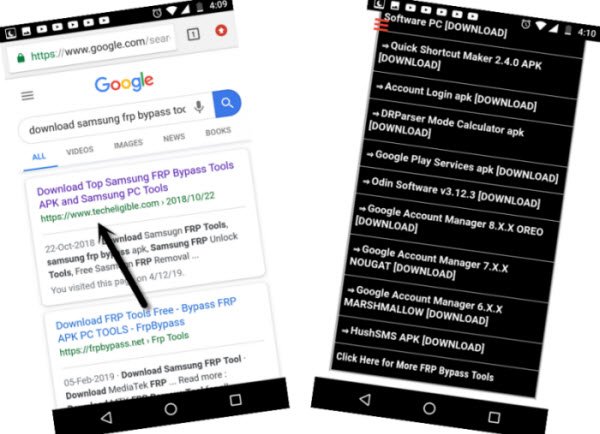
-Type & Search (Download top Samsung FRP Tools).
-Visit 1st search result same as shown in below image.
-Download from there below 3 frp apps.
1/Quick Shortcut Maker 2.4.0.
2/Google Account Manager 6.0
3/Account Login.
-Wait few minutes until downloading process done.
-Go to top & hit on “3 dots” from top right corner of the browser.
-After that, tap on “Downloads”.
-You will access to download folder, where you will be able to see all downloaded applications.
-Tap on “Quick Shortcut Maker” to install, after that you will chrome popup window, just tap on “Settings”, and enable option of “Allow from this sources”.
-Tap on “BACK KEY”, and then tap on > Install > Open.
-Perfect, now we are inside quickshortcutmaker app.
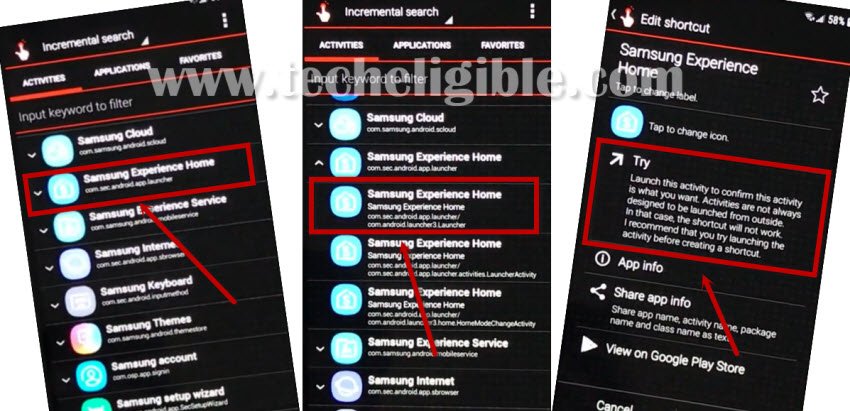
-Go down and find “Samsung Experience Home”.
-Tap on “”Samsung Experience Home” to expand result.
-After that, from the expended result, tap on very first “Samsung Experience Home”, after that, hit on “TRY”.
-Now we have to install 2 more apps to successfully Bypass Frp Galaxy J3 Android 8.
-Open “Chrome Browser” again.
-You will see download frp tools page, just tap on “3 dots” from top right corner of the browser & select “Downloads” to access downloaded folder again.
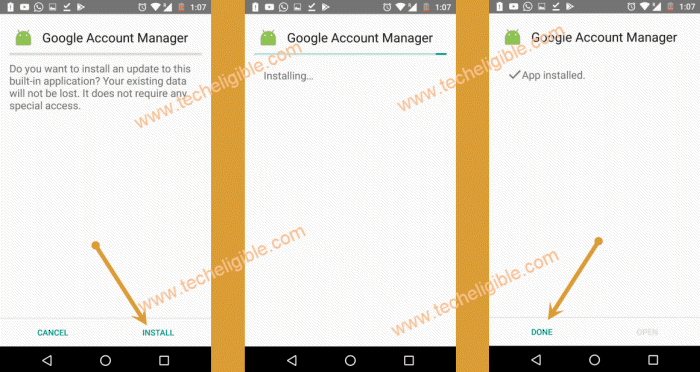
-Tap on “Google Account Manager > Install > Done”.
-Tap on “Account Login > Install > Open”.
Note: If you see any blocking popup, just hit on “Settings”, and enable the option “Allow from this sources”, after that you will be able to install app.
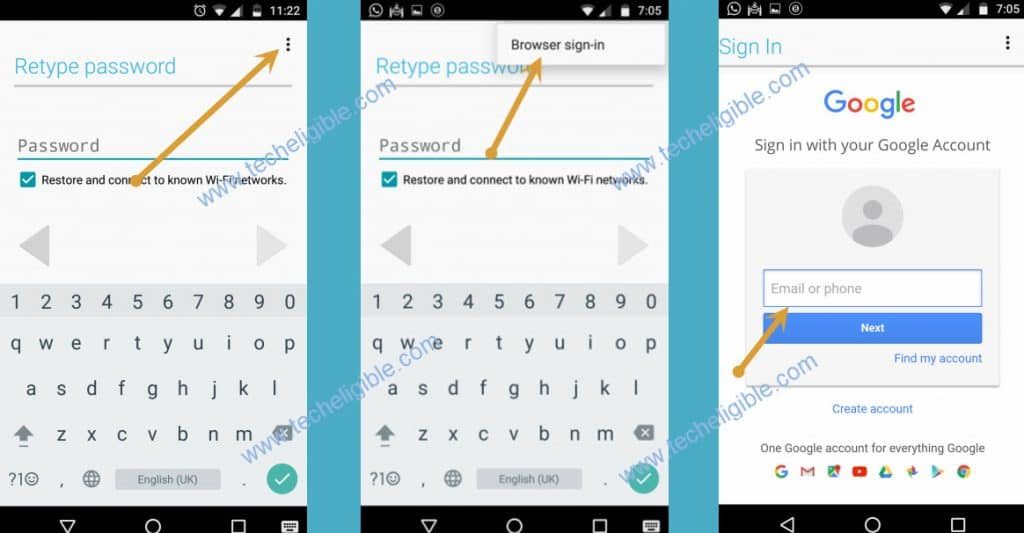
-After opening “Account Login” app, you will have first window of “Retype Password”.
-Just hit on “3 dots” from top right corner & select “Browser Sign-in”.
-Now enter your any valid Gmail account there for permanently Bypass Frp.
Method 3: Bypass FRP Galaxy J3 Android 9
If you have got frp protection on your own Samsung Galaxy J3 Android 9 phone without PC & Apps, then you are recommended to follow our this new process to Bypass frp Galaxy J3 Android 9, we will use pin locked sim card, and by using some new steps we would easily access to chrome browser, but you should follow all steps with fully consciousness.
Warning: This frp process is only for device owner to get his phone back.
Let’s Begin this Procedure:
-Start this process by connecting WiFi first in your galaxy J3 device.
-Go back to “Let’s Go!” screen.
-From there tap on > Next Arrow > Next > Skip this for now > Next.
-You have access to the screen of “Choose a Wi-Fi Network“.
Here, we will use our active 4 digits pin locked SIM Card, you can set 4 digits pin lock in your SIM using with any other android phone, so we have to follow below steps very quickly, otherwise you will fail to get top bar menu, you may have to try below steps multiple times, because at 1st try you wont succeed, repetition will bring perfection.
-Insert any active pin locked SIM Card.
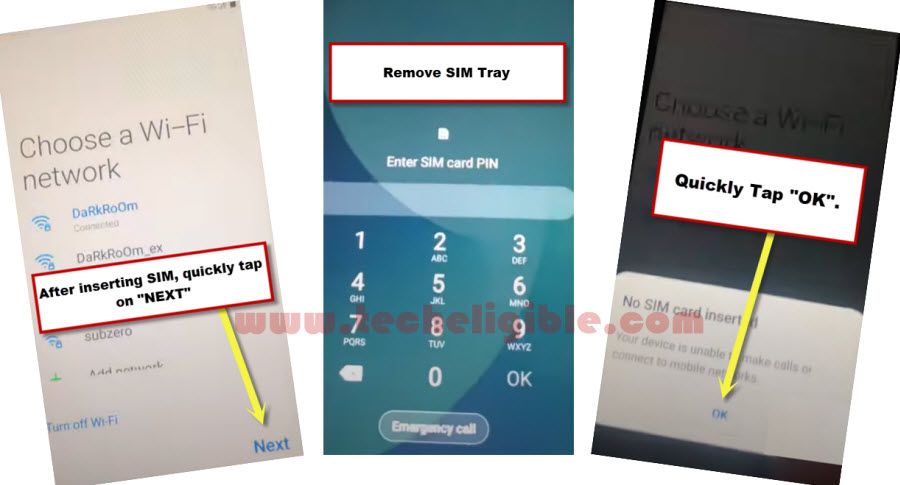
-After inserting sim card, quickly tap on “Next” option. (Don’t waste a second right after inserting sim card, just quickly press NEXT).
–Quickly remove SIM Tray after you see “Enter SIM Card Pin” screen.
–Quickly tap on “OK” from the popup window of (NO Sim card inserted).
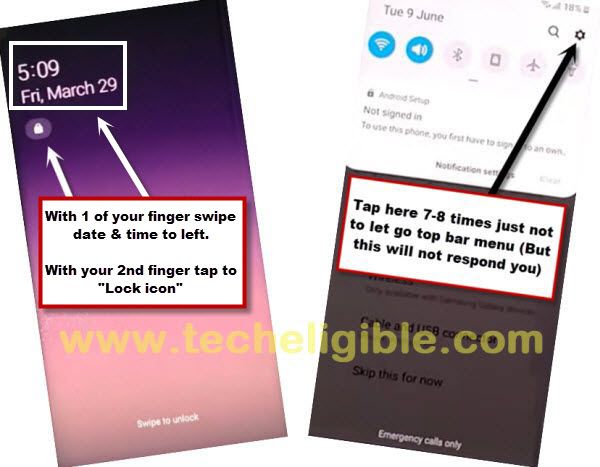
–Quickly Swipe the “TIME & Date” option to the left side & Quickly tap on “Lock icon“.
-By doing this it will bring Top Bar Menu.
-Now quickly start tapping on “Setting gear icon” from the top bar menu screen, by doing it will not allow top bar menu to be hidden.
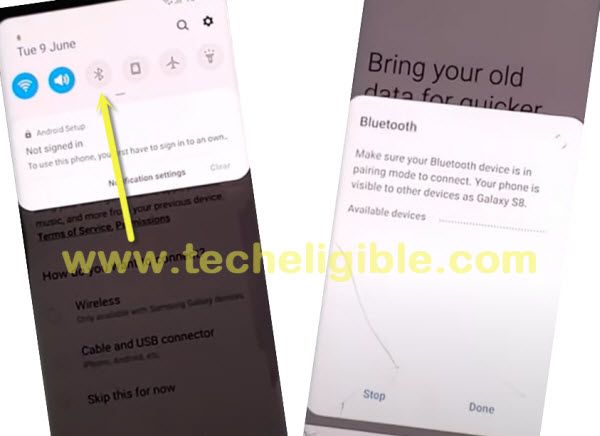
-Now be relax, and tap on “Bluetooth icon”.
-Make pair with your any Pods or Bluetooth headphone.
-After making pair successfully, just press power button 3 times from your Bluetooth pods or headphone.
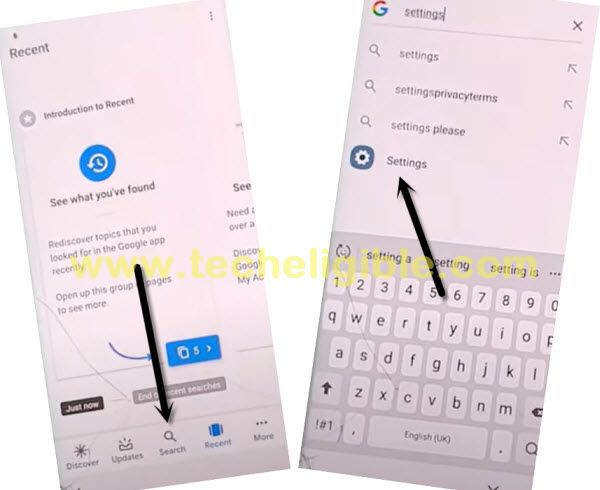
-This will open for you “Google app”.
-Type in search box “Settings”, and tap on “Setting gear icon” to get into your Galaxy J3 settings.
Enable Pin Windows:
-To successfully Bypass frp, we need to enable pin windows.
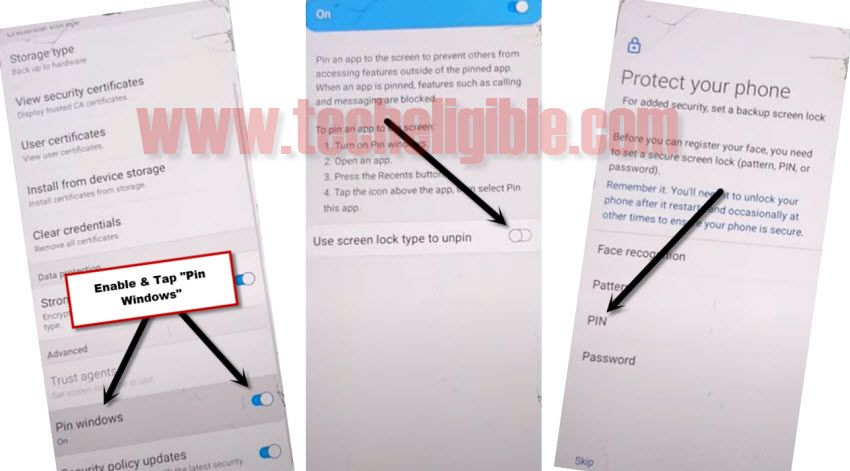
-Go to > Security > Other Security Settings > Turn on “Pin Windows” option from there.
-Tap on “PIN Windows”, and from there, tap “Use screen lock type to unpin”.
-Now tap “PIN”, and then tap on “Continue” option.
-Set your any desire 4 digits pin lock code, you can set “1234” pin lock code.
-After successfully setup pin code, just restart J3 phone.
-Remove your SIM Card & Complete Setup Wizard.
-After accessing to your phone, just go to > Settings > About Phone > Software info.
-Tap 7 times quickly on “Build Number” to enable developer options.
-Go back to “Settings”, and go all the way down, and then tap “Developer Options”.
-Enable option of “USB Debugging” from there.
-Congrats you are all done from Bypass Google Account Galaxy J3.
While completing setup wizard, you will be asked for pin code, just give your already setup PIN, and when you see (Verify your Account) screen, from there just tap on “SKIP” option, do also connect WiFi while completing initial setup wizard, we hope this method worked for you very well, and do not forget to make comment below of this post.
Relevant Methods:

