3 Methods to Bypass FRP Galaxy J5 Prime Android 8, 7
We have 3 Latest methods to Bypass FRP Galaxy J5 Prime Android 8 & Android 7 by SIM, Talkback, Miracle Software, these are very secure and safe methods, and we hope that one of these 3 methods would work with your Samsung Galaxy J5 Prime device. If your phone has android 8 version, then you should follow only android 8 frp methods from below.
⇒ Method 1: FRP Remove on Galaxy J5 Prime Android 8 by SIM ⇒ Method 2: FRP Remove on Galaxy J5 Prime Android 7 By Talkback ⇒ Method 3: FRP Remove on Galaxy J5 Prime Android 7 by Miracle 2.27A |
Method 1: Bypass frp Galaxy J5 Prime Android 8.0
You need to have 1 Pin Locked SIM card with you, and the 4 digits pin can easily setup with any other smartphone, that’s is pretty simple. and you will not lose your SIM as well, so don’t worry about that.
-Setup 4 digits pin code in your SIM with other phone.
-Remove Sim tray of Galaxy device.
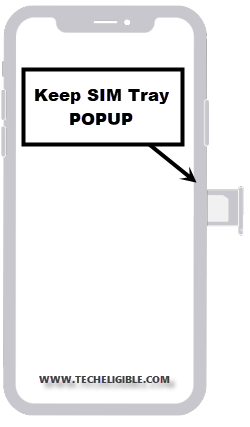
-Put your SIM card in sim tray and keep the sim tray in popup position, means do not completely insert SIM tray.
-Connect WiFi to your J5 Prime first.
-Go back to first “Welcome Screen”.
-Now Insert SIM tray in your phone.
-After detecting the SIM card, the phone will show you “Enter SIM card Unlock Pin” screen.
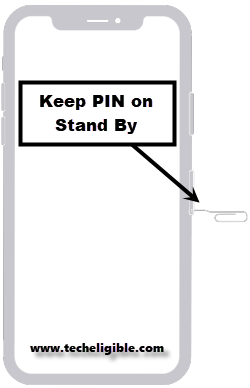
-Now we have to keep “Sim Removal PIN” in Sim tray hole on Standby Position, means do not remove sim tray now.
-Keep your other finger in standby position on “Power button”.
–Quickly Press “SIM Removal PIN” to popup the sim tray, and after that, quickly press “Power Button”.
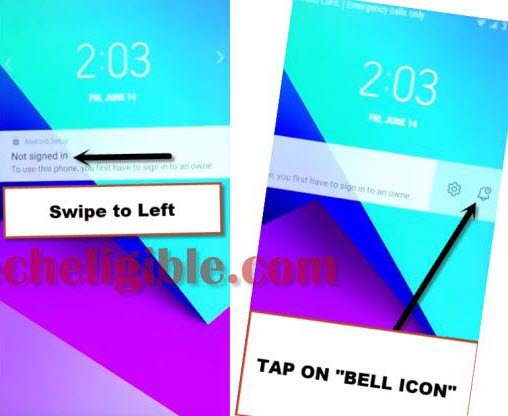
-Press power key again to wakeup the phone screen, and there you will have “Not Signed in” popup window.
Note: If you do not see that “Not Signed in” popup screen, that means you failed in your attempt, try again, this may take 2-3 attempts in getting “Not Signed in” popup window. (So Do not worry about that!).
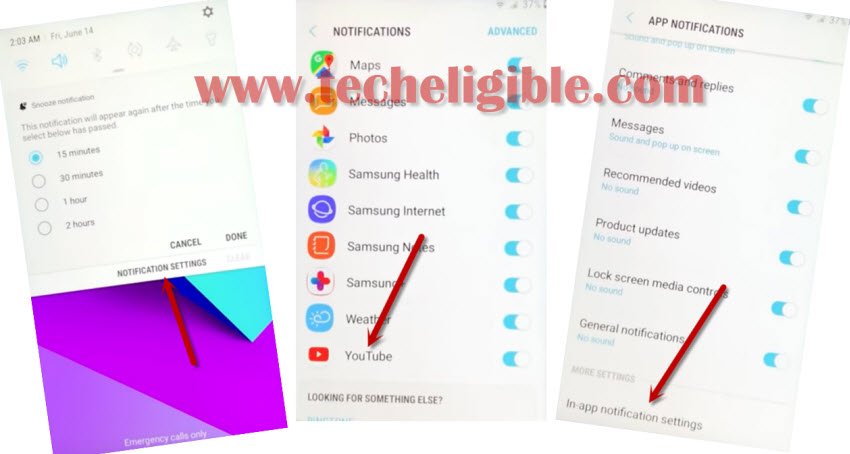
-Once you got the “Not Signed in” popup window, just drag the “Not Signed in” screen to the right, and tap on “Bell icon”.
-Tap on “Notification Settings”.
-Go down & tap on “Youtube”.
-Hit on “in-app notification settings” from the bottom.
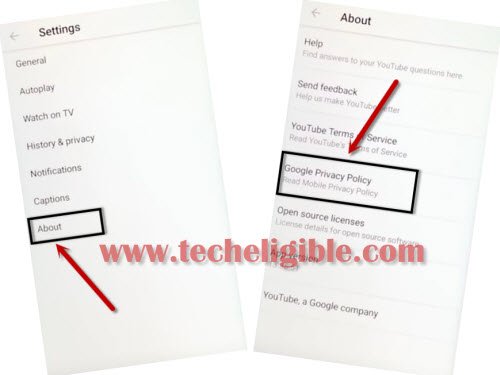
-After that, tap on > About > Google Privacy Policy.
-This will redirect you to the Samsung internet browser, from there we can install frp apps.
-There you will see “Samsung Internet” screen, just select “Start”, and then tap on “Cancel” from the popup window.
-We are going to download & install frp apps.
Download & Install J5 Prime Frp Apps:
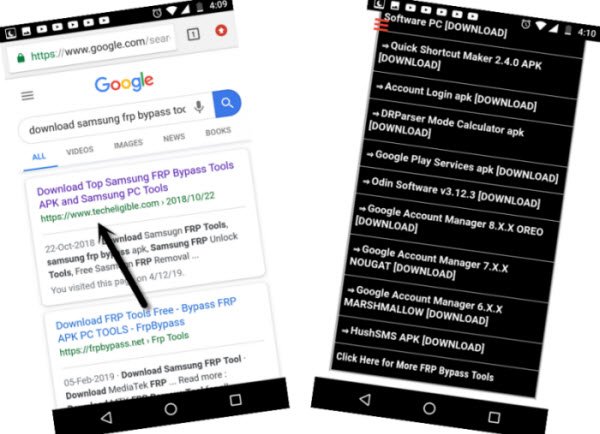
-Type and search “Download top samsung frp tools“.
-Visit 1st search result that will belong to techeligible site.
-You need to download from there 2 apps.
1-Apex Launcher 3.3.3.
2-Google Play Services.
-Wait few minutes until downloading process finish.
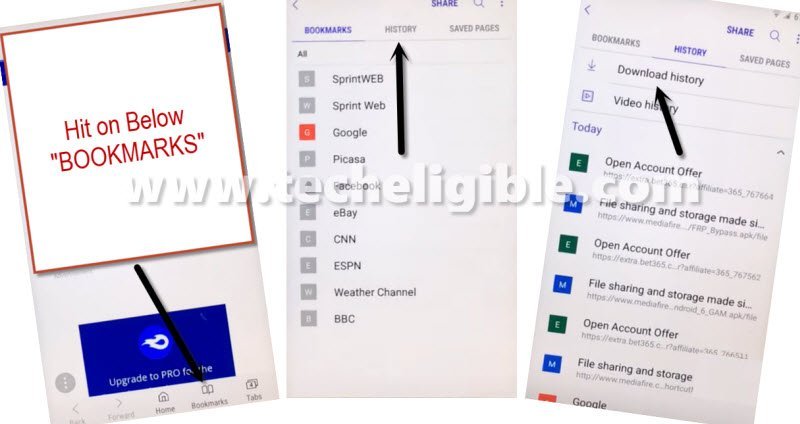
-To see your downloaded apps, just tap on “Bookmark” from the bottom of your browser.
-Go to > History > Download History.
-Tap on “Google Play Services” app.
-You may see popup window, just tap on “Settings”, and turn on the option of “Allow from this source”.
-Go back, and then tap on “Install”, and then tap on “Done”.
-Alright, now you have successfully installed “Google Play service” app, lets install 2nd app.
-Tap on > Apex Launcher > Next > Install > Open.
-Apex launcher will show you some initial setup screen, just tap on “Next” few times, and from “Download Now” screen, just tap on “Cross icon” from top right corner.
-Alright, now we have got access into our J5 Prime Android 8 phone successfully, now we have some steps ahead.
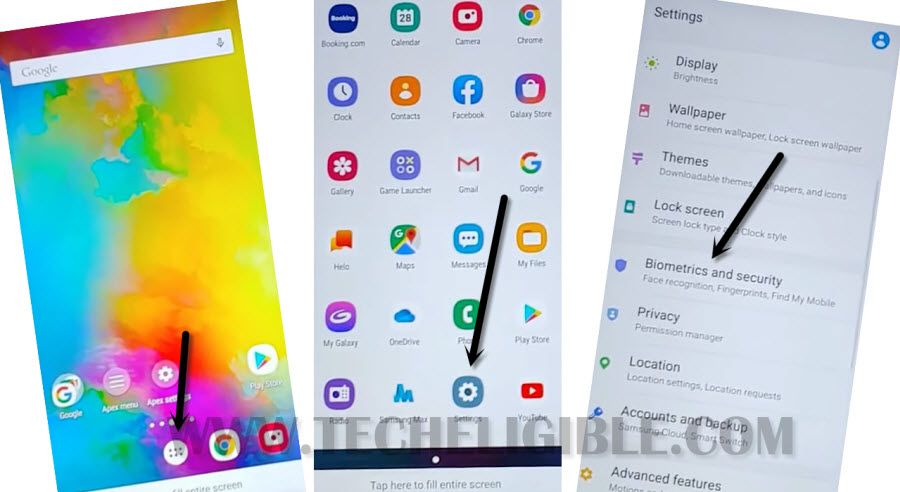
-Go to > MENU > Settings > Biometrics and Security.
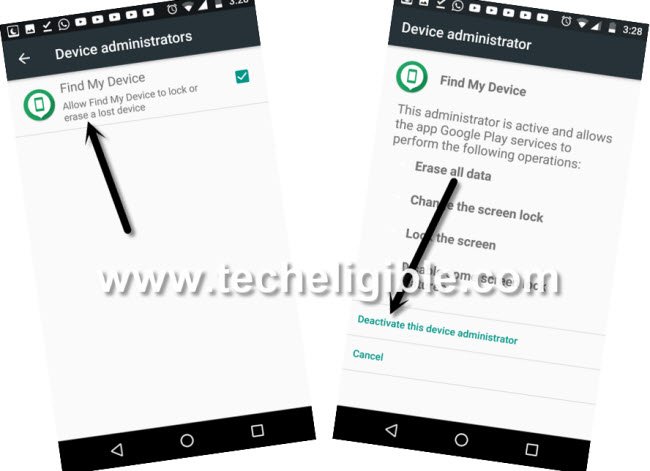
-Go to > Other Security Settings > Device Admin App > Find My Device > Deactivate.
-Go back to “Settings”.
-From there, tap on “Apps”.
-Now we are going to disable google play services app.
-Tap on > Google Play Services > Disable.
-After that, just go back to “Settings” again.
-Go to > Cloud & Accounts > Account > Add Account > Google.
-Sign in with your any Gmail account to bypass frp galaxy j5 prime android 8.
-After signing successfully, we are going back to enable all the disabled backs, those we did in above steps.
-Go back to “Settings”, and then go to > Biometrics and Security > Other Security Settings > Device Admin app > Find my device > Activate.
-After that, go back to “Settings” again, and then tap on “Apps”.
-From there, tap on “All app” from top left corner, and then tap on “Disabled”.
-It will show you the disabled google play service app there.
-Tap on > Google Play Service > Enable.
-Restart J5 Prime phone and complete your initial setup.
You are all done for now, and you just have to complete initial setup.
Method 2: Bypass frp Galaxy J5 Prime Android 7
-First of all Connect “Wi-Fi” in your device first.
-Go back to “Welcome” screen.
-Now just Press 3 times “HOME BUTTON” to enable “TALKBACK” feature.
-After “Talkback” enabled, you will have screen of “Talkback Tutorial”.
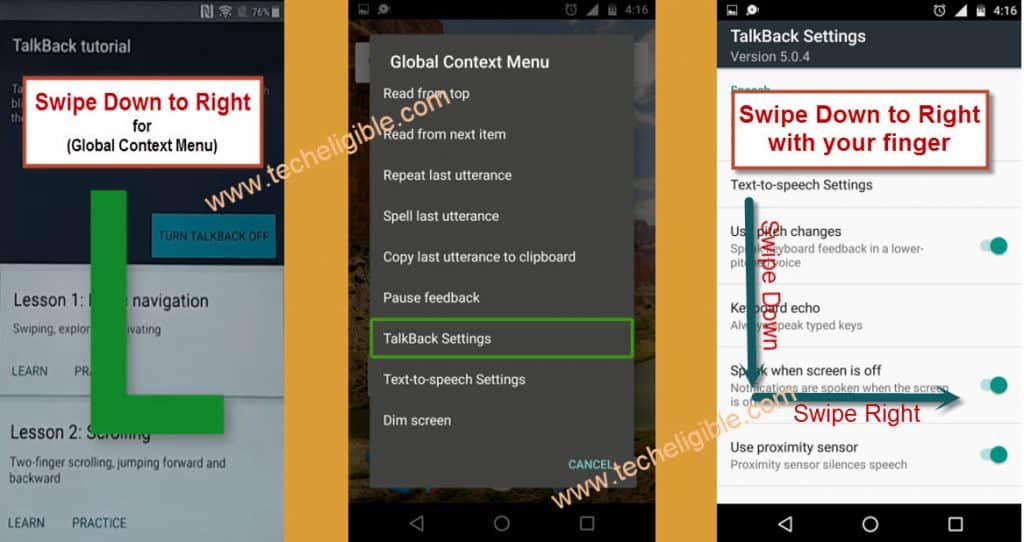
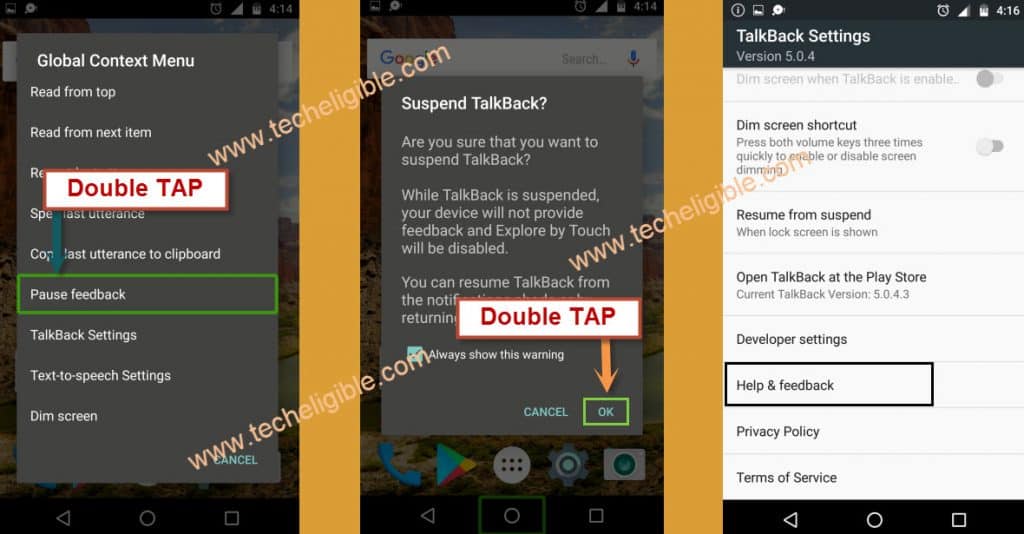
-Now just Draw “L” by swiping down to right to get “Global Context Menu”.
-Afterwards, Double Tap on “Talkback Settings”.
-Draw “L” by swiping down to right on “TALKBACK SETTINGS” screen.
Let’s just Suspend Talkback Feature:
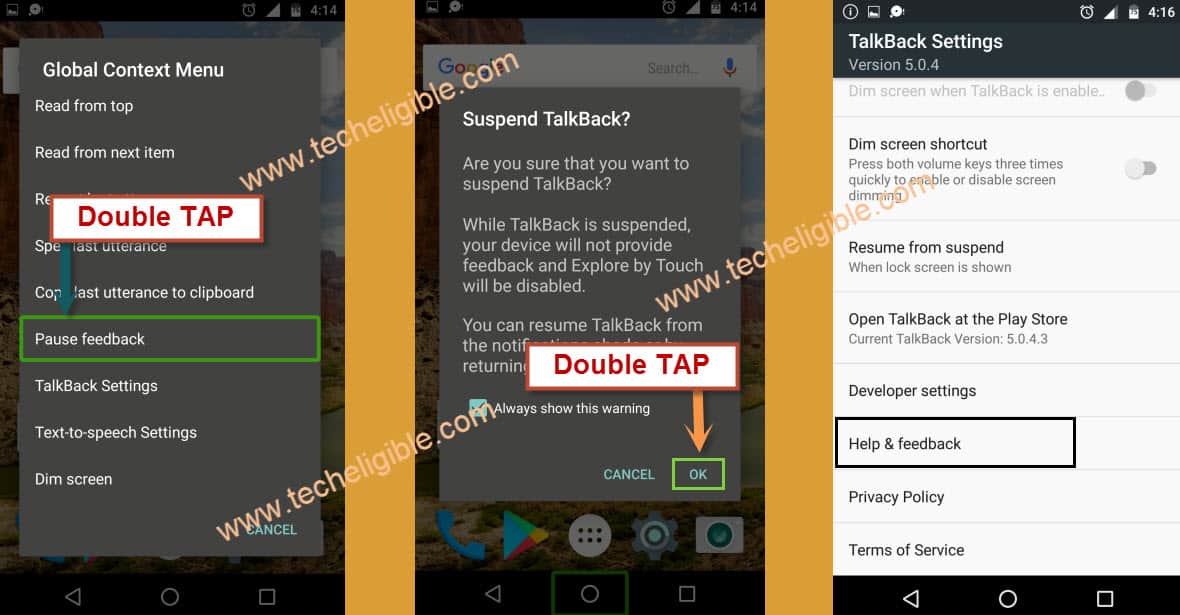
-You have to only Double tap on “Pause feedback” option, after that double tap on “OK”.
-Tap on “Help & Feedback”.
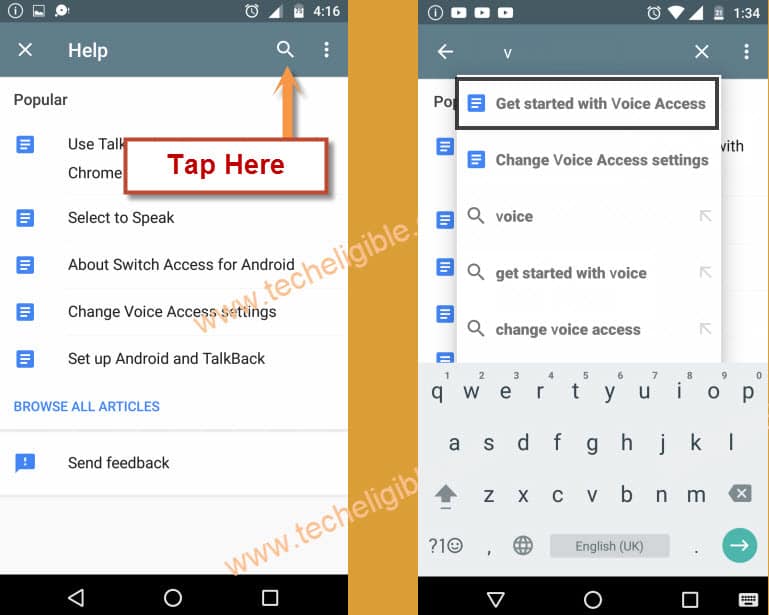
-Tap on “Search Icon”, and then type there “V”, after that tap on “Get Started with Voice Access”.
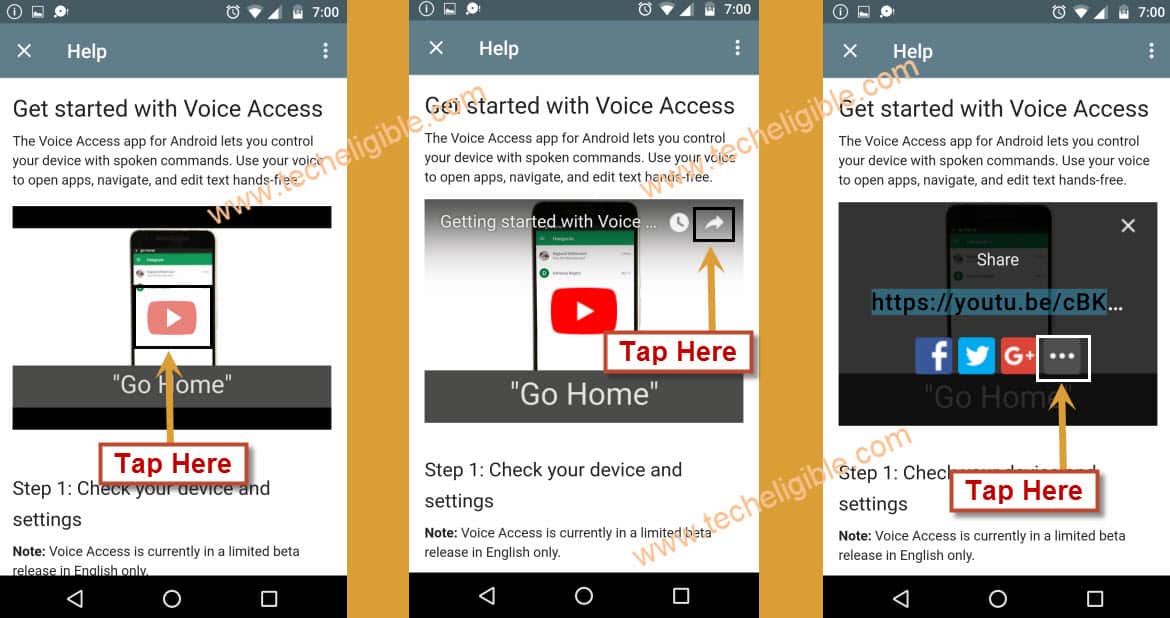
-Now tap on “Play Icon”, after that “Arrow” icon, and then “3 dots”.
-You will be redirected to the YouTube official website.
Note: If you see “Youtube Update” screen, and you are unable to bypass this screen, for that you should follow this method to bypass youtube update screen.
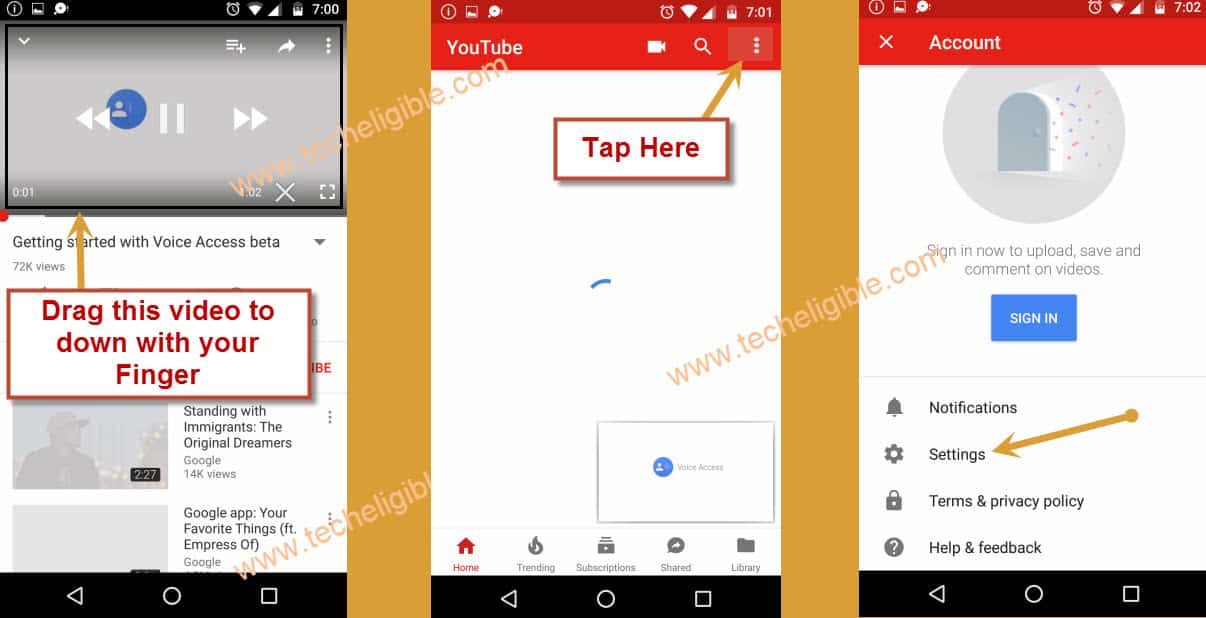
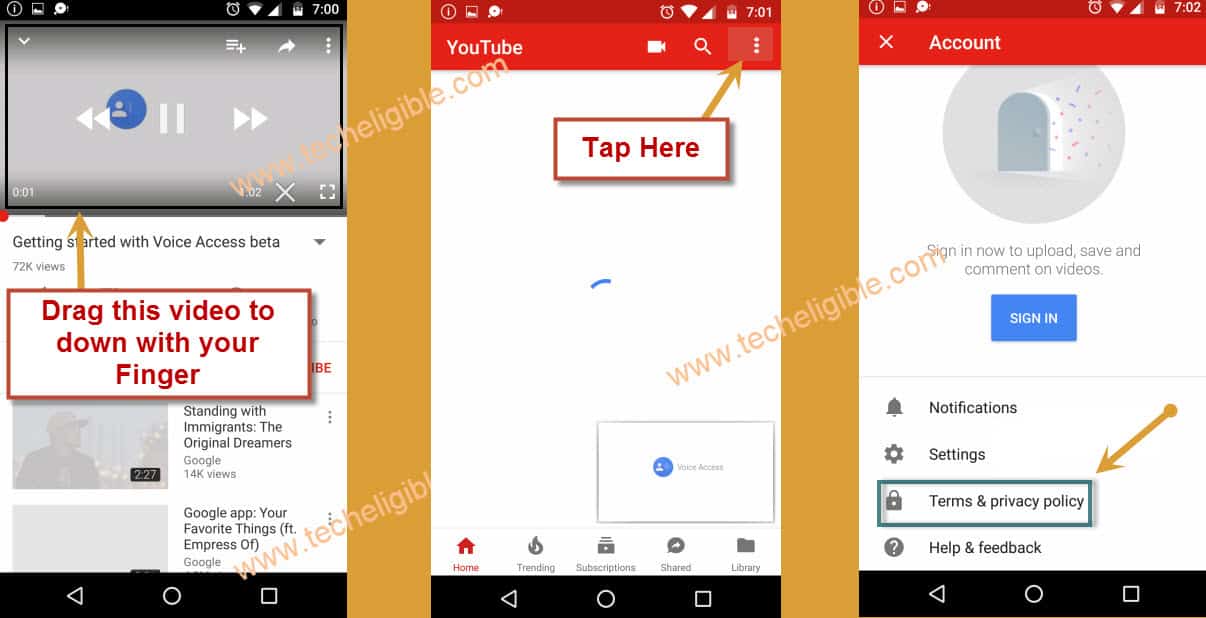
-Drag down “Youtube Video”.
-Tap on “3 Dots” from top right corner, and then tap on “Settings”.
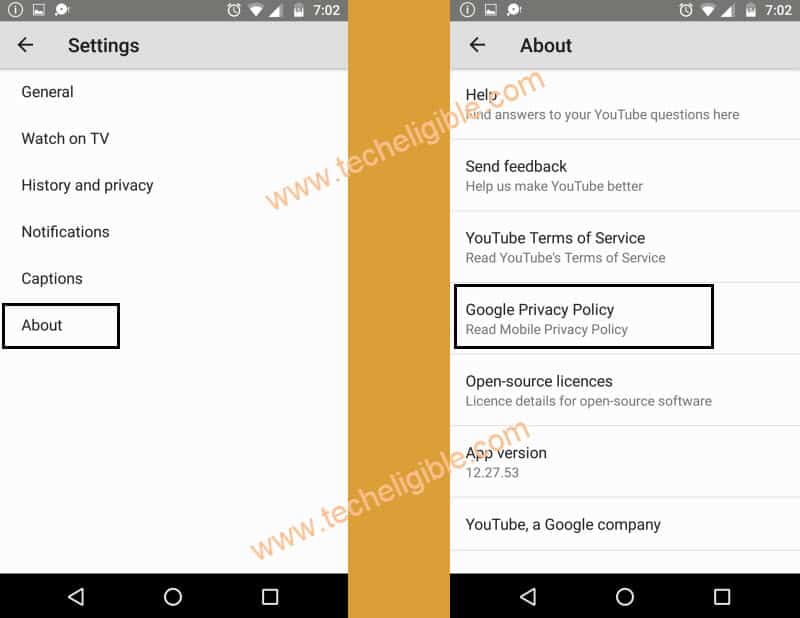
-After that, tap on “About”.
-Now tap on “Google Privacy Policy”.
Let’s Start to Download APEX App:
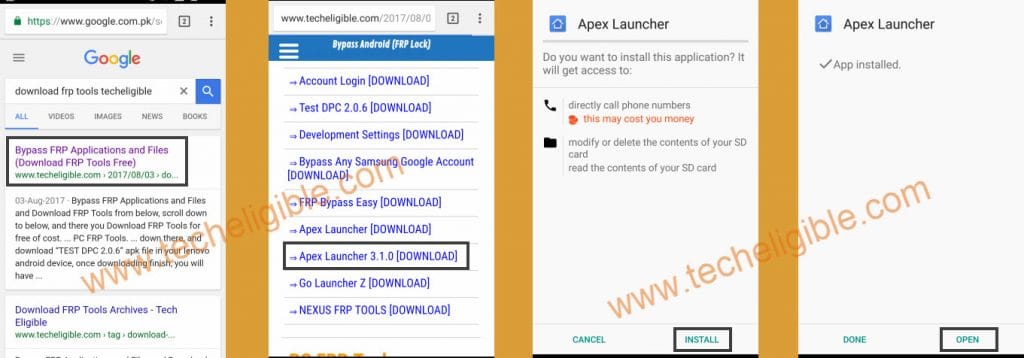
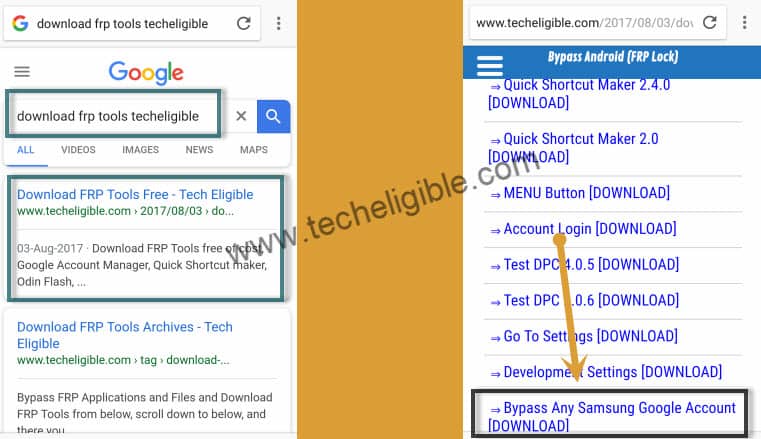
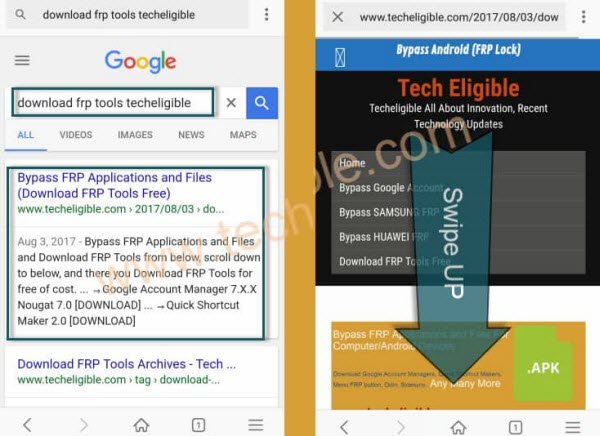
-Type “Download FRP Tools” in google search bar.
-Tap on most relevant search result, as shown in below image.
-Download from there “Apex Launcher 3.1.0“.
-Tap on “Bookmarks” from bottom of your browser bar, and then “History”, after that tap on “Download History”.
-Now you will be able to see “Apex Launcher” there, just tap on that to install it.
-Once downloading finish, tap on “OPEN” to launch Apex.
Note: If you get “Installation Blocked” popup, tap on “Settings”, and then enable “Unknown Sources”, after that you can easily install apex launcher app.
Enable ADB & USB Debugging J5 Prime:
-Now you have accessed to your J5 Prime, but still your device has frp lock, to Bypass frp Galaxy J5 Prime Android 7, we need to enable usb debugging.
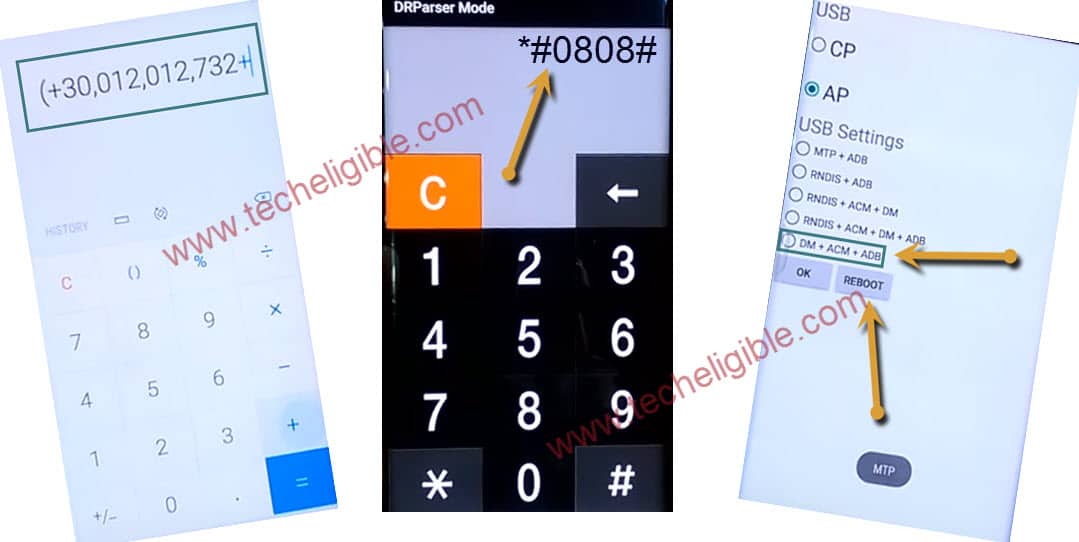
-Open “Calculator”, and then type there this code “(+30012012732+ “.
-Now DRParser Mode will open, type there ” *#0808# “
-USB Setting will open, tap on “DM + ACM + ADB“, after that tap on “Reboot“
-After rebooting finish, you will have “Talkback”, press both “Volume up + down” keys together to disable talkback.
Connect Device to Computer:
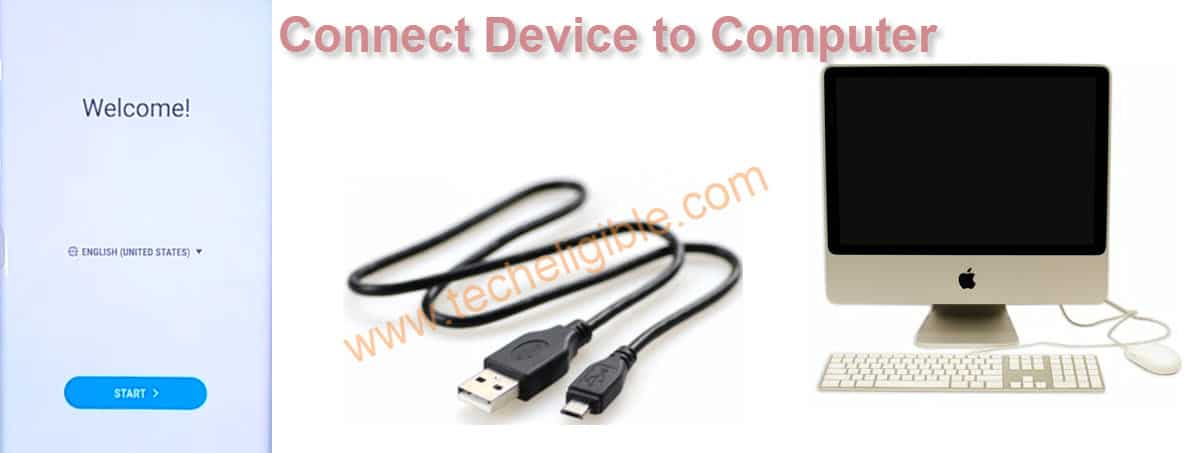
-Make sure, device is switched on & Connect J5 Prime to computer.
Download FRP Bypass Tool:
-Open Browser in your Computer, and then type in search bar “Download FRP Tools Techeligible“
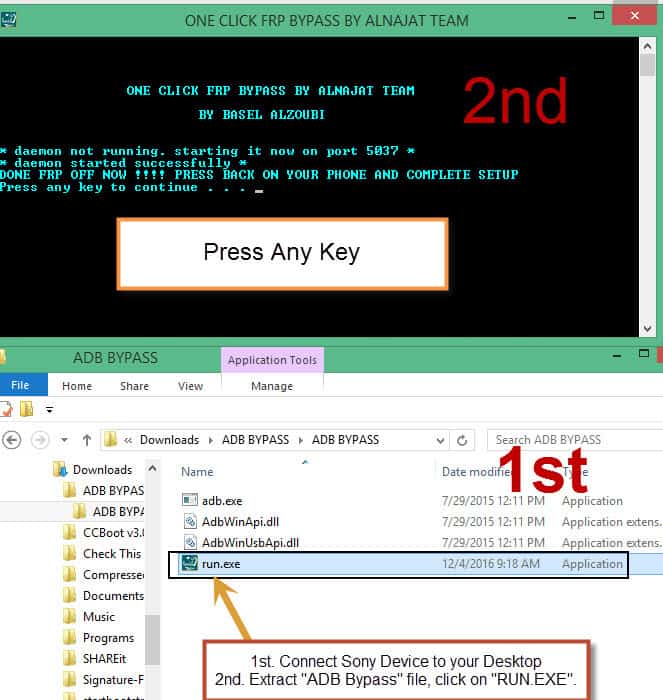
-Download from there “Samsung USB Driver“, and also “ADB FRP Bypass” tool (See Below Image).
-Extract “Samsung USB Driver”, and install it in your computer.
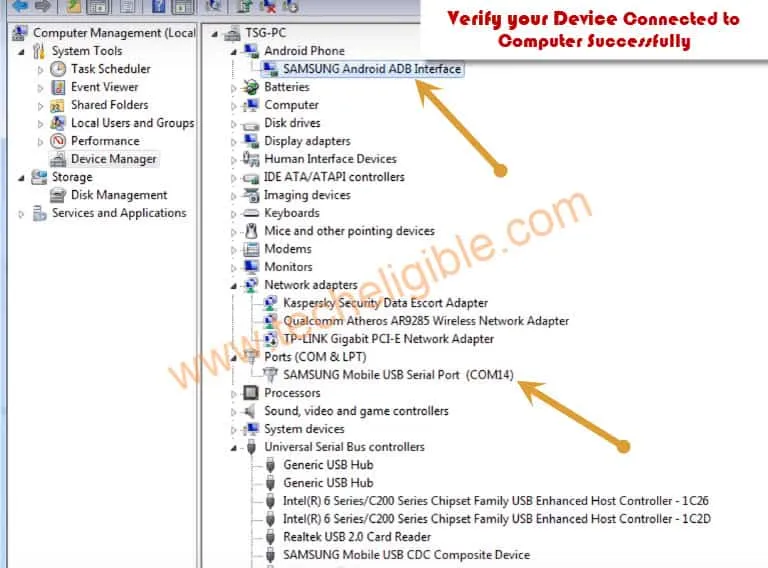
-Now make sure your device has successfully been detected by computer, for that, right click on “MY COMPUTER”, and then “Manage”, after that go to “Device Manager”.
-Now you can see there “Com Port” of your device, this is for sure that your device is connected.
Warning!: Turn off your “Antivirus Software”, to avoid file deleting from ADB FRP Bypass Tool.
-Extract “ADB FRP BYPASS“, and then right click on “RUN.EXE“, after that “Run as Administrator”.
-Now you will have “Window Command Prompt” on your computer screen.
-Press any key from your keyboard.
Note: If you get “Allow USB Debugging” Popup on J5 Prime, just tap on “OK”.
-Once you got “FRP OFF NOW, Press Back on your phone, complete setup”, that means you have successfully bypassed frp lock.
-Disconnect your device, and then go back “Welcome” screen by pressing “Back Key”.
-Now just complete “Initial Setup” to access J5 Prime device.
Method 3: Bypass Google Account on Samsung J5 Prime by Miracle
You don’t need to download combination file, or Odin software, OTG, this is very straight forward and simple method, just Download Miracle 2.27A Tool with loader from below, and connect your device to computer, and then click on start button from miracle software, to Bypass FRP Galaxy J5 Prime Android 7.0 Follow below steps carefully.
Note: This method successfully is successfully tested with Samsung Galaxy J5 Prime (g570F), Android 7.0, and this method is also for Galaxy J7 (Android 7.0) | Galaxy J3 Prime (Android 7.0).
-Tap on “Start” button to go for next.
-Connect “Wi-Fi” to your J5 Prime device. (You can use Data SIM, or Hotspot as well)
-Once Wi-Fi connected successfully, lets move on.
Enable Talkback Options:
-Press 3 times “HOME Button” in J5 Prime device to bring “Talkback Tutorial” screen.
-Now draw “L” on Talkback screen, means “Swipe Down to Right” to bring “Global Context MENU”.
-Double tap on “Talkback Settings”.
-On “Talkback Settings” screen, again “Swipe Down to Right” to get global context menu.
-Just double tap on “Pause feedback” in “Global Context Menu” screen.
-After that double tap on “OK”.
-Tap on “Help & Feedback”.
-Tap on “Search Icon”, and then type there “Voice”.
-After that, tap on “Get Started with Voice Access”.
-Now simple, tap on “Youtube Video” play icon.
-Then tap on “Share Arrow” from right corner of the video.
-After that, tap on “3 Dots” from there.
Now you will be redirected to “YOUTUBE” website, so to successfully Bypass FRP Galaxy J5 Prime, we have to open “GOOGLE” from there.
-Drag down “Youtube Video”.
-Tap on “3 Dots” from top right corner, after that tap on “Terms & Privacy Policy”.
Now you will have “Google Search Bar”,
Download Development Settings App:
-Type in search bar “Google.com”, and open that.
-Now type “Download FRP Tools Techeligible“, and open most relevant search result.
-After that, Download from there “Bypass Any Samsung Google Account“, apk file.
Install Downloaded APK File:
-Once downloading finish, tap on “Bookmarks” from below of your browser.
-Tap on “History”, and then tap on “Download History”.
-Now tap on “Bypass Any Samsung Google Account” downloaded apk file.
Note: If you get there “Installation Blocked“, just tap on “Settings”, and then enable “Unknown Sources” from there.
-Now you will be taken back to “Development Settings” app screen.
-Just tap on “Install” button, and then tap on “OPEN”.
Note: After tapping on “OPEN”, you will be taken to your Galaxy J5 Prime “Settings”.
Let’s Open Google Chrome:
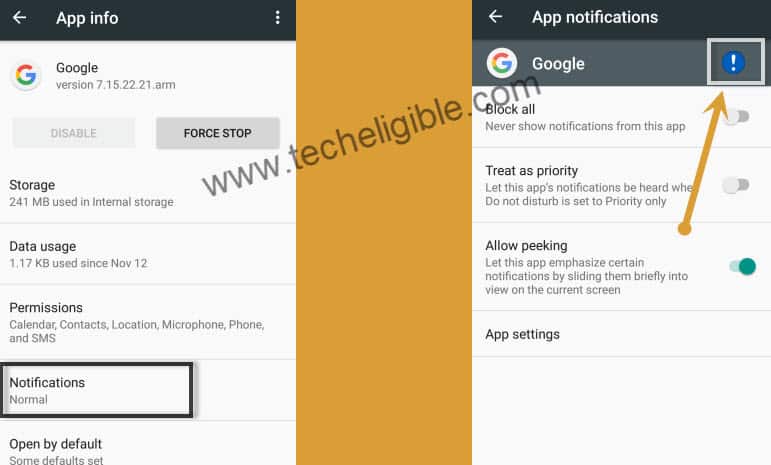
-Tap on “Apps”, after that tap on “Google”.
-After that tap on “Notifications”.
-Now tap on “Exclamation Sign”, that will appear in front of “Google”.
-You will be taken to “Settings” screen.
-Now from settings screen, enable “Feed”.
Note: Once you enabled “Feed”, you will get screen of “Google”.
Open Calculator & Enable USB Debugging:
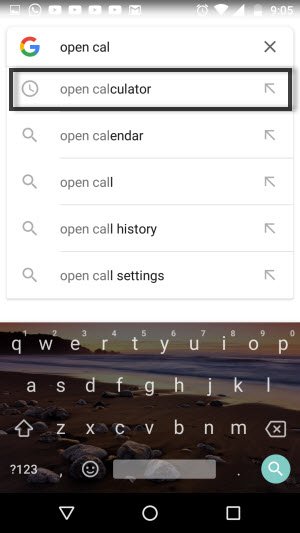
-Tap on “No Thanks, and then type in google “Open Calculator“, and open that.
-Type code with bracket sign in calculator ” (+30012012732+ “.
-Now you will be redirected to “DRParser Mode”.
-Type there “ *#0808# “.
-Tap on “DM + ACM + ADB“, and then tap on “Reboot“.
You have successfully enabled “USB Debugging” in J5 Prime, its to remove frp lock with miracle software.
Download FRP Tools in Computer:
-Open Browser in your computer / laptop, and type there (www.techeligible.com/Bypass-FRP-Lock-Galaxy-J5-Prime).
-Same post will appear in your computer browser, just scroll down and download below software.
⇒ DOWNLOAD Miracle 2.27A Software All in ONE Tool [DOWNLOAD]
⇒ Samsung USB Driver [DOWNLOAD]
-Once downloading finish, extract “Samsung USB Driver“, and install it.
-Turn off “Antivirus Software” to avoid file crack from “Miracle Software”.
-Now extract downloaded “All in One Tool” winrar file, and go to extracted folder.
-Double click on “All in ONE Tool.EXE” file to run it.
-After 1-2 minute you will get screen of All in ONE Tool Software.
-Click on “Miracle 2.27A“.
Note: Make Sure you have turned off “Antivirus” otherwise Miracle will not work.
-After miracle software run, do some setting in that.
Use Miracle Software to Bypass FRP:
-Once Rebooting finish in your “J5 Prime” device, just connect J5 Prime to your computer via Micro USB Cable.
Note: Make Sure J5 Prime is switched on, and make sure you have installed “Samsung USB Driver”, and your device successfully connected to computer. (If you get “ALLOW USB Debugging” option in J5 Prime, just allow that).
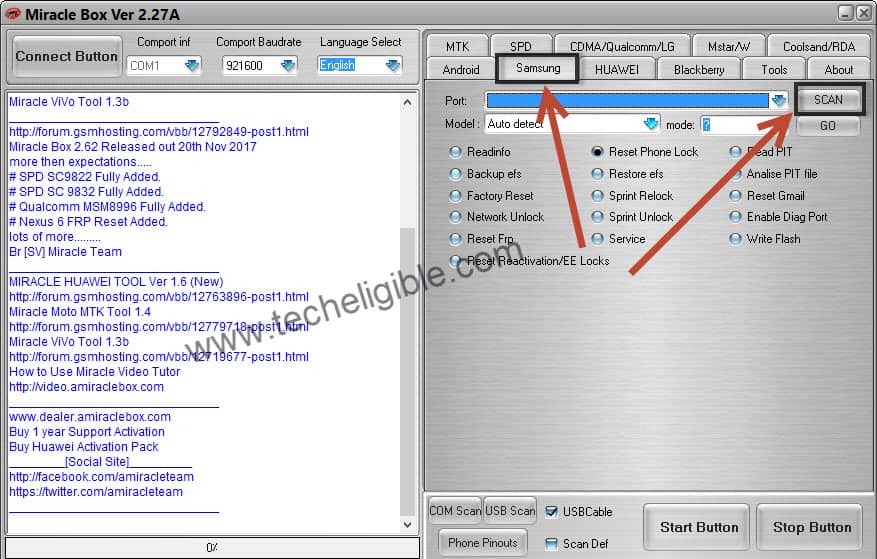
-Go to Miracle Software, Click on “Samsung” tab, and then click on “SCAN” button to detect connected J5 Prime device.
-If you get “USB Debugging Option” in your J5 Prime, just allow that and click on “OK”.
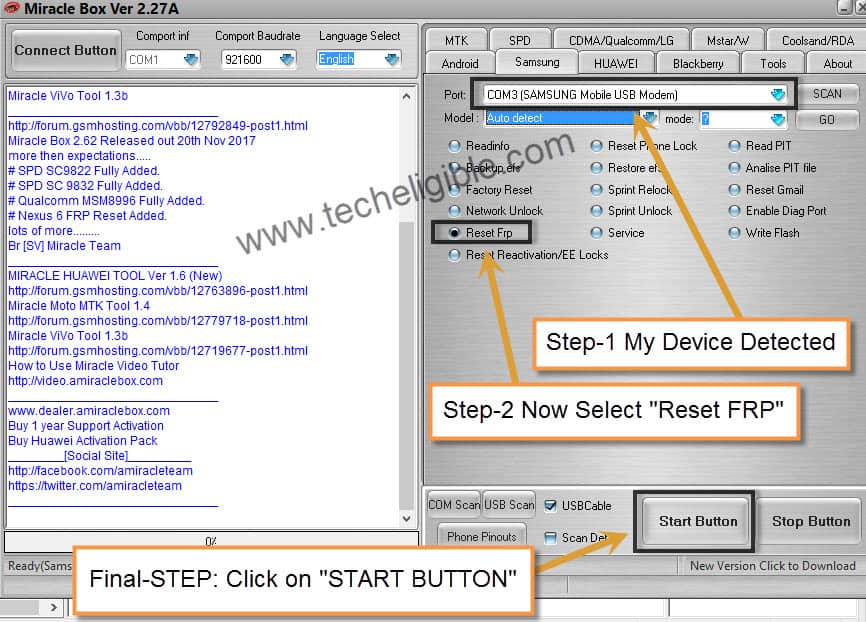
-Once it detected, select “Reset FRP” option, and then click on “START BUTTON”.
-Now it will start to Bypass FRP Galaxy J5 Prime, once you get “All Done, Reboot” in miracle software.
-Unplug j5 prime, and complete initial setup.
Note: If miracle Software failed to bypass frp lock, then follow below method.
Lets USE GSM FLASHER Bypass ADB Tool:
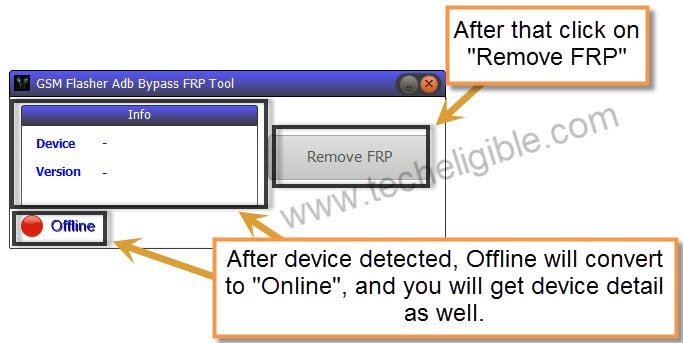
-Click on “GSM Flasher Bypass ADB Tool“.
-Switch on, and connect J5 Prime device to computer.
-Allow USB Debugging option, if you get.
-Now wait 1-2 minute “GSM Flasher Bypass ADB Tool” will detect your device.
-Just click on “REMOVE FRP” button.
After that it will reset frp lock from j5 prime device. thanks for visiting us, feel free asking any question if you have. if this method really helped you, don’t forget to mention device detail in comment box.
Related Posts:
How to Bypass frp all Samsung Galaxy J7 Models?
