3 Methods to Bypass FRP Galaxy Note 8 Without PC
We are going to share with you top best 3 methods to bypass FRP Galaxy Note 8 Android 9, Android 8, Android 7 version devices, because each android version has different settings, you can choose any one method according to your device android version to bypass frp easily.
All Available FRP Bypass Method on Samsung Note 8:
| 1st frp Method on Samsung Note 8 Android 9 |
| 2nd frp Method on Samsung Note 8 Android 8 |
| 3rd frp Method on Samsung Note 8 Android 7 |
| 4th frp Method on Samsung Note 8 Android 9 [New] |
Method 1: Bypass FRP Galaxy Note 8 Android 9
Do you really wanna Bypass FRP on Galaxy Note 8?, well you might have tried several methods, but most of them do not work or some of the more old methods, because this method is will also work on new security patch level Galaxy Note 9 devices, this is totally method, and we expect that you will be happy after trying this new way to bypass frp.
Warning: This method is only for Device Owner, and for educational purpose only.
Let’s Begin this Procedure:
-First of all restart your phone.
-After that, connect WiFi.
-Go back to first “Let’s Go!” screen.
-From there, tap on “Next Arrow”.
-Now you have to Select “I have read and agree all of the above”, and then tap on Next.
-Now Select “Skip this for now”, and then tap on “Next”.
-After that, tap on “Add Network”.
-From the keyboard, just Tap on “Setting gear icon”, and then tap on “Keyboard Layout and Feedback”, and then “Key-tap-feedback”.
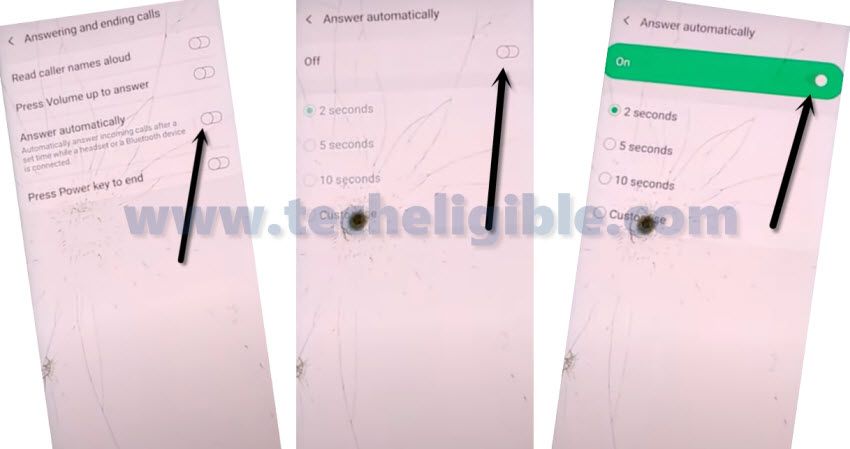
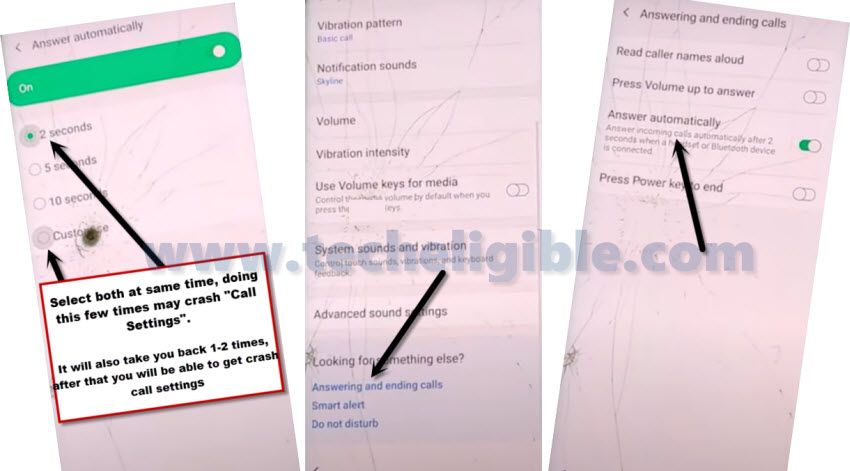
-Tap to > Sound and Vibration > Answering and ending calls.
-Now enable “Answer Automatically” from there, after that, tap on that.
-There you will see some options, now we have to follow below steps carefully to crash call settings.
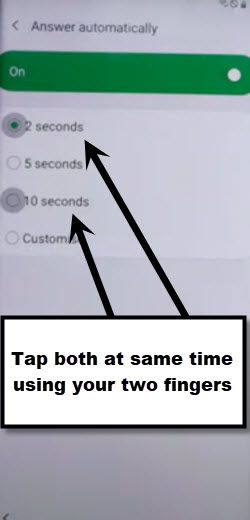
-Tap both options “2 seconds & 10 seconds” at the same time.
Note: You may be redirected to the back at first attempt, but do not worry, this will work for you, just get back to this screen again, and then again try to select both options at same time.
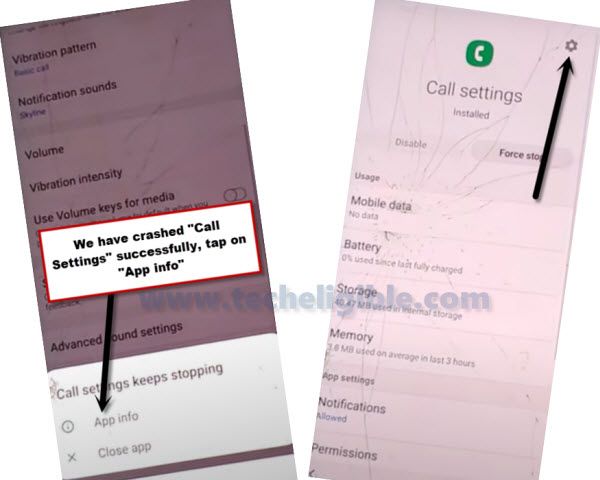
-After hitting both options at same time successfully, you will be shown popup window of “Phone Keeps Stopping”, only you have to tap on “App info” from there.
-Tap “Setting gear icon” from top right.
-Go down, and then tap on “About Phone”.
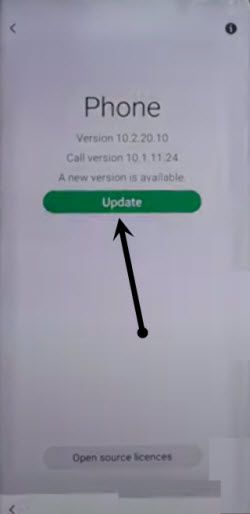
-Tap on “Update” once it turned to green.
Lets Install Apex Launcher:
-We are going to install apex launcher in our phone.
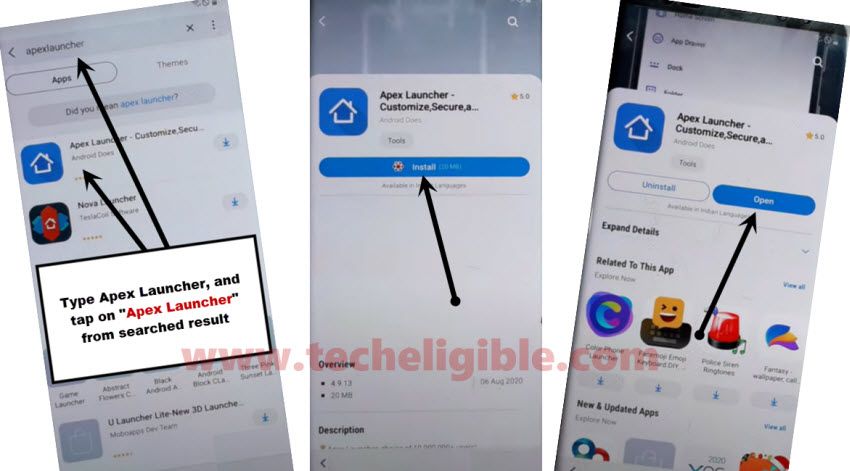
-Tap on “Search icon” from top right, and then type there “Apex Launcher”, and then tap on “Search icon” from bottom corner of the keyboard.
-From there, tap on “Apex Launcher”, and then tap to “Install” button.
-Once installing process done, just tap to “Open”.
-Now finish some initial steps by hitting on “Next”, and then “Skip” from top right corner.
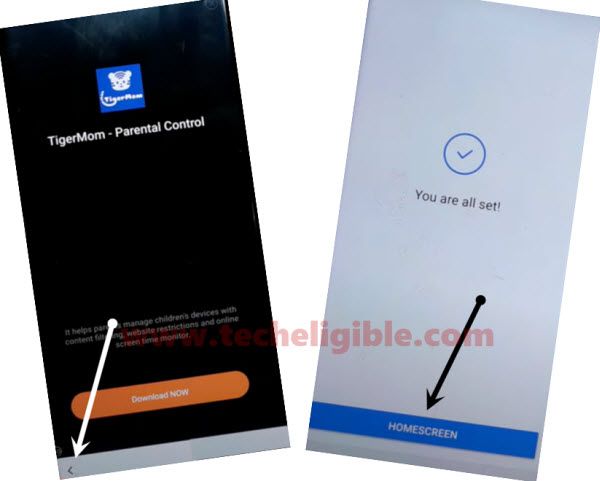
-From “Download” screen, just tap on “Back Arrow” from bottom left.
-After that, tap on “HOMESCREEN” button to get access into your frp locked device.
Download & Install Google Play Service App:
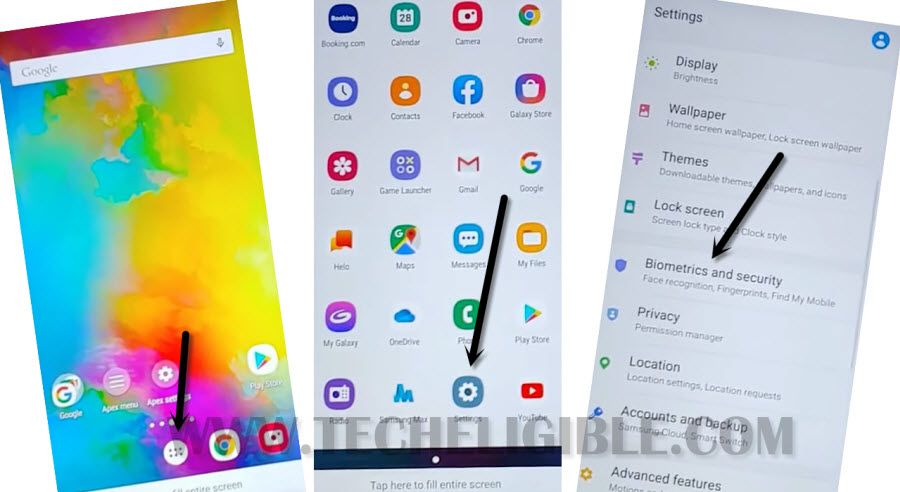
-Go to your device “MENU” by hitting on MENU icon from bottom bar, and then tap on “Chrome” to open chrome browser, because we’re going to download and install new frp apps to add our gmail account.
-Hit on > Accept & Continue > Next > No Thanks.
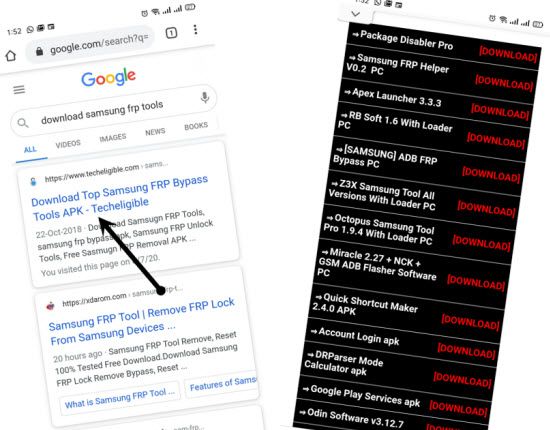
-Type in search bar “Download Samsung frp tools“.
-Tap on searched result (Download Top Samsung FRP Bypass Tools APK ) same as shown in below screen shot.
-Go down and download “Google Play Service” app, this app has 28mb size, so don’t be panic, it may take time if your internet speed is slow.
-Once downloading process, just go to top of the webpage, and tap on “3 dots” from top right, and then tap on “Download” option to see your downloaded app.
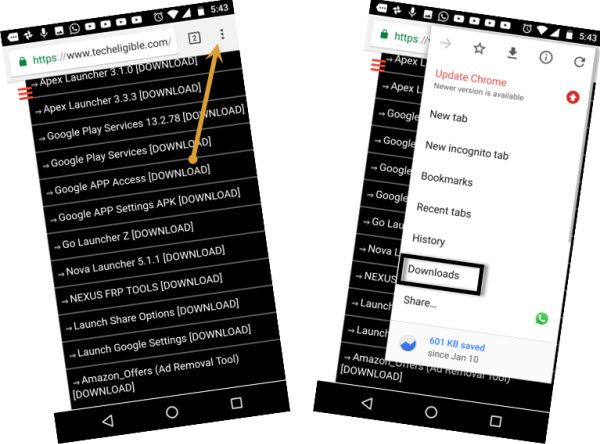
-Tap on “Google Play Services” app, and then tap to “Settings” from popup box, and then enable option “Allow from this source”.
-After that, tap to > Next > Install > Done.
Disable Apps in Samsung Galaxy:
-Go back to your phone by home screen by hitting on back arrow multiple times
-Go to “MENU”, open your Galaxy Note 8 phone settings by tapping on “Setting gear icon”, from there tap on “Biometrics & Security”.
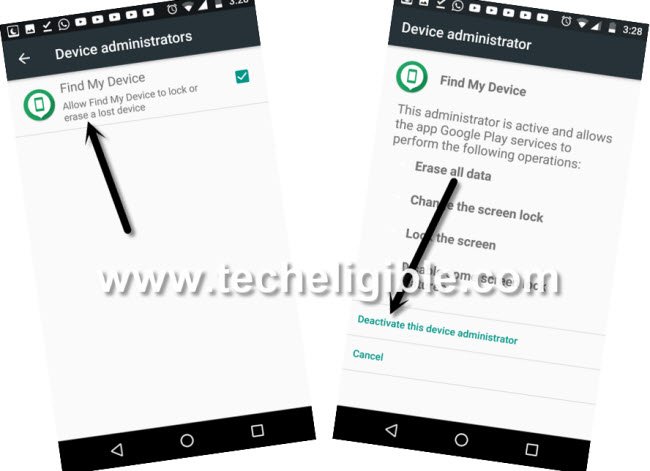
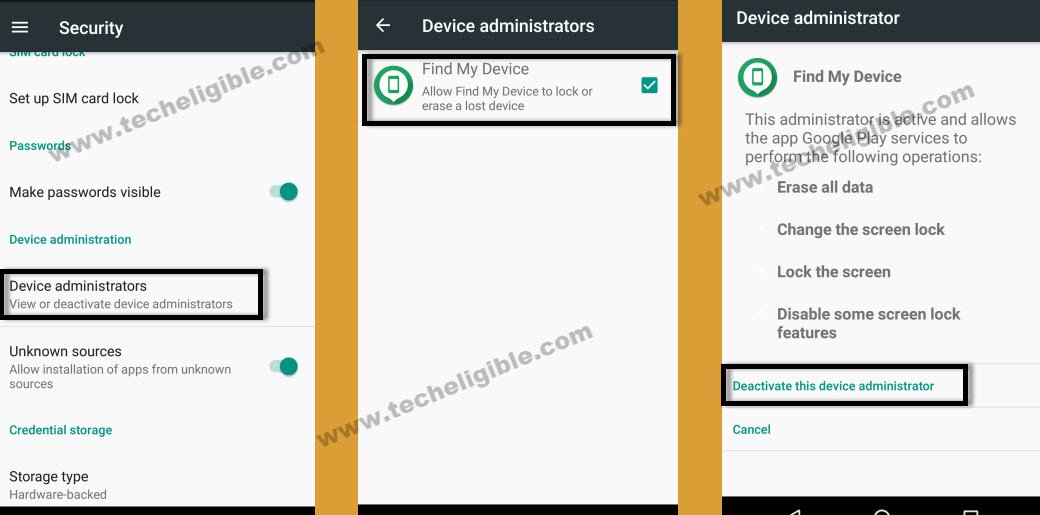
-Go to > Other Security Settings > Device Admin Apps > Find My device > Deactivate.
Note: If you see “Find my Device” is already deactivated, then leave it as it is..
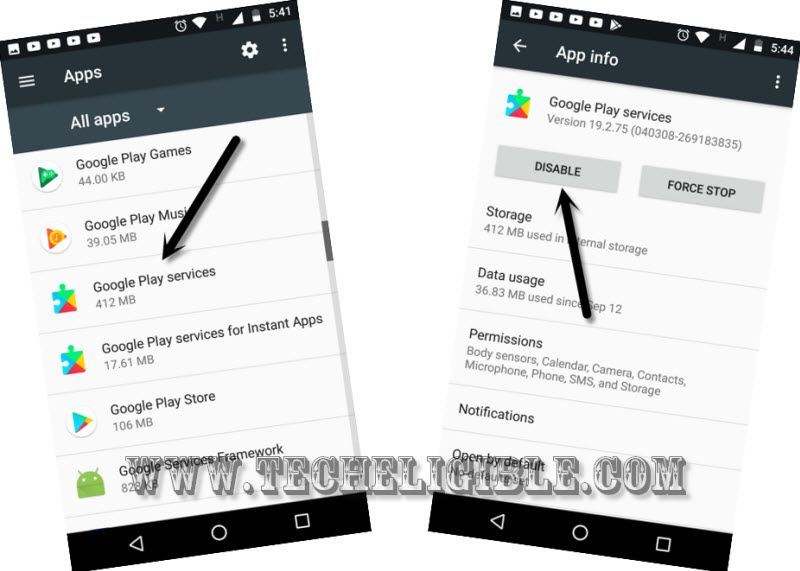
-Go back to “Phone Settings”, and tap on “Apps”.
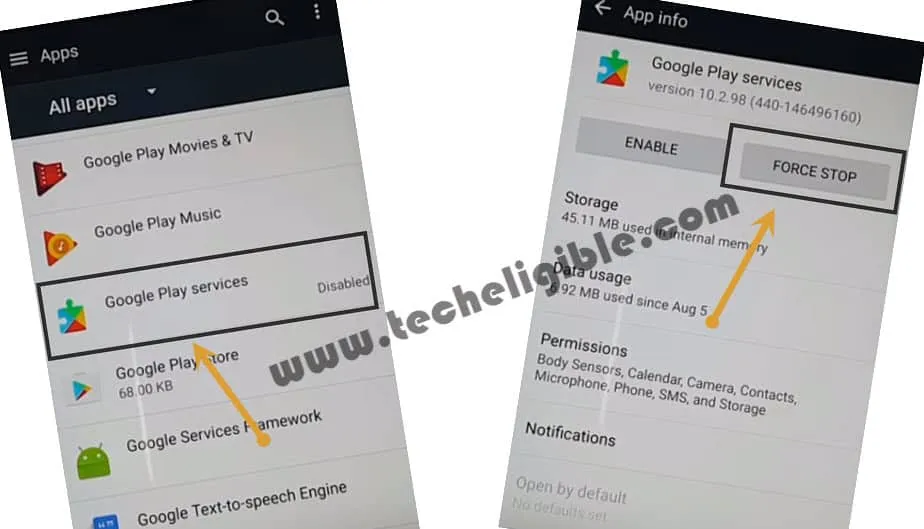
-Scroll down, and tap on “Google Play Services”, and then hit on > Disable > Disable.
-Go back to “Phone Settings”, and tap on > Accounts & Backup > Account > Add Account > Google.
-Sign in with your valid Gmail ID.
-After enter your Gmail ID, and pass, just tap to > Next > I agree.
-Wait on “Checking info…” screen, once it finishes, just go back, and there you will be able to see your added gmail account.
Let’s Go back to Settings to Enable Apps:
-Go back to “Phone Settings”.
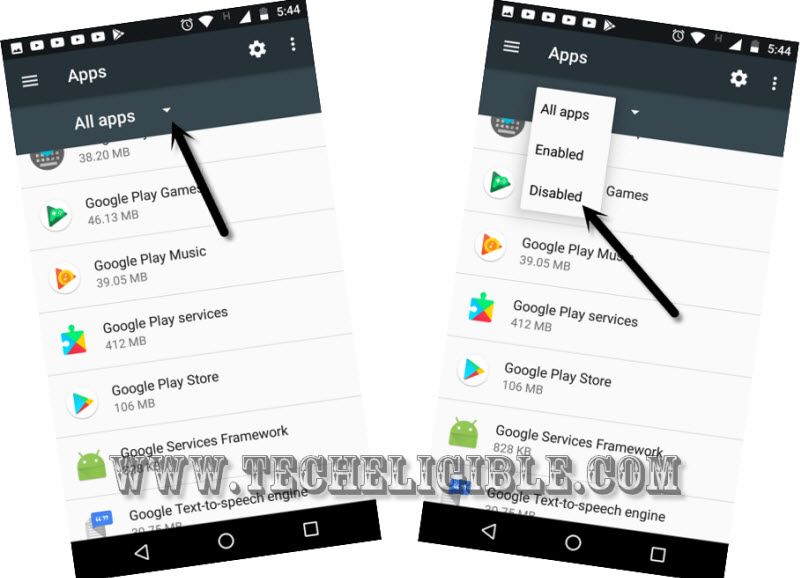
-Go to > Apps > All Apps > Disabled > Google Play services > Enable.
-Again go back to phone settings, and from there go to > Biometrics & Security > Other Security Settings > Device admin apps > Find my device > Activate.
-Restart Samsung Galaxy phone, and complete your initial setup, and congratulation to you on getting back your phone with your new Gmail account.
Method 2: Bypass FRP Galaxy Note 8 Android 8.0:
We have best method that will bypass frp from your Samsung Galaxy Note 8, and good thing is that you won’t need any PC and flashing your galaxy device, so surely you will not have to find out combination ROM and stock firmware to Bypass FRP Galaxy Note 8 Android 8.0 device, we will bypass google account Samsung galaxy with the help of “HUSHSMS Apk” application. This method is only for Device Owner.
Note: This method has successfully been tested with Samsung Galaxy Note 8 (SM-N950F), Android 8.0.
Let’s Begin this FRP Method:
-Make sure you have 1 more extra android device.
-Inset working SIM card in your phone.
-Now turn on your device and put your device on “Welcome Screen”.
-Now we have to install “HushSMS App” in our other android device.
-You have to insert another working SIM card in your other android device as well.
Note: It does not matter whether the sim network is same or not, but matter is both android device should have working sim card and enough balance to send SMS from your other android device to frp locked galaxy note 8 device.
-Open chrome browser in your other android device.
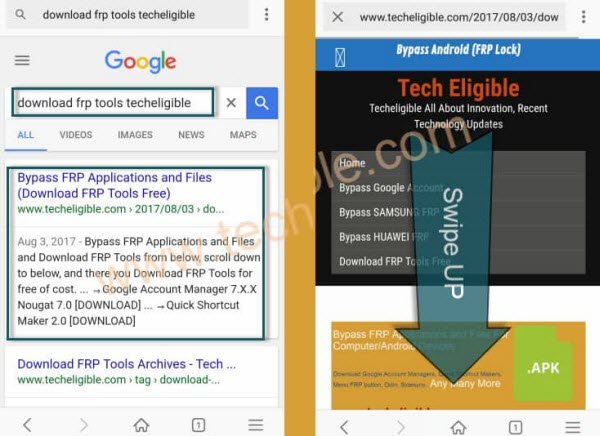
-Type in search bar “Download FRP Tools“.
-Go to first search result same as shown in below image.
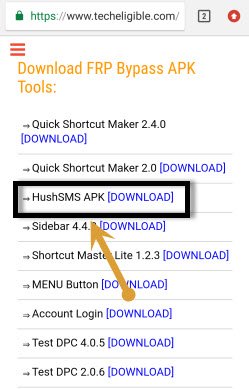
-Download “HushSMS” app from there.
-Once downloading finish, just tap on “HushSMS” app to install it.
-After installation finish, just open hushsms application in your other android device.
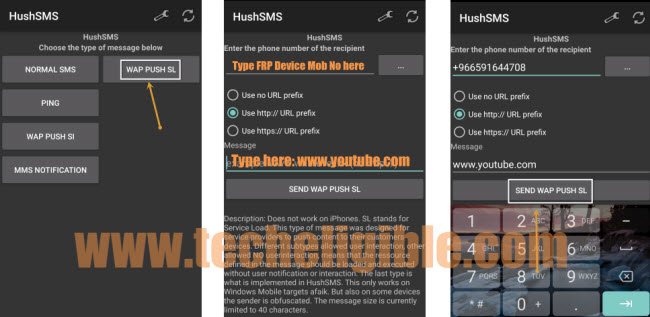
-Now tap on “WAP PUSH SL” button.
-Type cell no of your galaxy note 8 frp locked device.
-Type “www.youtube.com” in message field. (See Below Image).
-After that, tap on “SEND WAP PUSH SL” button.
Note: If you are unable to receive notification message, so you can try alternate method to Bypass FRP Galaxy Note 8
Access to Youtube Website:
-You will receive a popup message in your Samsung Galaxy Note 8 device.
-Tap on “OK”, after that you will be redirected to the youtube official website.
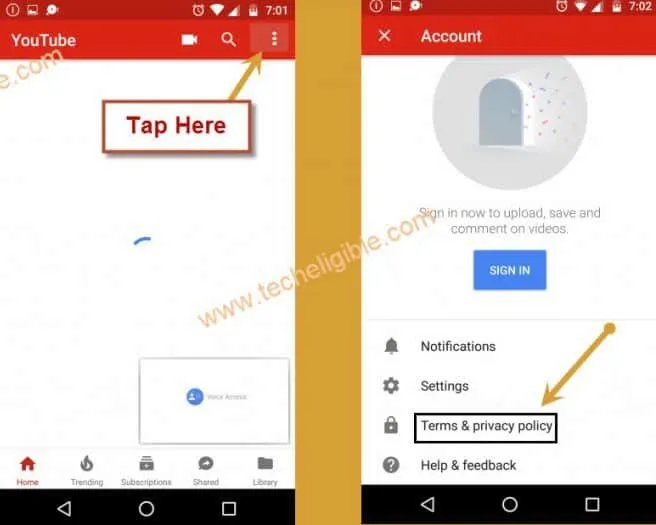
-Tap on “3 dots” from top right corner & select “Terms & Privacy Policy” option from there.
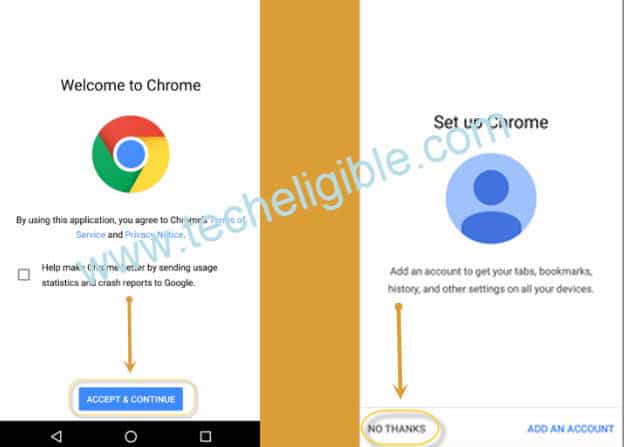
-From welcome to chrome screen, tap on “Accept & Continue”.
-Tap on “Next”, and then tap on “No Thanks” from bottom left corner.
-Now you have got chrome search box, so we will be able to download frp bypass tools.
Download Samsung Note 8 FRP Tools:
-Type in search bar “Download FRP Tools“.
-Go to first search result from there.
-Now Go down, and download from there below 2 applications
1-Quick Shortcut Maker 2.4.0
2-Google Play Services
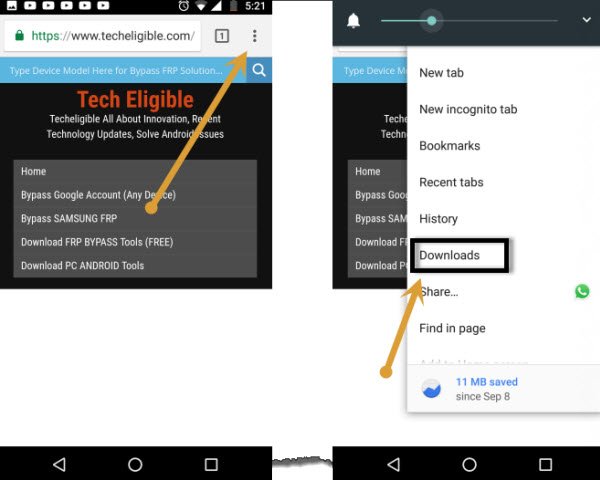
-Tap on “3 dots” from top right corner of chrome browser, and select “Downloads”.
-Now you can see your downloaded “Quick Shortcut Maker” app there.
-Tap on “Quick Shortcut Maker” app, and then you will get “Chrome Popup Window”, just tap on “Settings” from that popup window.
-Enable “Unknown Sources” from there to easily Bypass FRP Galaxy Note 8.
-Now go back and tap on quick shortcut maker app.
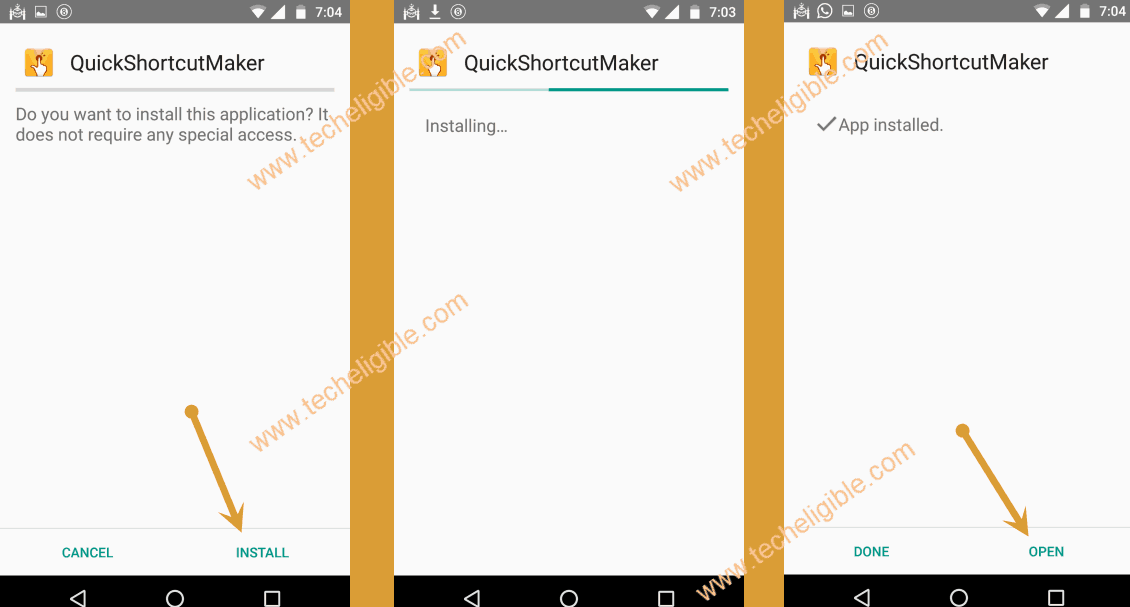
-Tap on “Install”, and then tap on “OPEN”.
-Perfect, now we have accessed quick shortcut maker application.
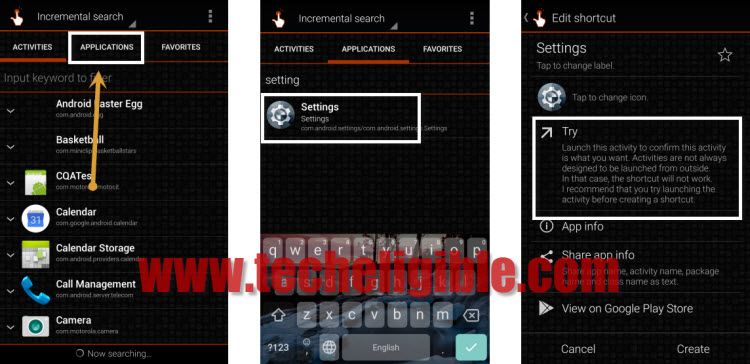
-Tap on “Application” from top bar.
-Type in search bar “Settings”.
-From result, tap on “Settings” and then tap on “TRY”.
-Now we have accessed to our device.
Disable Device Admin App:
-Tap on “Lock Screen and Security”.
-After that go to “Other Security Settings”.
-Tap on “Device Admin App”, and then select “Android Device Manager “.
-Now tap on “DEACTIVATE” from bottom right corner.
-We have deactivated device admin app successfully.
Disable Google Play Services & Google Services Framework:
-Go back to “Settings”.
-Go down & Tap on “APPS”.
-From there, Go down and tap on “Google Play Services” app.
-Now tap on “Disable” button to disable google play services application.
-Tap on “3 dots” from top right corner & select “Show System Apps”.
-Now go down again, and tap on “Google Services Framework”.
-After that tap on “Disable” button to disable google services framework application.
-Tap on “Back Key” multiple times until you get back “Download Folder”, where you will be able to see your 2nd downloaded app “Google Play Services”.
-Tap on “Google Play Services” app, and then tap on “Install”, after that tap on “Done”.
-Perfect, now we’ve successfully installed google play services app.
-Now again install & open “Quick Shortcut Maker” app.
-From quick shortcut maker, go to “APPLICATIONS”, and then find “Settings”.
-Go to “Settings”, and then tap on “TRY”.
-After you access to your Samsung Galaxy Note 8 Settings.
-From “Settings”, just go to > Clouds and Accounts > Accounts > +Add Account > Google.
-After that, you will have a screen of “Just a sec…”.
-Now sign in there with your any valid Gmail account to bypass FRP Galaxy note 8.
Let’s Enable the Disabled Applications:
-Go back to “Settings” by tapping on back key.
-Go to “Lock Screen and Security” option.
-Select “Other Security Settings”.
-Go to > Device Admin APPS > Android Device Manager > Activate
-Now go back to “Settings”, and then go to “APPS”.
-Tap on “3 dots” from top right corner & select “Show Systems App”.
-Afterwards, tap on “All Apps”, and then select “Disabled”.
-There you will be able to see your disabled apps, just tap on “Google Play Services”, and then tap on “ENABLE” button.
-Tap on “Google Service Framework”, and then tap on “ENABLE” button.
-Congrats, now we have successfully enabled all disabled applications, and added new gmail account.
-Now Reboot Galaxy Note 8 device by long press “Power Key”, and select “Restart” option.
-Complete initial setup.
Let’s Soft Reset Galaxy Device:
-Go to “Settings > About Phone > Software Information.
-Tap 7 times quickly on “Build Number” to enable developer mode.
-Once you see a popup “You are now a developer” that means you have successfully enabled developer mode in your Note 8 device.
-Let’s go back to “Settings”.
-Go down, and there you will be able to see “Developer Option”.
-Go to “Developer Option”, and then enable “OEM Unlock”, and also enable “USB Debugging” option from there.
-Now again go back to “Settings”.
Note: This would remove your all data.
-After that, go to > General Management > Reset > Factory Data Reset > Reset > Delete All.
-Congratulations, now you have accomplished this post and successfully bypassed google account verification from your Samsung Galaxy Note 8 device. Thanks for visiting us.
Method 3: Bypass FRP Galaxy Note 8 Android 7 & Note FE
Our best and multi device frp bypass method, because you can Bypass frp galaxy note 8 Android 7, Note FE Fan Edition, also on galaxy note 5, this method covers all these models, but all should be of android 7 version, otherwise this wont work.
Note: This method is successfully tested on Galaxy Note 8 (SM-N950F/DS), Android 7.1.1, Patch Level Aug 1 2017 & Galaxy Note FE (Fan Edition)”, Android 7.
You can also try this method with your “Samsung Galaxy Note 5“ as well.
Tools You are required:
• Computer
• Bluetooth Headset
• Samsung ADB FRP Bypass (We will download from below)
• Samsung USB Driver(We will download from below)
Let’s Start FRP Process:
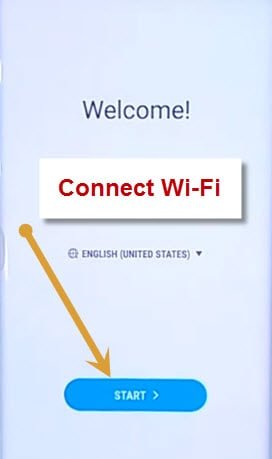
⇒ Tap on “Start”, and Connect Wi-Fi.
⇒ Once “Wi-Fi” connected, go back to “Welcome!” screen again by tapping on “Back Key”.
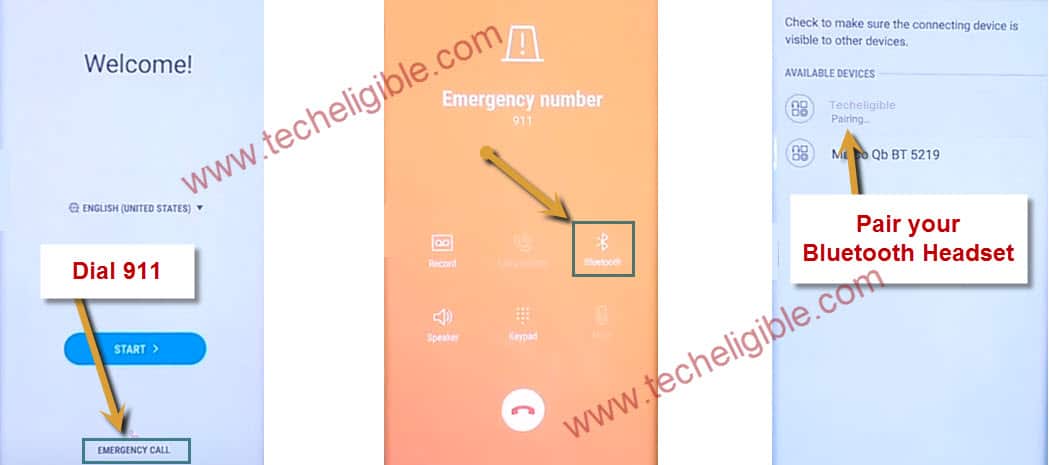
⇒ From “Welcome Screen” tap on “Emergency Call”, after that dial ” 911 “.
⇒ While making call, tap on “Bluetooth Icon”.
⇒ Pair “Bluetooth Headset” to bypass frp.
⇒ Once Successfully paired, drop call.
Open Galaxy APP & Download Calculator:
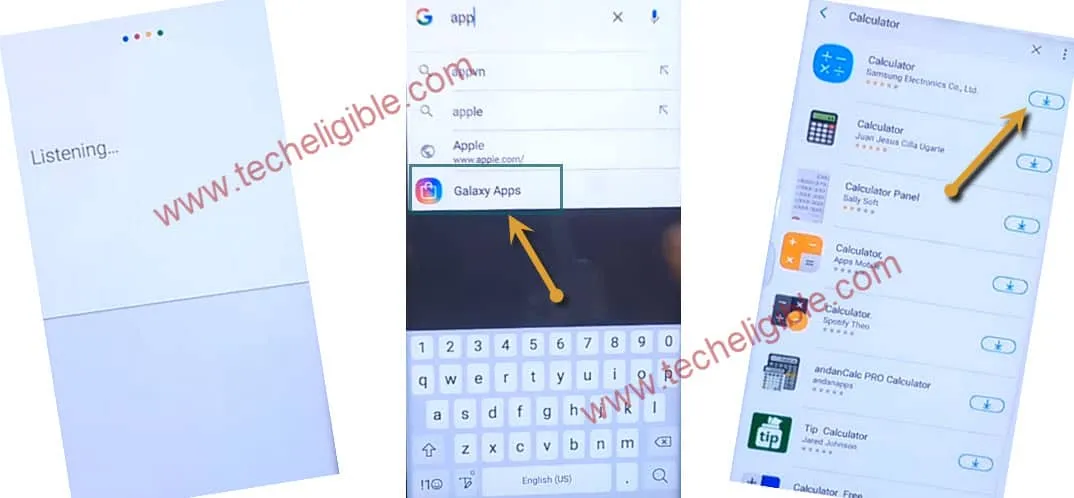
⇒ Long press “Call Button” from your Bluetooth headset.
⇒ Speak “Google” in headset to open “Google”.
Note: If you have “Galaxy Note FE“, then directly type “Calculator”, and open that calculator, and leave below 4 steps.
⇒ Type there “Galaxy App”, and open galaxy app by tapping from search result.
⇒ Tap on “I have read…” and after that tap on “Start”, then tap on “YES” from popup.
⇒ Now galaxy app will open, and type in search bar “Calculator”, and tap on play icon to download it.
⇒ Once downloading finish, tap on play icon to install and open it.
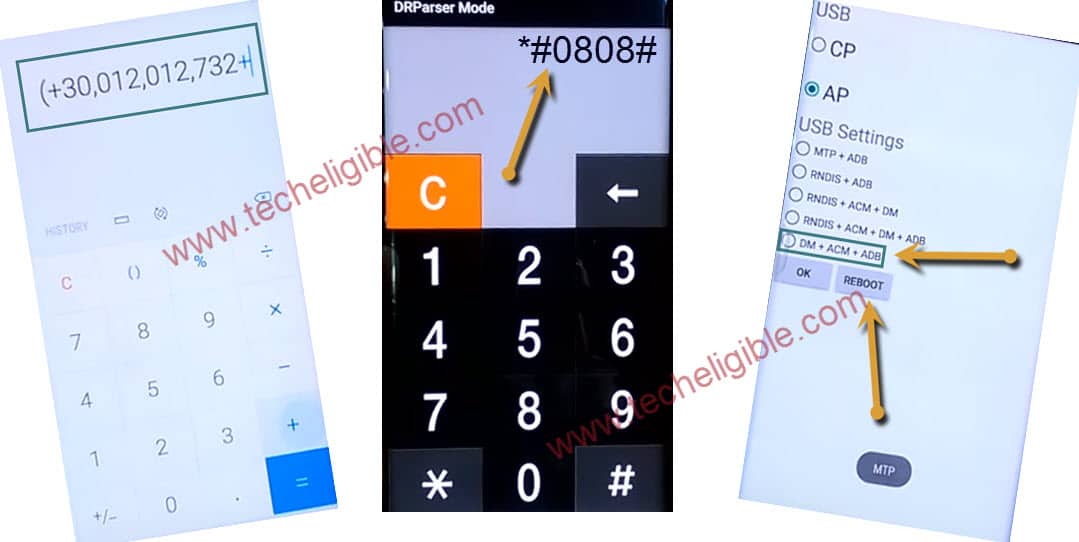
⇒ Type in Calculator ” (+30012012732+ “
⇒ Now DRParser Mode will open, type there ” *#0808# “
⇒ USB Setting will open, tap on “DM + ACM + ADB“, after that tap on “Reboot“
⇒ After rebooting finish, you will have “Welcome!” screen.
Download Tools for Samsung:
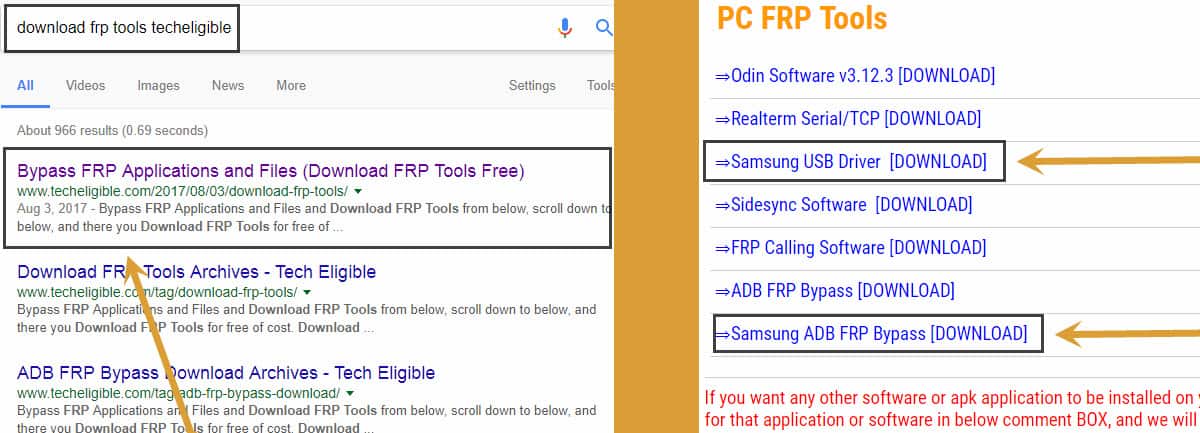
⇔ Go to your Computer Browser, and search there “Download FRP Tools Techeligible“
⇔ Open most relevant search result (As Shown in below image)
⇔ Download from there “Samsung USB Driver“, and “SAMSUNG ADB FRP Bypass“.
⇔ Extract “Samsung USB Driver”, and install in your computer / Laptop.
⇔ Extract “Samsung ADB FRP Bypass” as well.
Connect Galaxy Phone to PC & Remove FRP via ADB FRP:
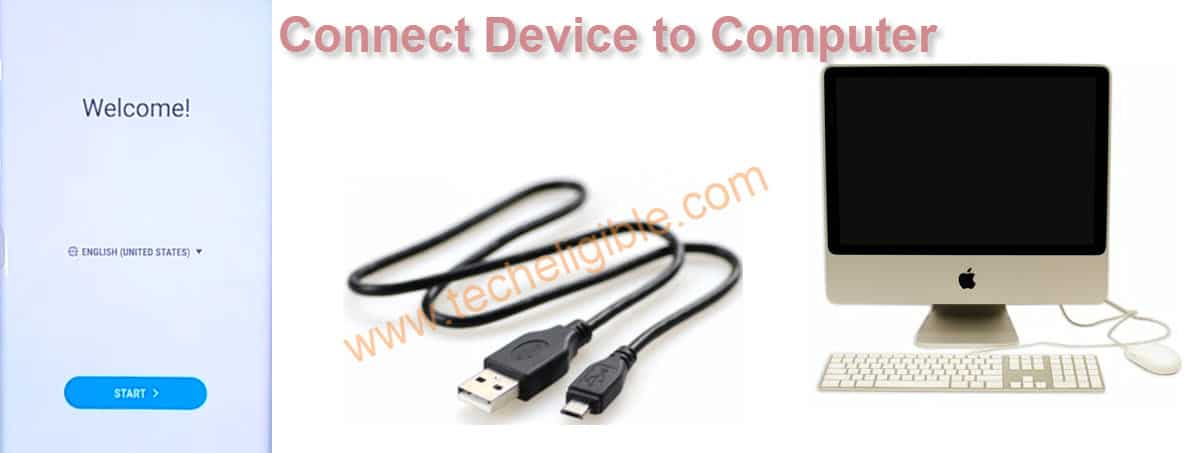
♦ Connect device to computer.
♦ You will get a popup of “Allow USB Debugging!”, tap on “Always…” after that, tap on “OK”.
Make Sure Galaxy Note 8 Successfully Connected to Computer:
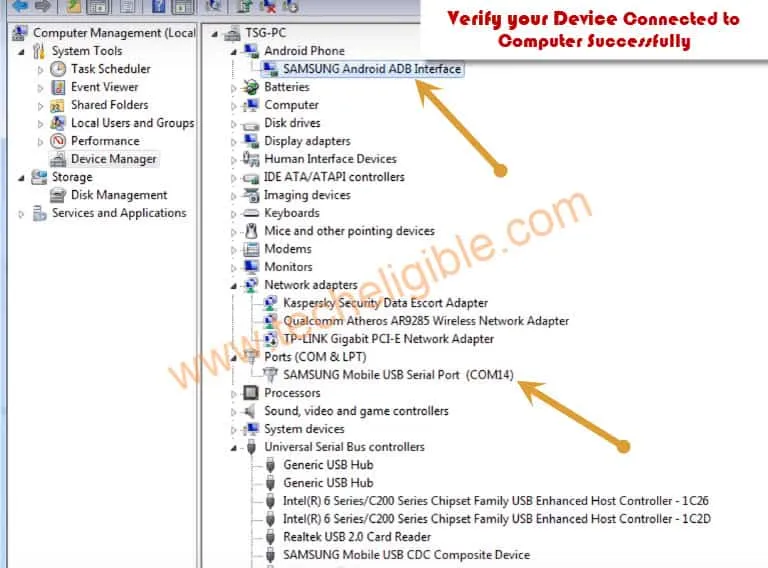
♦ Right click on “My Computer”, then click on “Manage”.
♦ Click on “Device Manager”. Verify both things there as shown in below image.
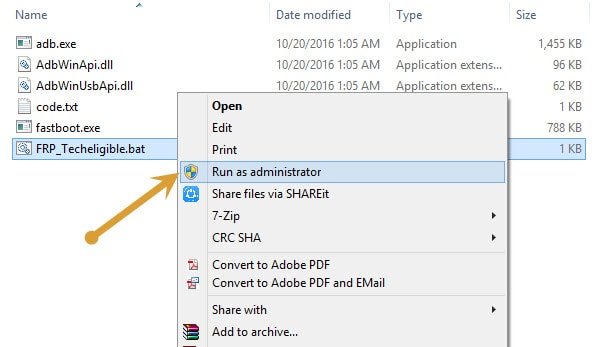
• Right click on “FRP_Techeligible.bat” file, and run as administrator.
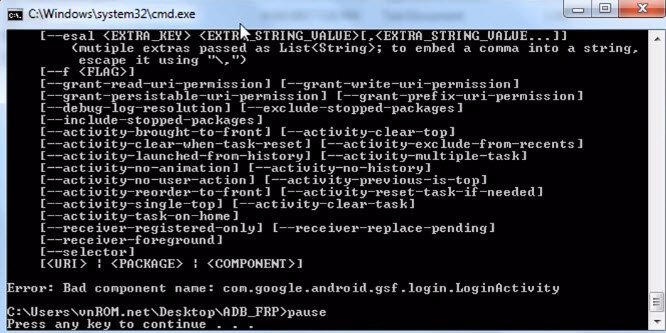
• Command Prompt window will appear, just wait until it detect your device, and ask you to press any key..
• Once you get “Press Any Key to continue” just press “ENTER” key from your keyboard.
• After command prompt auto disappear, disconnect your device.
• Tap on “Start”, and here you have finished to Bypass FRP Galaxy Note 8 Android 7 & Note FE.
Now go to your device “Settings”, and tap on “ADD ACCOUNT”, and add your latest Gmail account there.
Thanks for visiting us, if you have any question feel free to ask us. Do mention your device detail before typing comment.
Relevant Methods to Bypass frp:
