3 Methods to Bypass FRP Samsung Galaxy J2 Android 6, 5
Easy and simple method to Bypass FRP Samsung Galaxy J2 Android 6, Android 5, you can try these 3 methods according to your device android version, in 1st method, we will apply go for latest 2021 method, no PC and no sidesync is required, just access to browser through talkback feature and install frp tools to remove frp completely.
In 2nd method, we will download and install “SIDESYNC” software in our PC or laptop, and after that we can easily open google chrome browser, once we access to chrome browser, after that we can easily bypass frp.
In 3rd method, we wont use any PC or Laptop, through a new way, we will access to browser to install some frp free apps, and through these apps, we will be able to bypass frp from our Samsung phone.
3 Methods Available Below to Bypass FRP:
| Method 1: Sasmsung Galaxy J2 [Latest 2021] |
| Method 2: Samsung Galaxy J2 by Sidesync |
| Method 3: Samsung Galaxy J2 Without PC |
Method 1: Bypass FRP Samsung Galaxy J2 [Latest 2021]
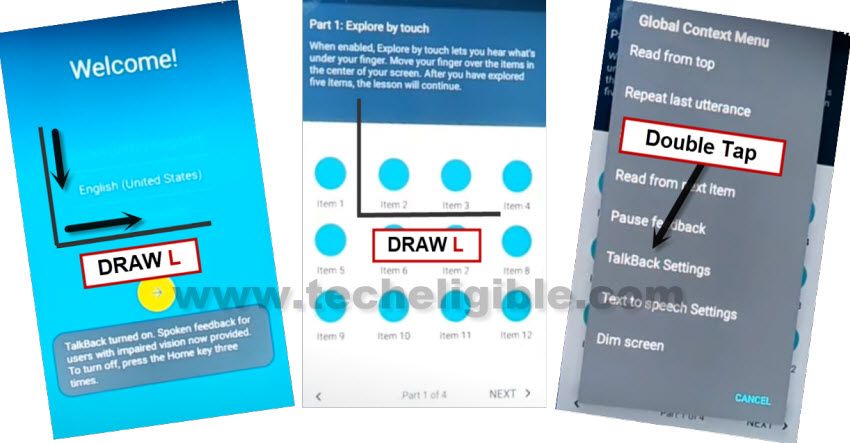
By enabling talkback feature, you can bypass google account Galaxy J2, because we will enable talkback by pressing (Home Button) 3 times, and afterwards, we will draw letter L, and then we can easily access to internet browser for downloading and installing (Google Account Manager 5 & 6 versions) for adding new Google Account, follow this latest method step by step from below.
Let’s Begin to Bypass frp:
1. Firstly, connect WiFi & go back to “Welcome!” home screen.
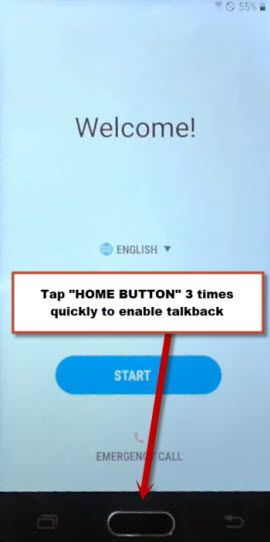
2. Tap 3 times quickly “Home Button”, this will show you popup message that talkback has been enabled….
3. Draw “L” by swiping down to right.
4. Draw “L” again by swiping down to right & double tap to “Talkback Settings”.
5. We have to disable talkback feature, for that press (Home Button) 3 times.
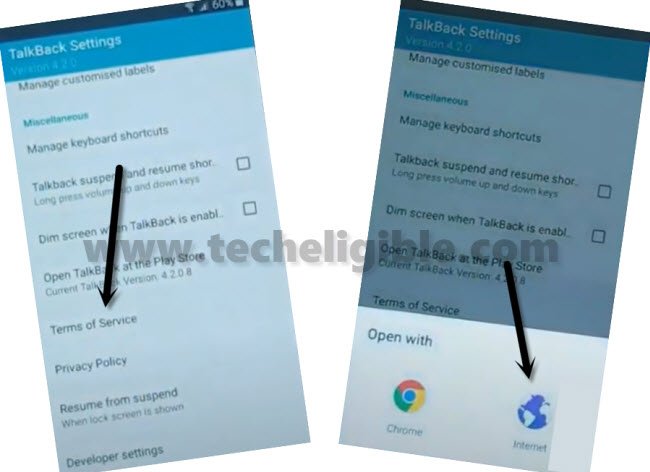
6. Go down and tap to > Terms of services > Browser.
Let’s Download Tools:
7. Search in browser “Download Top Samsung frp tools, and go to our website searched result.
8. Download 3 tools from there.
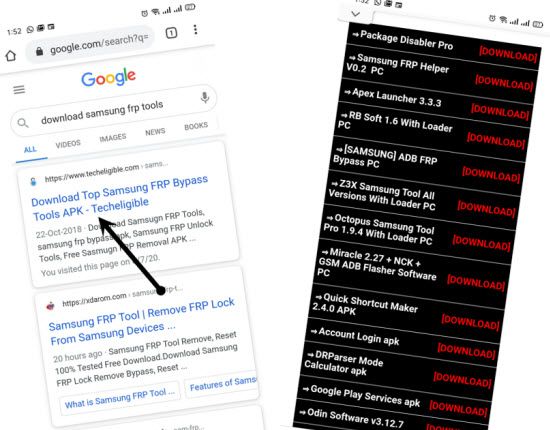
1st: Google Account Manager 6.
2nd: Google Account Manager 5.
3rd: Account Login.
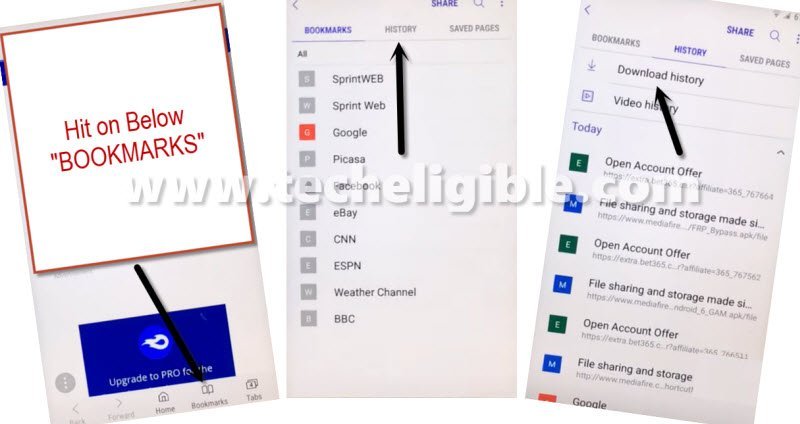
9. Tap to “Bookmarks” icon from bottom menu, and go to > History > Download History, there you will be able to see all 3 downloaded tools, these tools will assist us to bypass frp easily.
10. Firstly, tap to “Google Account Manager 6”, you will see installation blocked popup window, just tap to “Settings”, and then turn on option “Unknown Sources”.
11. Now install “Google Account 6”.
Note: If you get an installation error in installing (Google Account Manager 6), then install (Google Account Manager 5), because one of these 2 apps will work smoothly fine, so try with both.
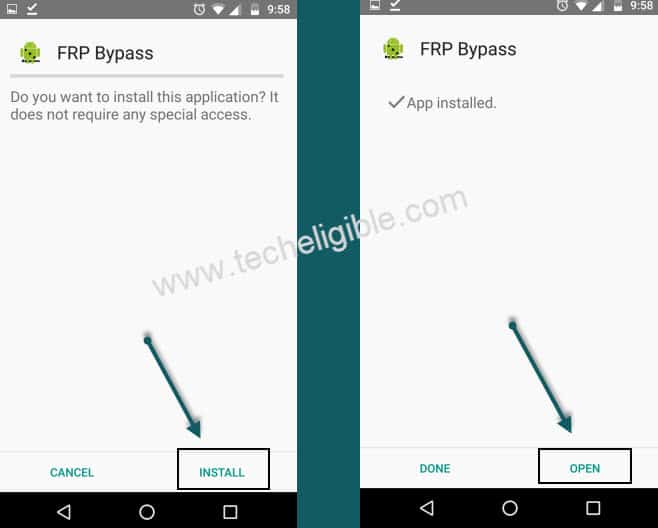
11. Go for 3rd app, tap to > Account Login > Install > Open.
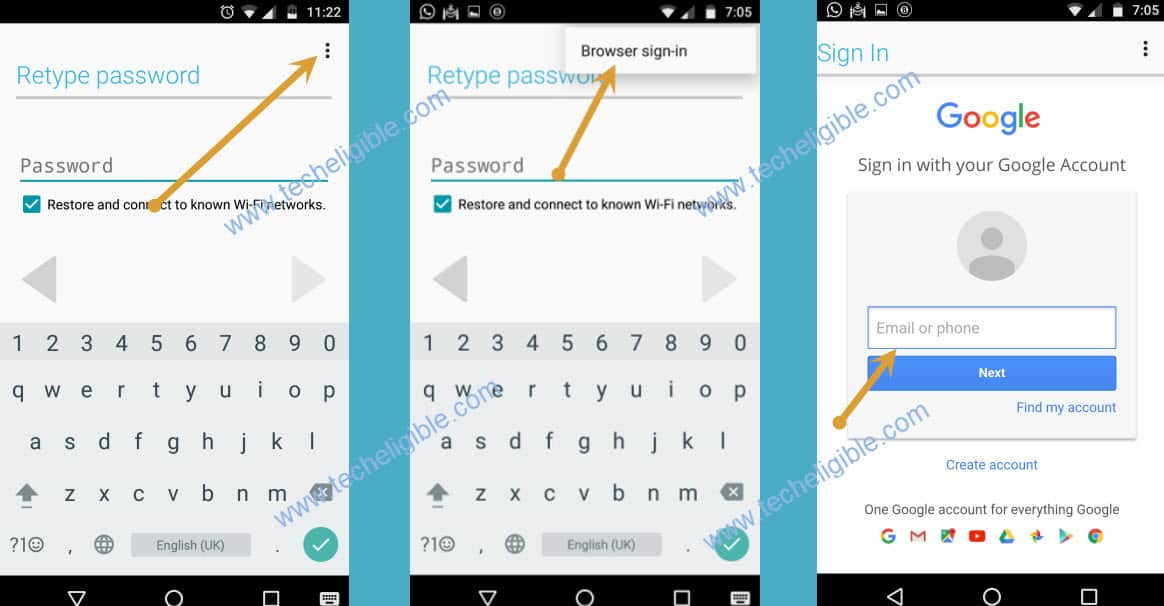
12. Tap “3 dots”, and tap “Browser Sign in”.
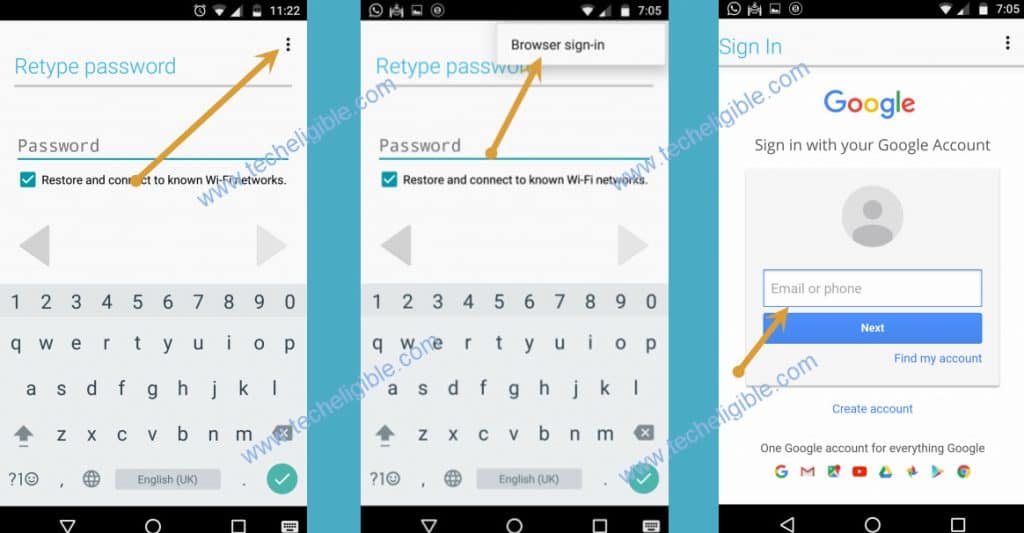
13. Add new Google Account to bypass google account on Samsung J2.
Congratulations, now you are all done, after signing in with Google Account successfully, just restart your device and complete initial setup.
Method 2: Remove FRP Samsung J2 by Sidesync
-Open Internet Browser from your Computer.
-Type on google search “Techeligible.com sidesync samsung galaxy j2 download“.
⇒ Sidesync Software [DOWNLOAD]
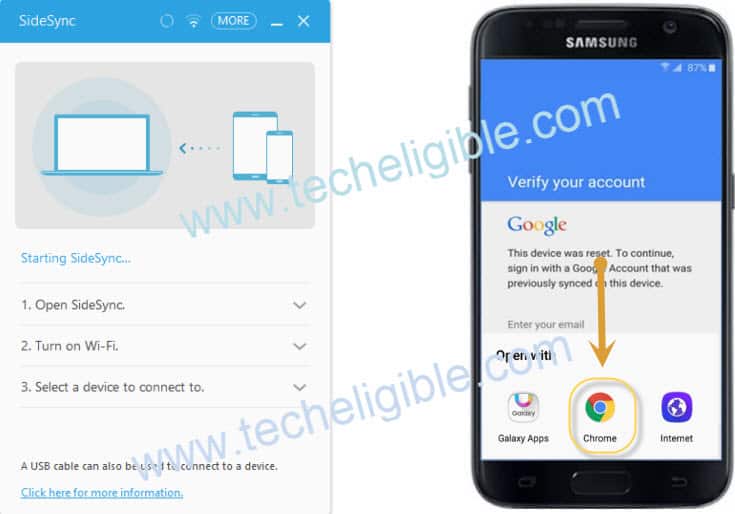
-Once downloading finish, install and open sidesync into your PC/LAPTOP.
-Connect Samsung Galaxy j2 device to computer via USB Cable.
Note: If you did not get pop-up on your mob screen, so try 5-6 times by connecting and disconnecting your mobile, you’ll see a bottom “Popup” screen on Galaxy J2 Device.
-Tap on “Chrome” to open google chrome browser.
-From Chrome “Welcome Screen”, tap on Continue > No Thank You.
-Now tap on search bar and type “Google.com”, and open it.
-Type in search bar “Bypass Google Account Galaxy J2 techeligible.com “, you will see 1st result with techeligible.com website, tap on that.
-Download from there “Google Account Manager 5.x.x & Google Account Manager 6.x.x & Account Login”.
Download FRP Tools:
⇒Google Account Manager 5.x.x [DOWNLOAD]
⇒Google Account Manager 6.x.x [DOWNLOAD]
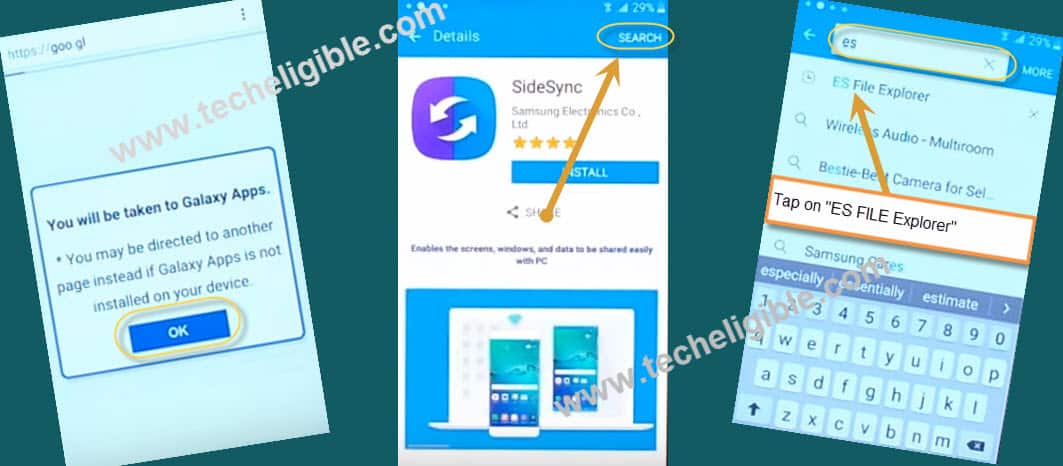
-Once downloading finish, tap on “Back Key” from J2 Device, you may have to tap 2-3 times, till you get popup of “Redirecting to Galaxy APP”, tap on “OK” from popup, then tap on “Agree”.
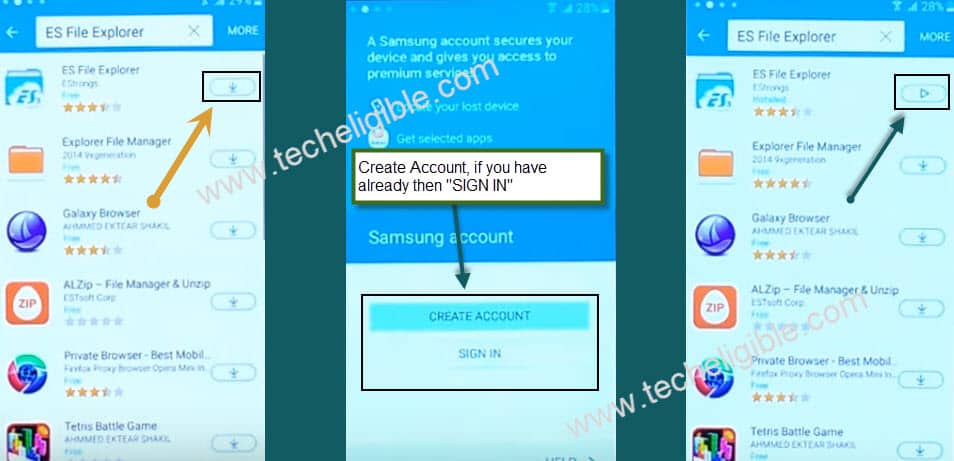
-Tap on top right corner “SEARCH”, and type there “ES FILE EXPLORER”, then tap on es file explorer.
-Now Tap on “Download” button to download this app.
-After that, Tap on “Sign in” if you have Samsung account already, otherwise tap on “Create Account“, to create free Samsung account, after that sign in your Samsung account there to download “Es File Explorer” successfully.
-Once installing finish, tap on “Play icon” to open ES FILE EXPLORER.
-Open “Download FOLDER” from there, Tap on any one “Google Account Manager” according to your ANDROID VERSION, tap on “Install”, then tap on “Done”. (If you don’t know your version, install both 5.x.x and 6.x.x).
| Note: If below method does not work, Click Here to bypass frp Galaxy J2 Without PC |
Warning: if you get an “Install Blocked” error, so don’t worry, tap “Settings” from popup, and then enable “Unknown Sources” from there, after that you will be able to install “Google Account Manager” easily.
-Now Tap on “Account Login” App, which you’ve downloaded already, and install and open this FRP Bypass app.
-Tap on “3 dots” from top right corner, then “Browser Sign-in”, and add your valid “Gmail Account” to successfully Bypass Google Account Galaxy J2.
–Once Account Sign-in Finish, just restart your device, and you will get all access to your mobile back as it was before.
Method 3: Delete FRP Samsung Galaxy J2 [NO PC]
The another easiest way to bypass google account without having computer, or OTG, all you need just 2 mobiles, one is apparently yours J2, and 2nd any android mobile which has wifi connection or internet.
All you need to download some files in your wifi connection mobile, and after that transfer that downloaded files into your “MEMORY CARD”.
Tools You Need to Bypass FRP:
-SIM Card
-Memory Card
-Extra Wifi connection mobile
-Gmail account
-Download Files into Memory card.
Let’s Begin this Procedure:
You have to set a “PIN CODE” in your sim card from other mobile which is working perfectly and has no frp lock.
-Go to mobile “Setting > Security > Sim Card Lock (set any pin code)
-Now go to your mobile “Chrome Browser”, and search there “bypass frp samsung galaxy j2 techeligible“, visit first search result to open this same post in your frp locked device.
-Now scroll down to find below frp tools to download in your J2 device.
Download Frp Tools Here:
⇒Google Account Manager 5.x.x [DOWNLOAD]
⇒Google Account Manager 6.x.x [DOWNLOAD]
⇒Quick Shortcut Maker [DOWNLOAD]
-After you finish downloading, move these downloaded files into your memory card and then remove your “SD Card and SIM card” from your mobile.
-Insert “SD CARD” and “SIM CARD” into your Samsung j2 mobile which has “FRP LOCK”.
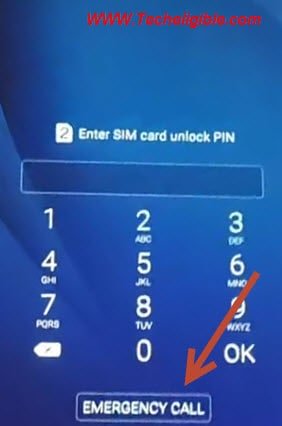
-Turn on your device, you will surely be asked to put “PIN CODE” to unlock, tap on “Emergency Call” after that tap on “Contact Icon” as shown in below image, and then again you will be asked for pin code, so give your “PIN CODE” there, which you set before.
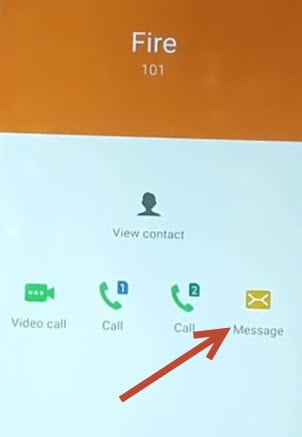
-Type your “PIN CODE” and tap to “OK”, after in new screen, wait few sec till your contact list appear, and then select from there any contact to make call, and after that it will take you to calling scree, so now “CUT CALL” and select “Message ICON”.
-After that type there any “Email Account” e:g, “[email protected]” and then tap to “Send”, now after that from that sending message, tap on that e-mail, and then select “Send E-mail” option from there.
-after that you will get options below of your screen like these, so tap on “Email” icon and “Add there any Gmail Account”, and follow with given instructions on your mobile screen.
-Once you successfully signed into your g-mail account, now tap on “Attach” top of your mobile screen, now on the bottom screen, you will be given some options to choose, from where you wanna give attachment to your e-mail, so you need to search there “MY FILES” option, which could also be seen by “swapping right with your fingers” once you got “My Files” option, now tap on that and then tap on “SD Card”,
-After that select the folder from there, in which you moved your downloaded files or you have your downloaded files (Google Account manager + Quick Shortcut maker), one by one, select all three files to be attached on your e-mail, once you successfully attach, now tap one by one on each attached file to open, if you get “Installation Blocked” so no problem, tap on “Setting” and from there “Turn on, Unknown sources”.
NOTE: If Google Account Manager 5.x.x did not install, it means your device is marshmallow, so install 6.x.x, and install Quick Short cut maker.
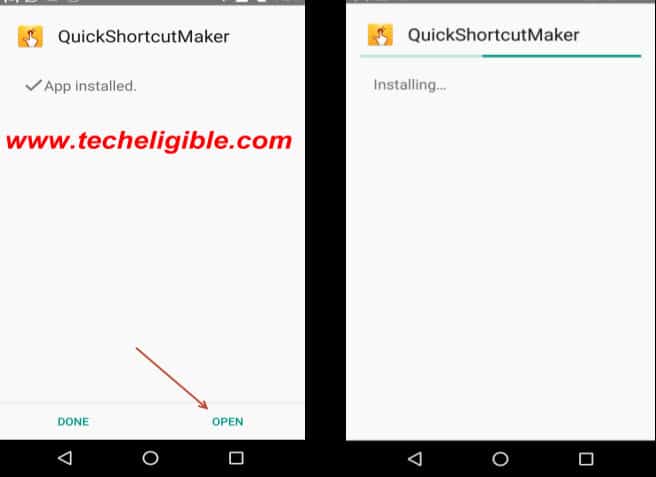
-Once “Quick Shortcut maker installed” you will get two options on installation completions, one is “Done” and 2nd one is “OPEN”, tap on “Open”,
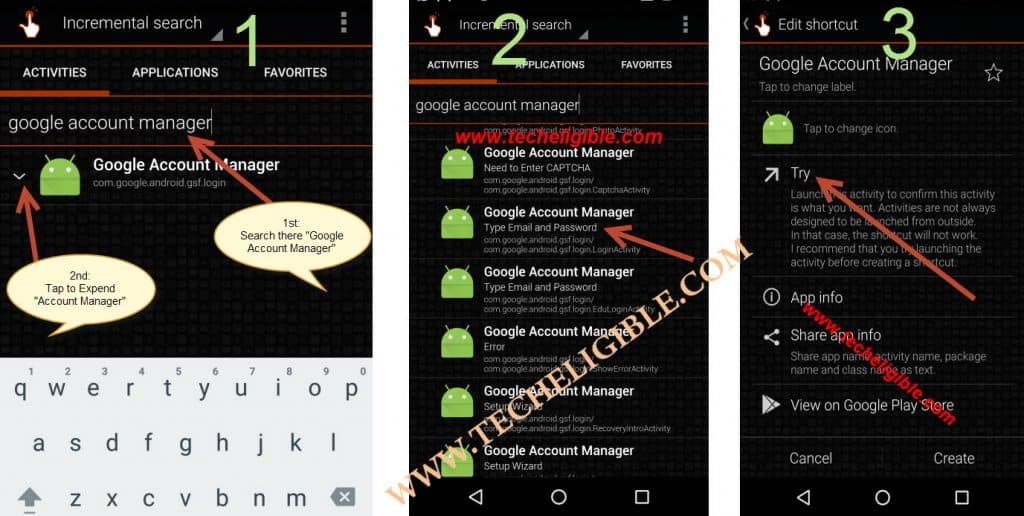
-Type in search box “Google Account Manager”, and from list of google account manager, select the one, that appears with “Type email and password“, and tap on “Try”.
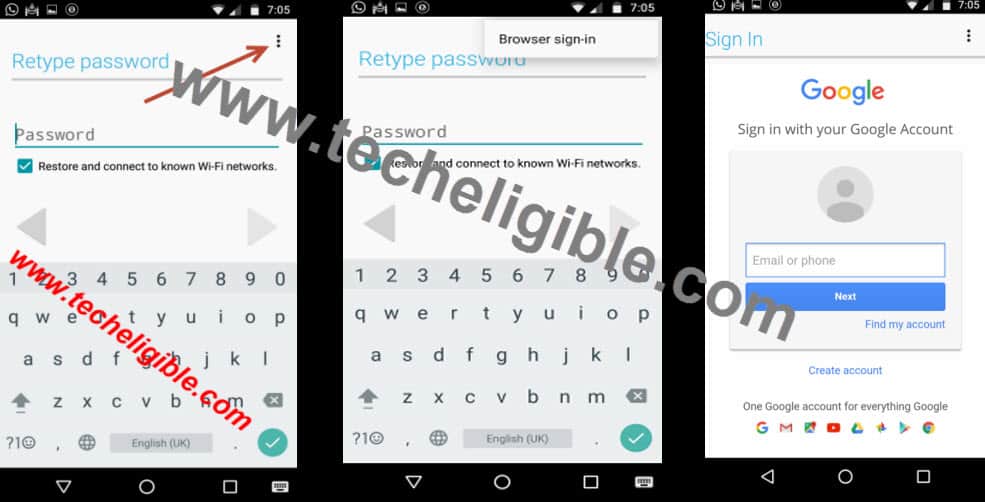
-After that you will be asked to “Retype Password”, from that screen, tap on top right side corner, and tap to “Browser Sign in”, now you will be taken to google chrome, from where you have to enter any your “Gmail Account”, see below images for more help
That’s it, you have successfully added your new Gmail account, and now its time to restart your device, after that, you will be able ot finish setup wizard without facing any google verification screen.
Related Questions:
How bypass frp Galaxy J2 Pro Android 7?
How to Bypass frp Galaxy J2 Prime?
