
Remove FRP Xiaomi Redmi Note 10 Pro EMUI 12.5.2 Without PC
Remove FRP Xiaomi Redmi Note 10 Pro by disabling and force stop 3 applications from the device, and then enable google play services while you see checking for update.. screen, i know you are not understanding what we are describing you here to remove frp, don’t worry, follow steps from below.
Warning: This method is for educational purpose only.
Why Do You Face FRP Lock ?
There could be many reasons of facing frp lock, but one of the most common reason is that, people do hard reset phone without knowing with what Gmail id this device is logged in, or you bought old/used device from mobile market without checking already signed in google account, and you don’t even know what Gmail account is added in this device, then you won’t be able to bypass “Setup Phone” popup screen until you sign in with previously synced Gmail ID, so in this condition, you will have to go Remove FRP Xiaomi Redmi Note 10 (EMUI 12.5.2).
Let’s Start to Remove FRP Xiaomi Redmi Note 10 Pro:
-Start with turning on device & Connect WiFi in redmi device.
-Go back to (Connect to Network) screen, and hit on “Add Network”.
– Type anything in SSID field, and long tap your typed words, and there you will have some options, just hit on “Download icon” same as shown in below image.
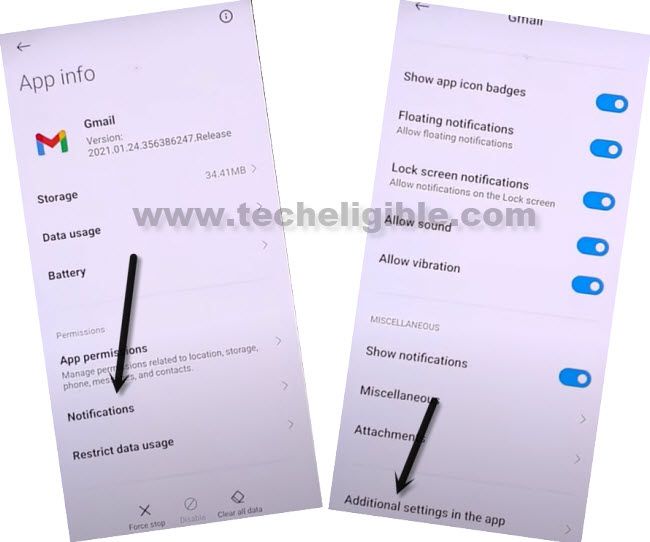
-Tap and hold at “Gmail icon”, and you will be redirected to the Gmail App info screen.
![]()
-> Notification > Additional Settings in the app.
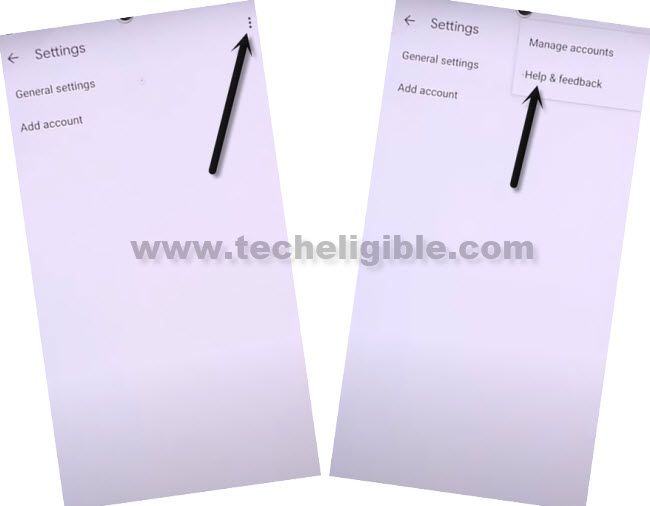
-> 3 Dots > Help & Feedback.
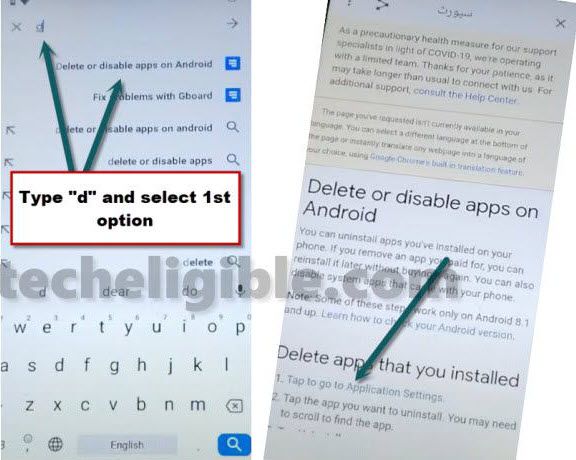
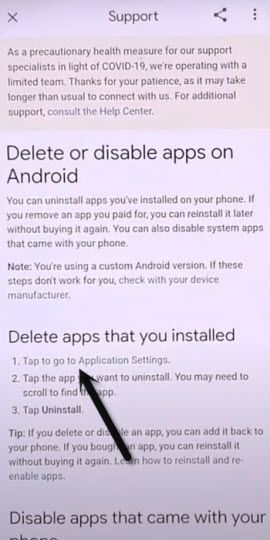
-Type text in search box “Delete or disable apps on Android”, and tap on that from the searched result.
-Go to the hyperlink “Tap to go to Application Settings”, this will open (APP list) for you.
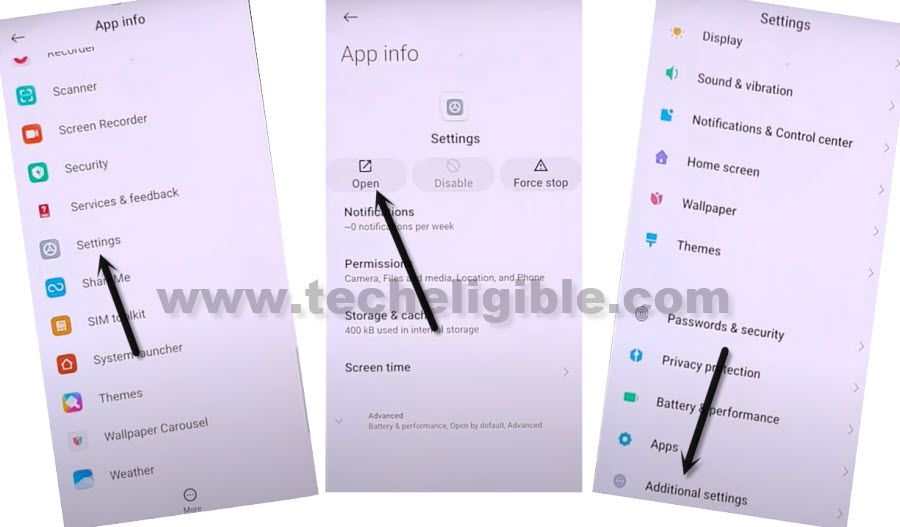
-From the App list, just find and tap to > Settings > Open > Additional Settings.
-Lets enable shortcut menu by tapping to > Accessibility > Accessibility MENU > Turn on (Accessibility Menu Shortcut) > Allow > Got it.
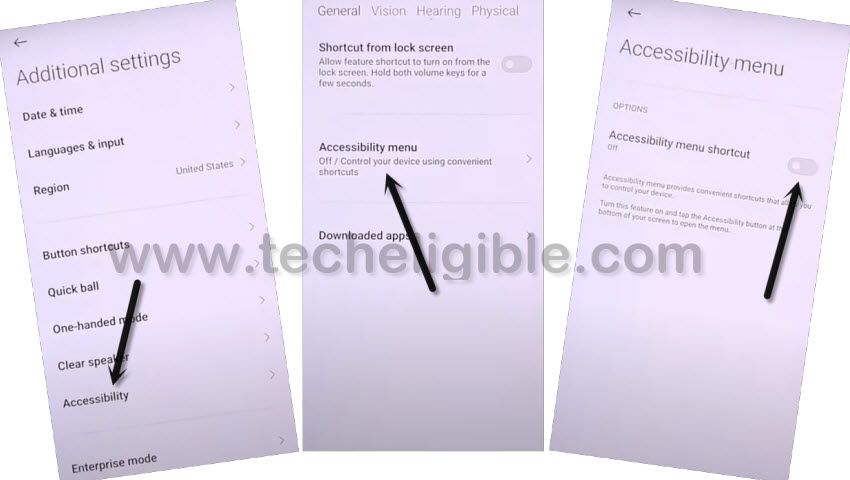
-There will be a (Human icon) at the bottom right corner, that means you have successfully enabled accessibility menu shortcut, and through this option, we will Remove FRP Xiaomi Redmi Note 10 Pro.
-Switch back to (Delete or Disable App on Android) homepage same as can be seen in below image.
-From there, hit again on hyperlink text “Tap to go to Application Settings”.
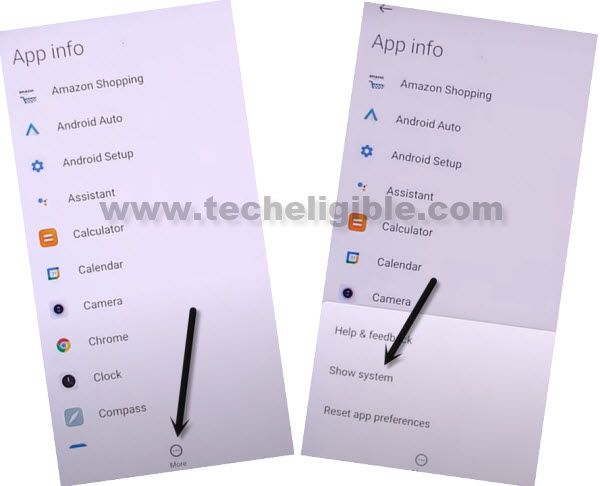
-From bottom center option, hit on > More > Show System.
Force Stop & Disable Apps:
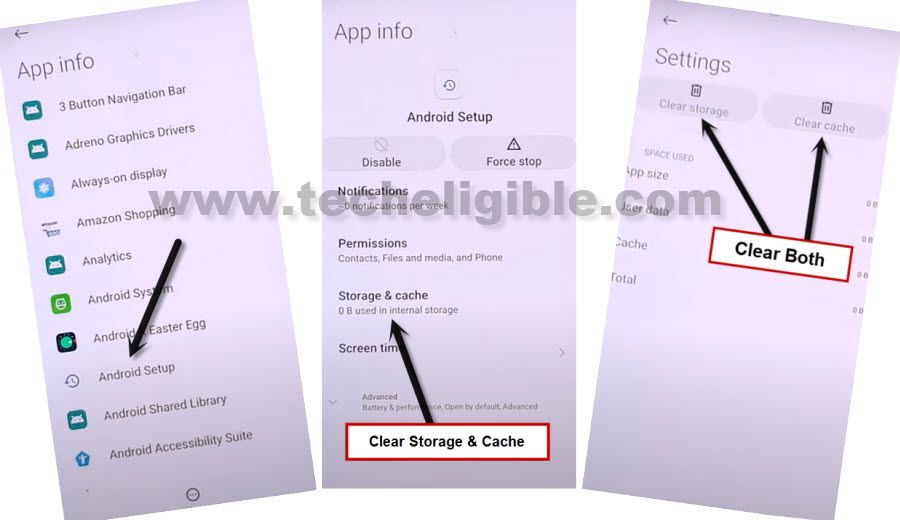
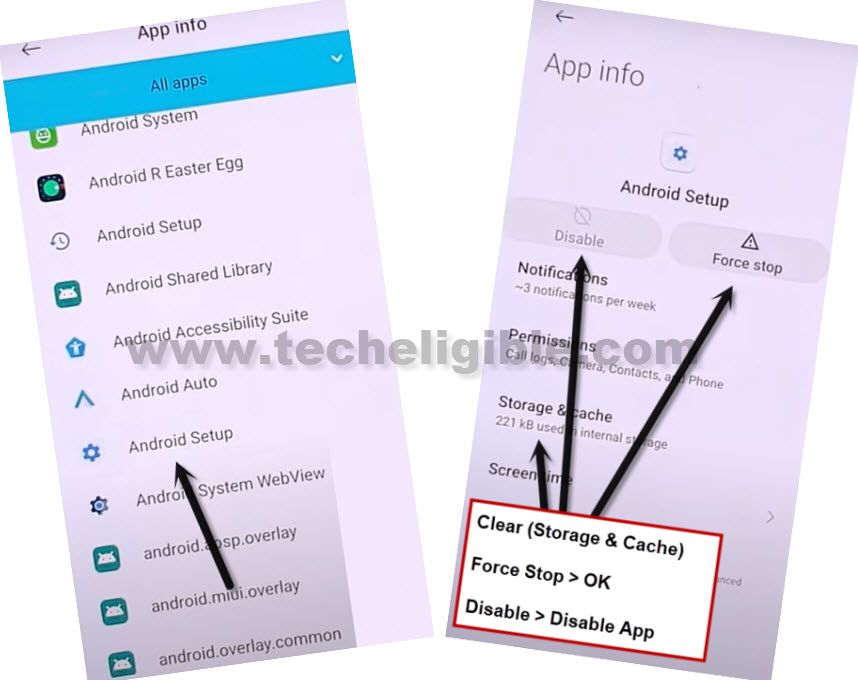
-First of all, go to > Android Setup > Storage & Cache > Clear (Both Storage & Cache).
-Tap on “Back Arrow” to go back to app.
-Tap on > Force Stop > OK, and then tap on “Disable > Disable APP”, again tap on “Force Stop > OK”.
-Get back to App list, from there tap on another “Android Setup”, and do same thing with that also, clear storage and cache, and then force stop, and Disable app. (See below image).
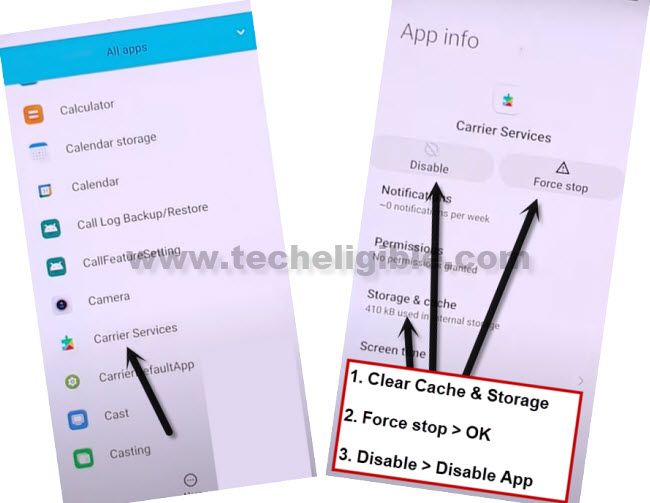
-Again go back to app list, find and tap on “Carrier Services”, and clear cache and storage, and afterwards, tap on > Force Stop > OK, and then tap on “Disable > Disable APP”, again tap on “Force Stop > OK”.
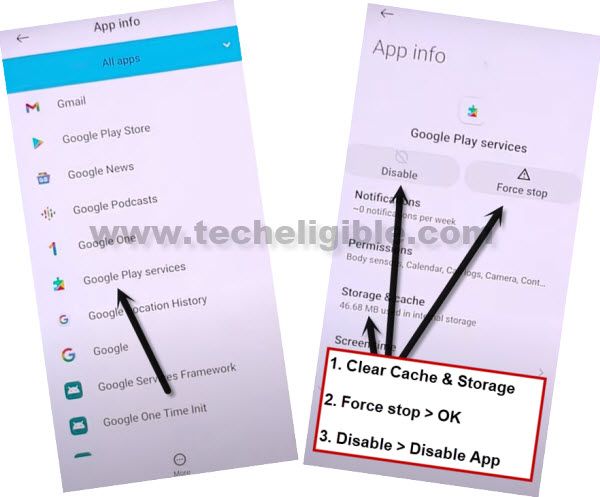
-Go back to app list again.
-From there, just just tap to > Google Play Services > Storage & Cache > Clear (Both).
-Tap on > Force Stop > OK, and then tap on “Disable > Disable APP”, again tap on “Force Stop > OK”.
-We have successfully disabled and force stop, and also clear cache and storage of total 4 apps from here to Remove FRP Xiaomi Redmi Note 10 Pro.
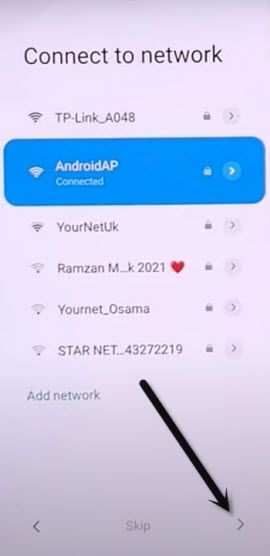
-Get back to (Connect to Network) screen by tapping at back arrow.
-Once you accessed to connect to network, just hit on “Next Arrow” icon.
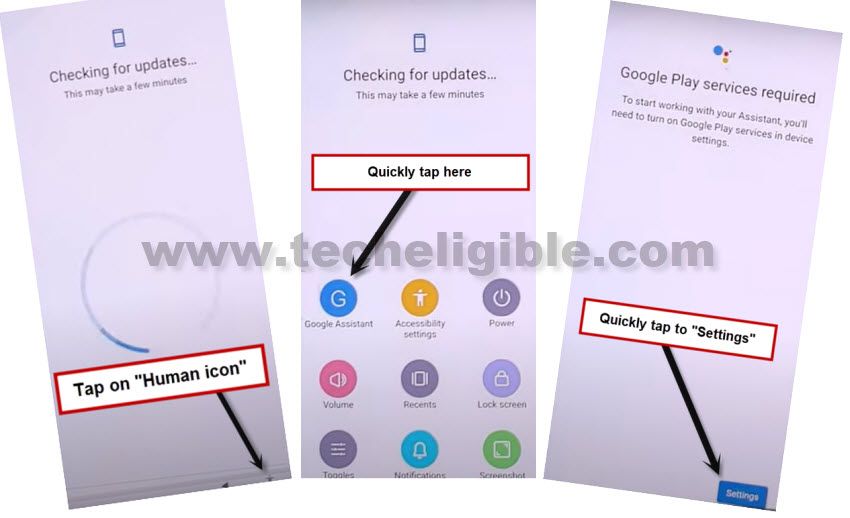
-Now wait until you see (Checking for update…) screen, quickly tap on > Human icon > Google Assistant > Settings.
Note: You will have to do this very fast and quickly, and you will be able to access (Google Play Services) homscreen at 3-4 attempts.
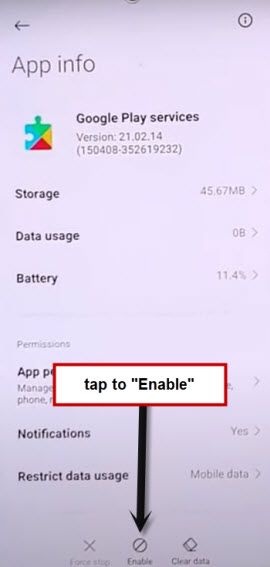
-Let’s enable app by tapping on “Enable” to enable google play services.
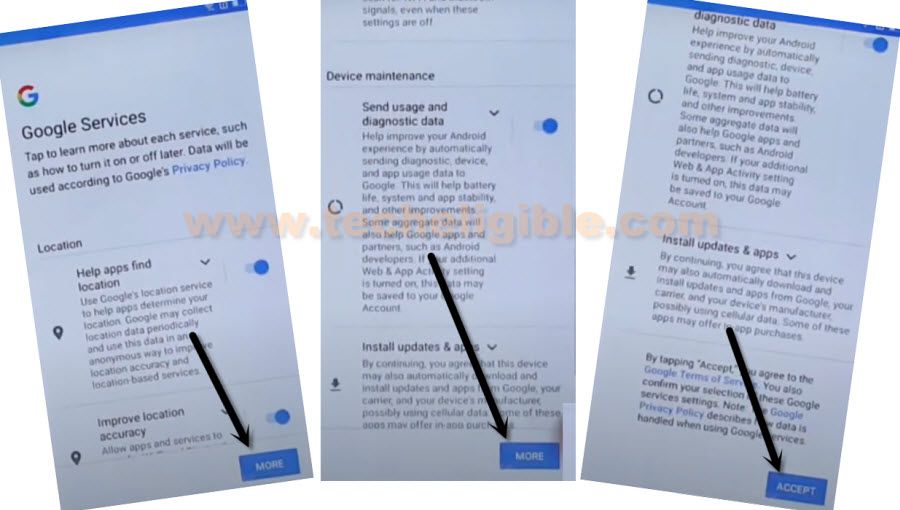
-Tap one time on “Back Arrow”, and there you will see (Google Services) screen.
Note: If you see “Pattern Lock” screen, just don’t worry, hard reset your device, and repeat all steps.
Go to > More > Accept.
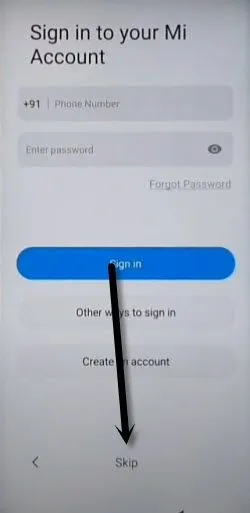
-From (Sign in to your Mi Account) screen, just Hit on > SKIP > SKIP
Hit on > Skip this step > Next Arrow > Next Arrow > Next Arrow.
Read More: