2 Methods to Bypass Google FRP Galaxy A31 Android 11, 10 [UPDATED]
This is the best way to Bypass Google FRP Galaxy A31 Android 11, 10, if you don’t remember your previously added google account, so you can try this method to bypass frp easily without using any paid tool.
Disclaimer: This method is for educational purpose only, try this method only on your own phone, do not try this method on stolen phone, this is a serious crime, if you are trying to unlock stolen phone, you may also be jailed.
List of Available FRP Methods:
| Method 1: Remove FRP Galaxy A31 Android 11 (New) |
| Method 2: Remove FRP Galaxy A31 Android 10 |
Method 1: Bypass Google FRP Galaxy A31 [Android 11]
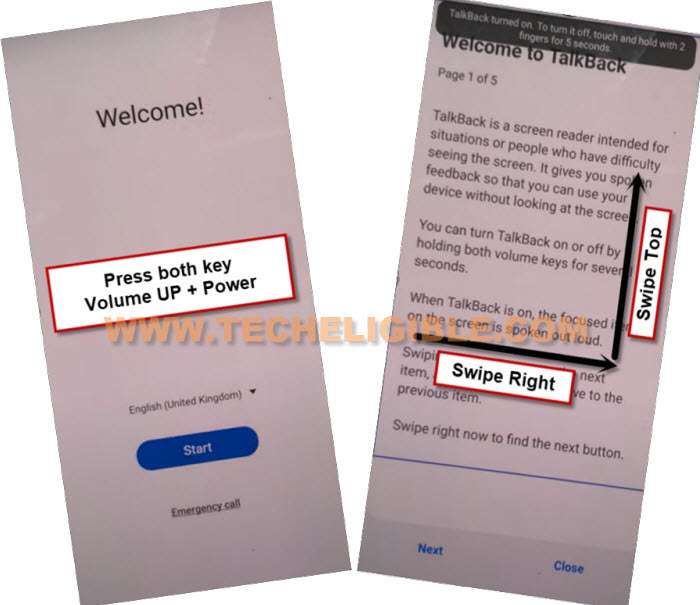
1. Connect WiFi & Get back to first homescreen, enable talkback just by long press both buttons (Volume UP + Power) simultaneously.
2. Hit on “USE” option from the popup window which will appear right after you long hold keys.
Note: In case, if you are unable to turn on talkback, so try with long press both (Volume UP/Down) keys, if this works, then use these keys to turn on or turn off talkback instead of (Volume UP + Power), even then, if you are failed to turn on talkback, then you will have to use your PC to launch browser directly, for that click here to launch browser via PC.
3. Long press both buttons (Volume UP + Power) buttons, and you will see popup flash message of (Talkback turned on….), that means, now we can easily move forward.
4. You have to draw “L” shape by swiping on screen from right to left, and then swipe top. (See below image).
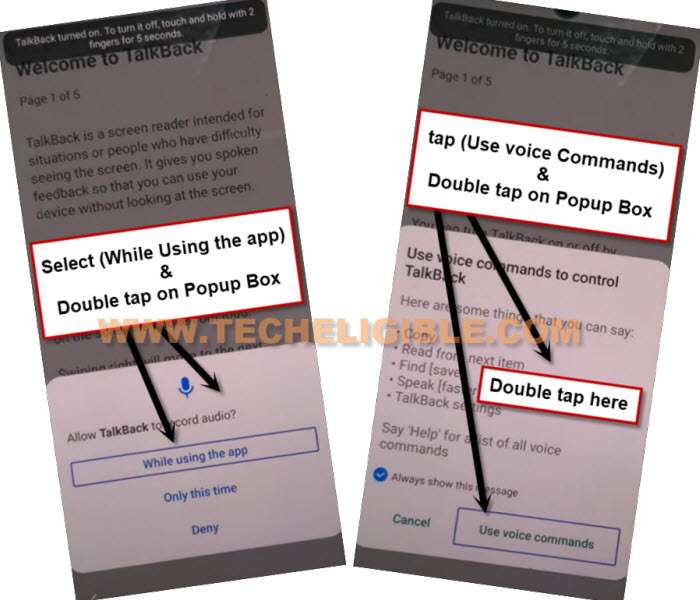
5. From the popup window, select only “while using the app”, now double tap on anywhere on screen.
6. Tap once on “Use Command Voice” option, and again double tap on popup box.
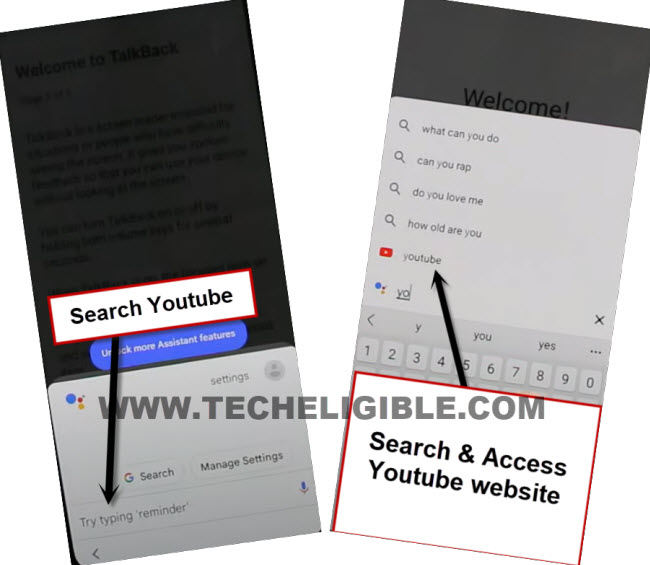
7. Lets open google assistant by Speaking loudly (Google Assistant).
8. Long press both buttons (Volume UP + Power) to just turn off talkback feature, if these 2 keys do not work for you, so press both (Volume up/down) keys, and the talkback will turn off successfully.
9. Go to “Keyboard” icon same as shown in below image.
10. Search “You”, and hit on “Youtube” icon from searched result to be redirected to Youtube website.
11. You will see a human icon at top corner, just tap on that > Profile icon > Settings.
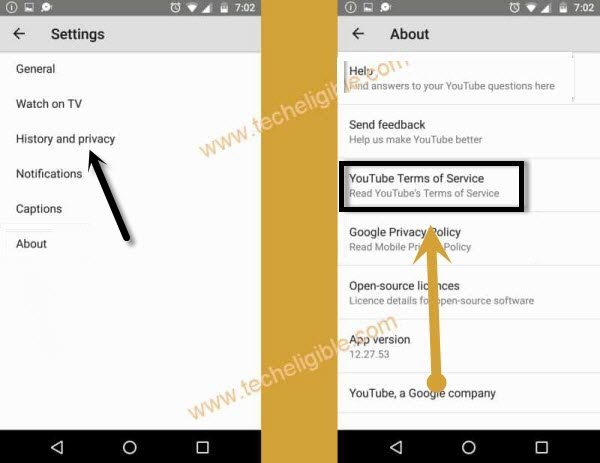
12. Tap to > History and Privacy > Youtube terms of service.
13. Go to > Accept & Continue > No Thanks.
Open Galaxy Store to Bypass FRP:
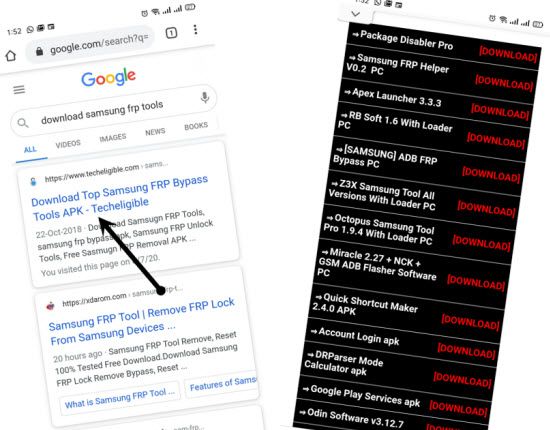
14. Search google chrome browser “Download Top Samsung FRP Tools“, and visit our website searched result.
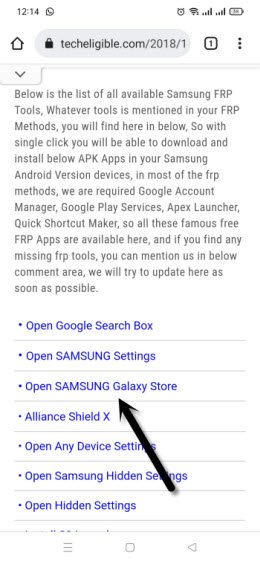
15. Scroll down and tap on “Open Samsung Galaxy Store“.
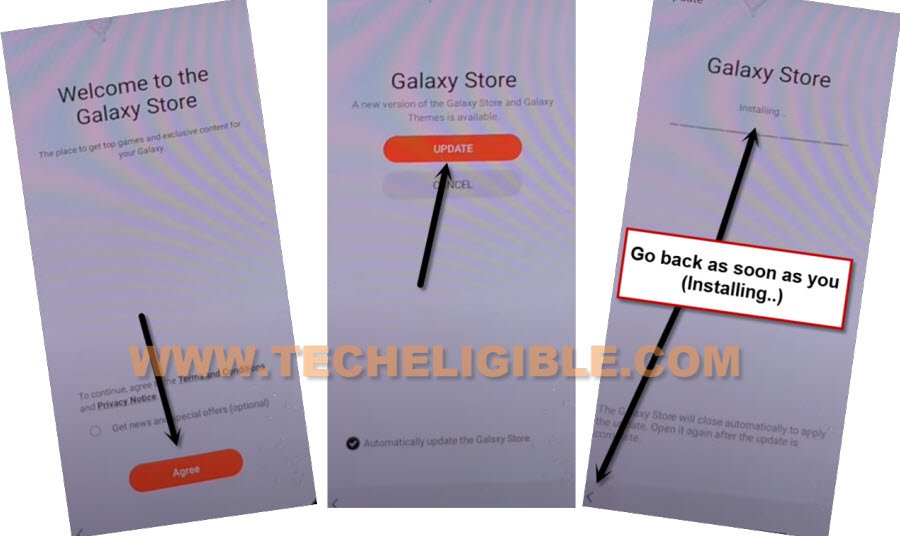
16. Select “Get news and Special Offer”, and then tap to “Agree” option.
17.You will have galaxy store update screen, tap on “Update”, just wait, as soon as you see “Installing…” screen, quickly tap on “Back Arrow” from bottom left corner before the installing finish.
Note: Do not let installing.. process complete, just tap on “Back Arrow” as soon as you see “Installing..”.
18. You will see there galaxy store has opened, but wait for 1 minutes, you may could see again (downloading…) screen, if you see again, just wait there, hit again on back arrow as soon as you see “Installing….”, and you will get back to “frp tools” page.
19. Tap again on “Open Samsung Galaxy Store” again, and this time without updating, you will reach inside Galaxy Store.
20. Tap to > Continue > Skip.
21. Give some app permissions by tapping on > While Using the app > English.
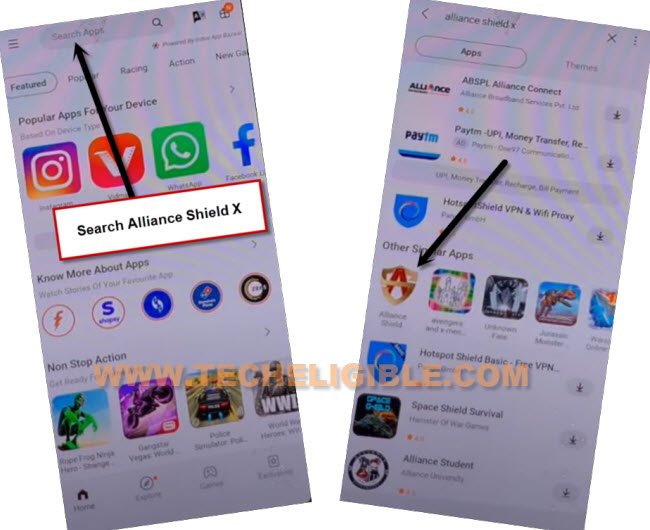
22. Type in search box “Alliance Shield X”, and then tap to “Alliance Shield X” app icon.
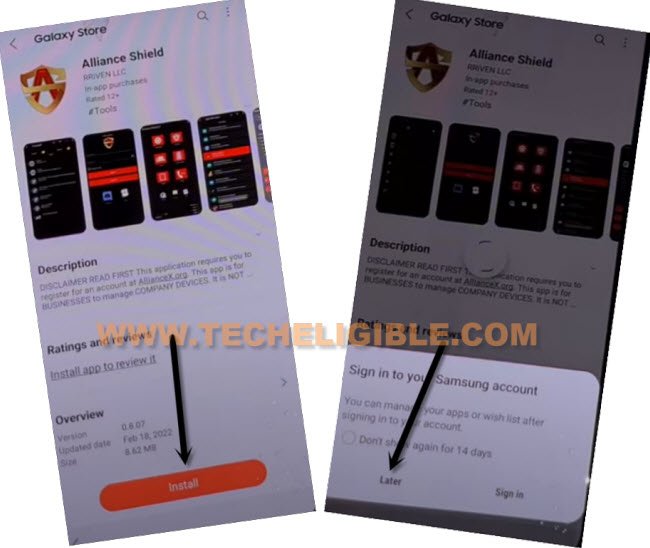
23. Tap on “Install”, and hit on “Later” from sign in window to Bypass Google FRP Galaxy A31 Android 11 without restore and Samsung Account.
24. Tap to “OPEN” button to reach Alliance Shield X app, if you don’t have an account, so you can register new account by tapping on “Resister” option, otherwise just sign in.
Turn on ADB + MTP Option:
25. If you don’t own any Alliance Shield x account, so you can Register your new account to login with.
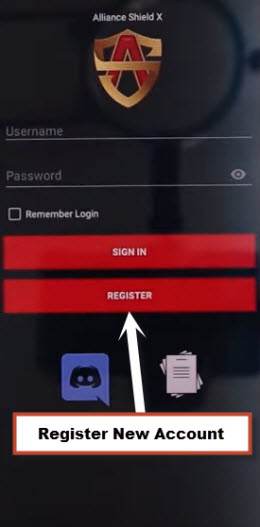
26. Sign-in with your registered account in (Alliance Shield X) app, after that, give any device name, and tap “Next”.
27. Turn on “Device Admin”, and hit on > Activate > Next.
28. Turn on “Knox”, and select option (i have read and agree…), and tap to > Confirm > Next > Finish, now hit on “App Manager”, and then tap “Close”.
29. Tap to “Search icon” from top corner, and search there “Mode”, and tap to “Service Mode” from list.
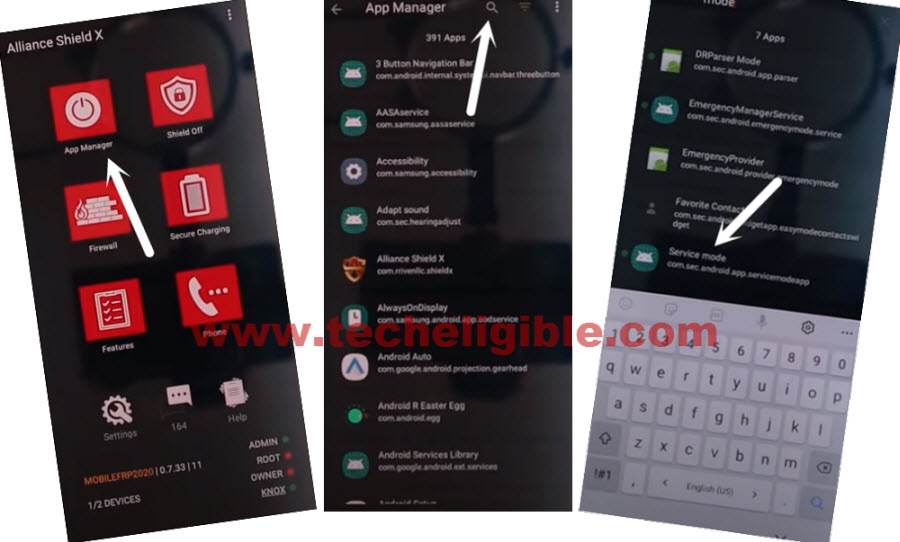
30. From top tab, hit on “Activities”, go down and tap 3rd last option (com.sec.android.app.modemui.activities.usb.settings).
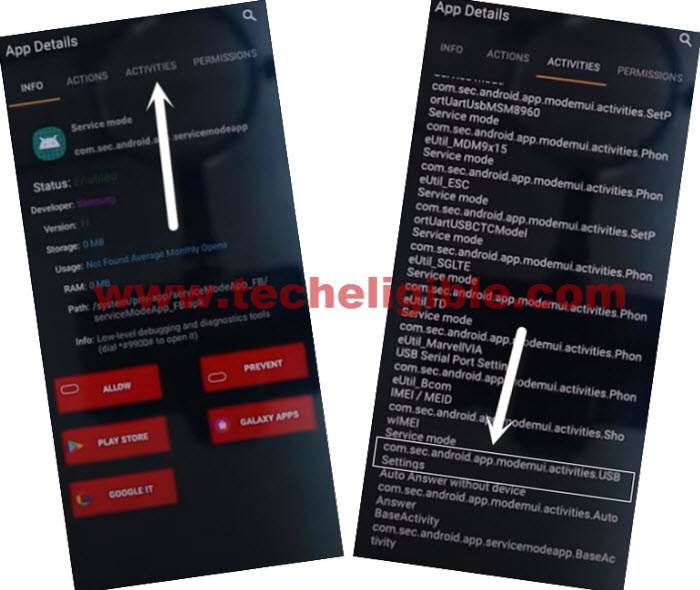
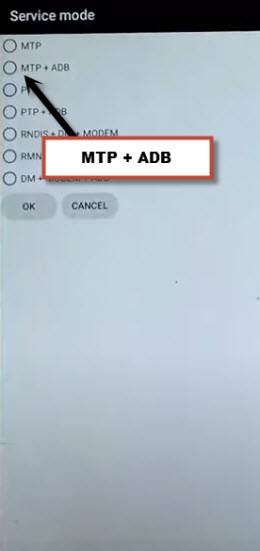
31. Tap again on (com.sec.android.app.modemui.activities.usb.settings), and again hit on “OPEN”, and then select (MTP+ADB).
Note: If you cant enable “MTP+ADB”, you can easily enable that from outside, as soon as you hit on 3rd option from the last, you will see popup window, just tap on “Enable” option from there instead of “Open”.
Use Samfirm Tool:
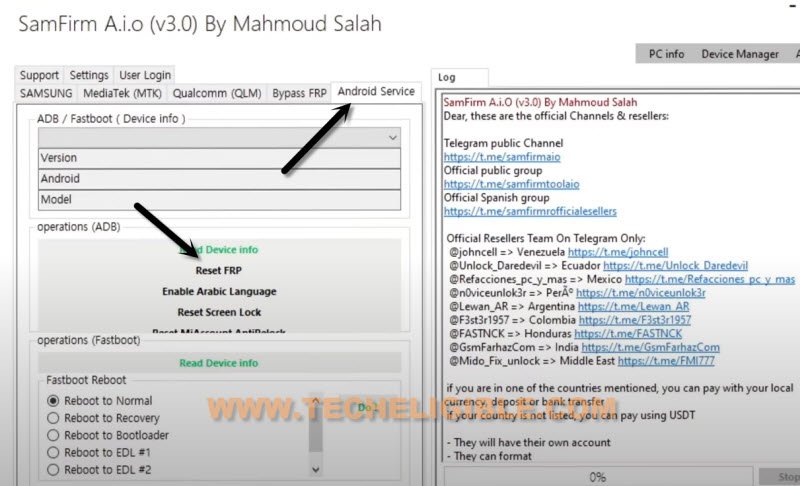
32. First download Samfirm too in PC.
⇒ Samfirm Tool. V3.0 [DOWNLOAD]
33. Connect Galaxy A31 device with PC, connect WiFi also in your device.
34. Open Samfirm tool, and go to > Android Service > Reset FRP.
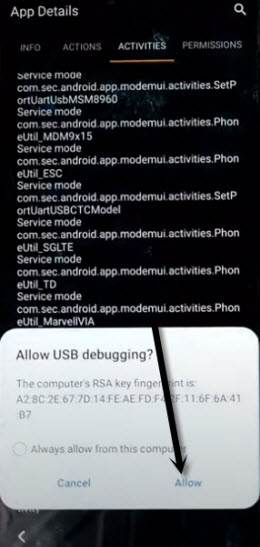
Note: You will have (Allow USB Debugging) popup window, just tap to “Allow” button from Samsung A31.
Method 2: Bypass Google Account on Galaxy A31 [Android 10]
To Bypass frp on Android 10 without Bluetooth Headphone or Pods, we will download and install Samsung Browser, and from there we can add New PIN using Secure folder option, to understand all these steps easily, just follow below process carefully, and do not miss any step. You are required a WiFi connection and PIN locked SIM card.
⇒ Connect to WiFi > Go to “Verifying your Account” screen > Tap to “Email or Phone” tab > Tap to “Settings gear icon”.
⇒ Go to > Swipe, Touch and Feedback > Touch Feedback.
![]()
⇒ Tap to > Sound & Vibration > Ringtone > SIM 1.
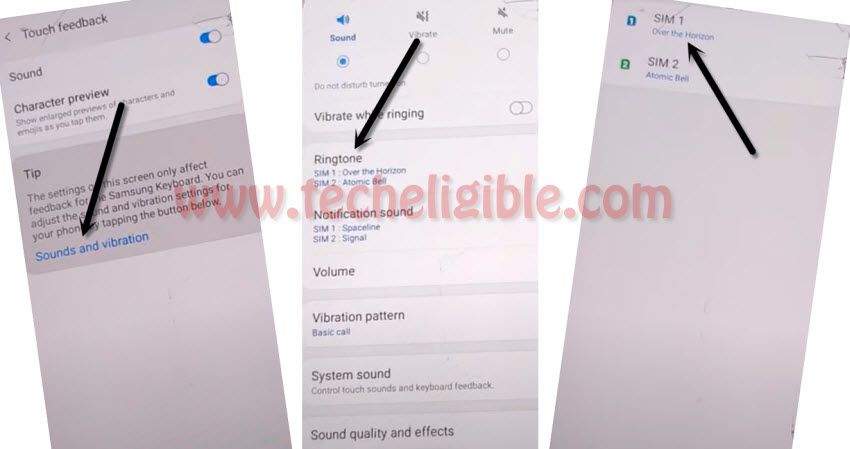
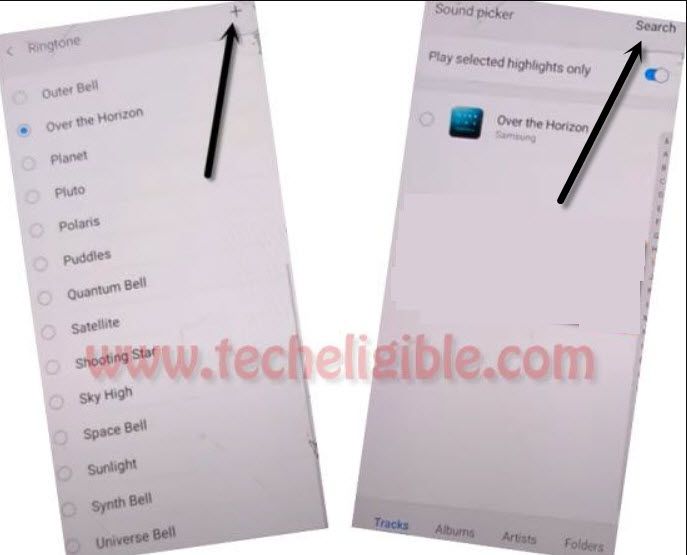
⇒ Afterwards, Hit on “+” sign from top right corner, and then Hit on “Search”.
⇒ Lets insert (PIN Locked SIM) in your Samsung Galaxy A31 Android 10.
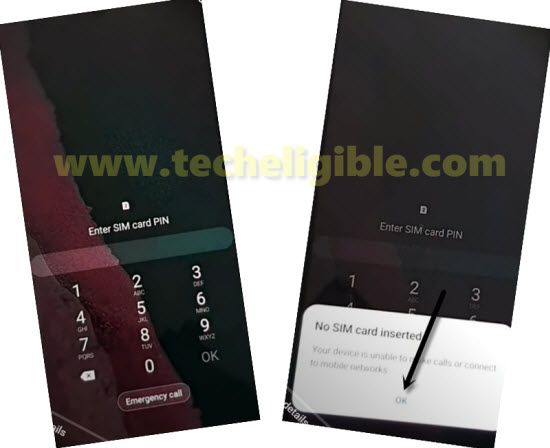
⇒ After inserting SIM, wait 2-3 seconds & Start Tapping on “Mic icon” until you have a screen of “Enter SIM Card PIN”.
⇒ Popup or Remove SIM tray.
⇒ Tap on “OK” from “No SIM Card inserted” popup window.
Apply Below 3 Steps Very Fast:
1st: Quickly Swipe date & time to right side, keep tapping on that (Date & Time).
2nd: Using other finger, drag down “Lock icon“.
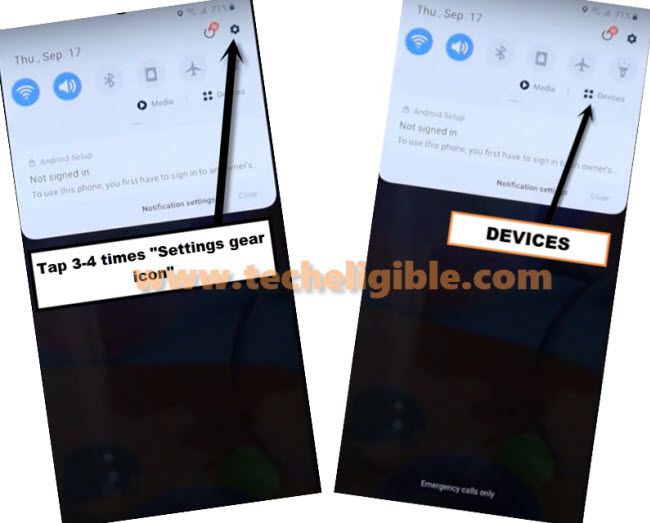
3rd: Tap on “Settings gear icon” from top right corner of the notification bar.
Note: If you have (Previous Screen), where from we hit on “Mic icon” in the background of “No SIM Card inserted” popup window, so try again, if this screen appears each time, then you will have to restart your phone and try again. (See below image).

⇒ Congrats, the hard part of this process we have crossed successfully, now go ahead and follow easy steps.
⇒ Tap to “Devices” from notification bar.
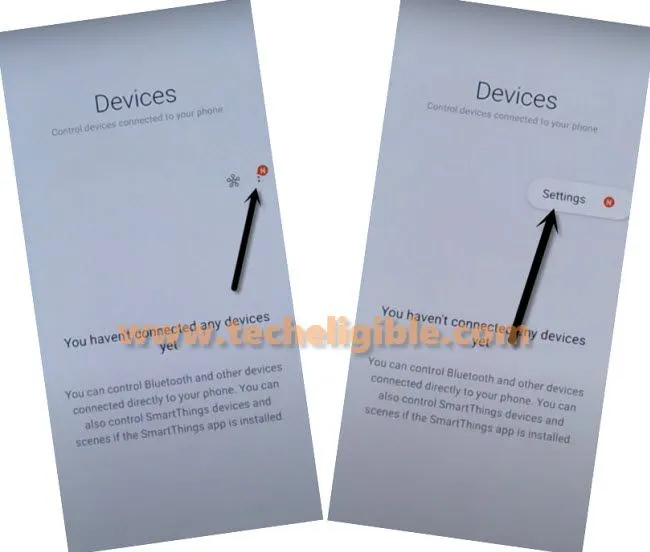
⇒ Now tap to > 3 dots > Settings.
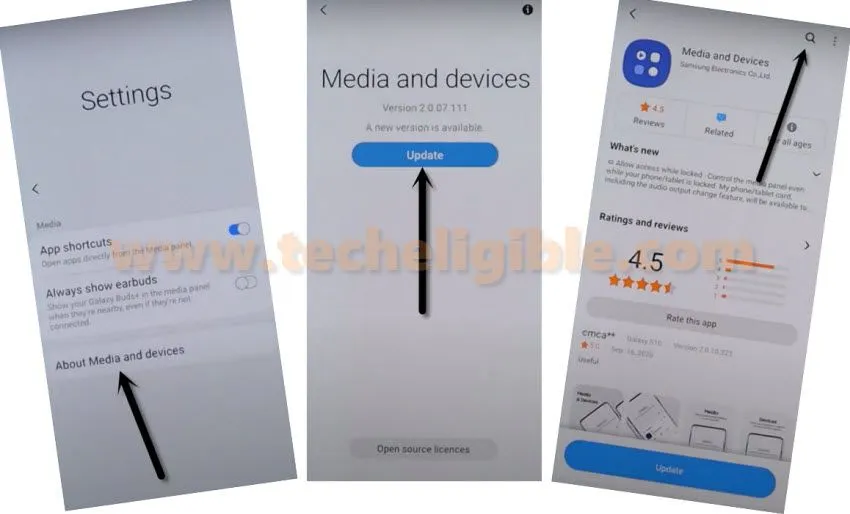
⇒ After that, tap to > About Media and Devices > Update > Search icon.
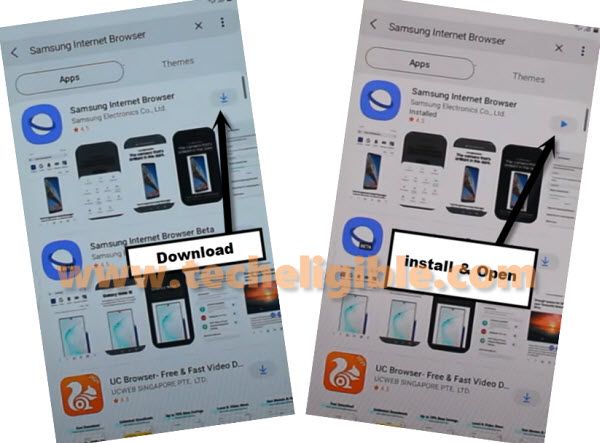
⇒ Search there “Samsung internet browser“, and then tap on (Samsung internet browser) from searched result.
⇒ Tap to “Download icon”, and once downloading finish, tap to “OPEN” icon. (See below image).
⇒ Check mark (i agree to help Samsung …..), and then tap to “Continue”.
⇒ Tap to “Not Now” from popup window.
⇒ Tap on > Google icon > MENU icon.
⇒ Tap on > Maps > Map icon.
⇒ Tap to “SKIP” from top right corner.
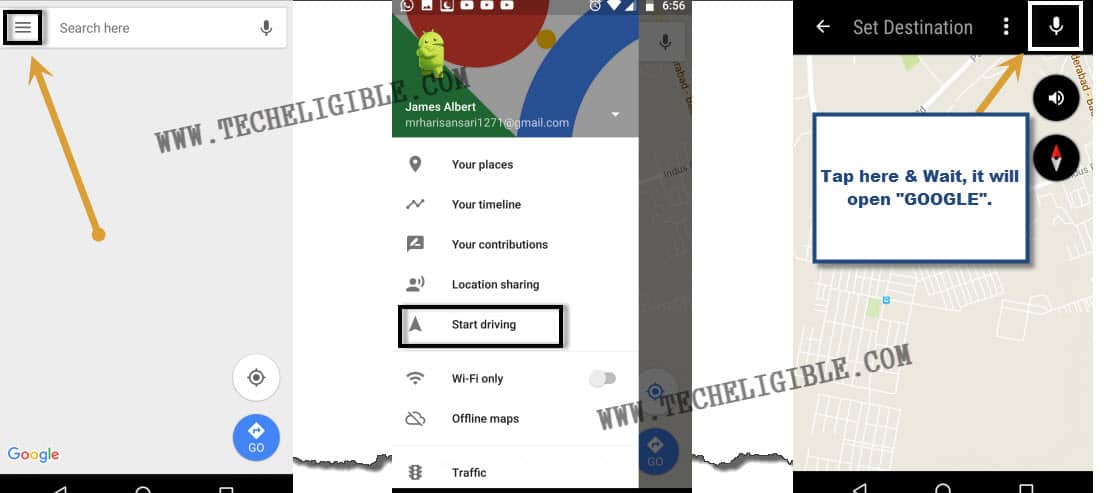
⇒ Now tap on “MENU” icon from top left corner, and then tap to > Starting Drive > Got it > No Thanks.
⇒ Tap on “Mic” icon from top right corner.
⇒ Speak loudly “Open Settings”.
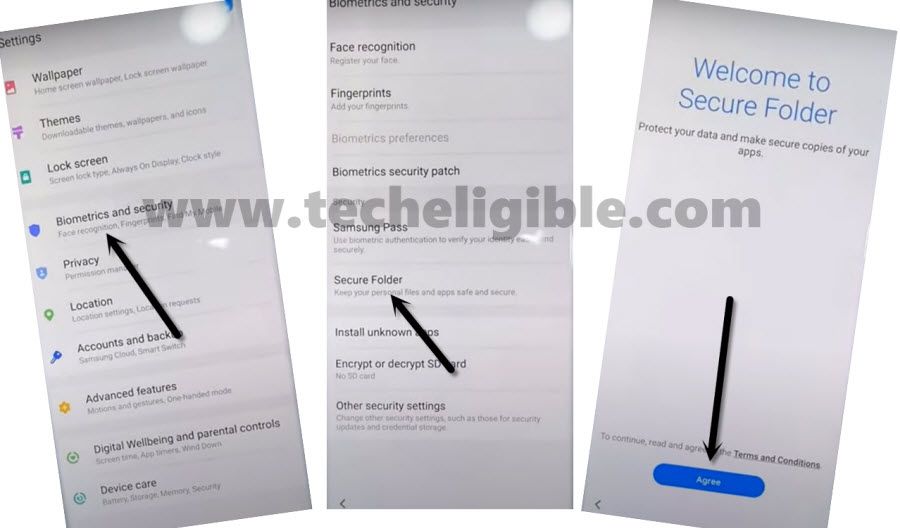
⇒ This will open your Galaxy A31 Settings for your.
⇒ Now we can easily add our new PIN to DEOTAT
Add New PIN in Galaxy A31:
⇒ Tap to > Biometrics & Security > Secure Folder> Agree.
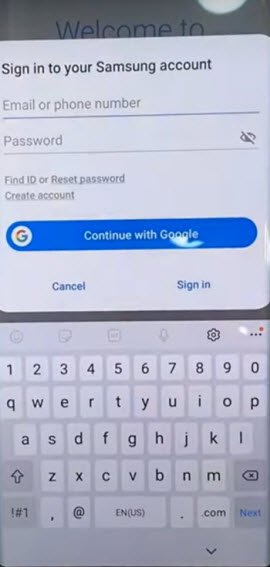
⇒ Sign in to your any Gmail Account.
⇒ Check mark the option (i have read and agree all of the above), and then tap to “Agree”.
Note: A verification code will be sent to your Gmai Account connected device etc, just verify that to sign in successfully.
Note: If you see a popup window of (Want a faster way to Sign in), just tap to “Cancel”.
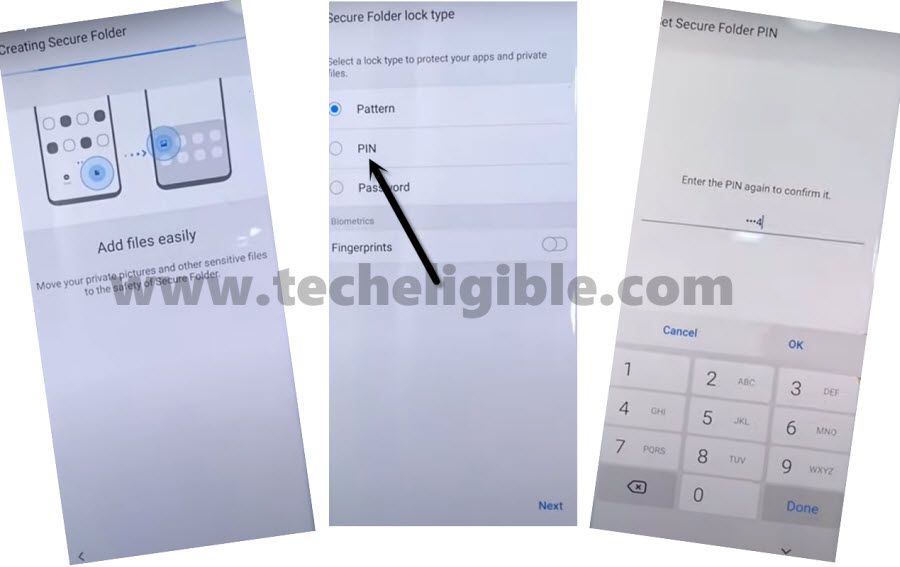
⇒ After that, it will start to create secure folder for you, just keep patience.
⇒ You will be asked to setup PIN Code.
⇒ Tap to > PIN > Next.
⇒ Setup your pin code 1234.
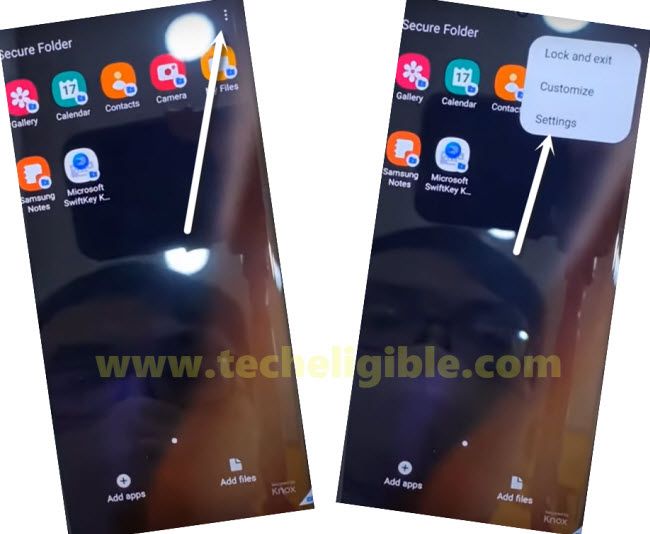
⇒ Tap “3 dots” from top right corner, and then tap to “Settings”, and then tap to “Lock Type”.
⇒ Give the same “1234” pin and then tap to “Next”.
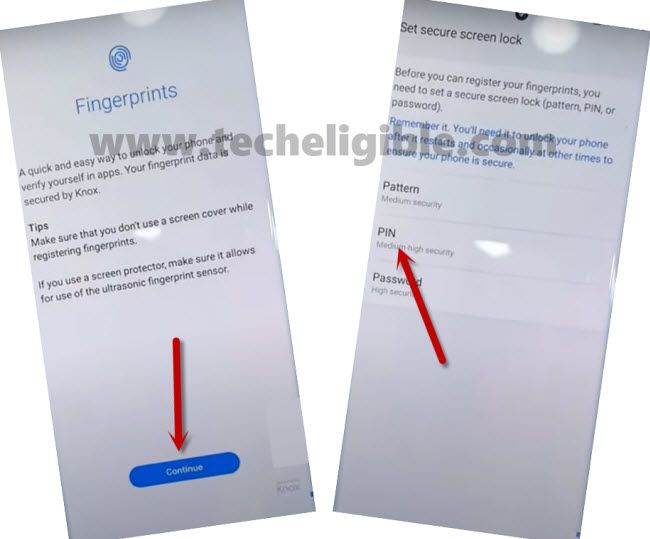
⇒ Enable “Fingerprints” option from the last, and then tap to “Continue”.
⇒ Select “PIN”, and again setup your pin code (1234).
⇒ Now it will ask you to setup your fingerprints as well, just tap on “Back Arrow”.
⇒ From there, tap on > More Settings > Uninstall > Uninstall.
⇒ Get back to “Lets Go!” screen by tapping at Back Arrow several times.
⇒ Finish your SETUP Wizard, and give same pin that you have already entered to Bypass Google FRP Galaxy A31, thank you for visiting us.
Read More:
⇒ Remove FRP Galaxy A32 (Android 11)


