2 Methods to Bypass FRP Galaxy C9 Pro Android 8,7,6 Without PC
We have 2 methods here for different version devices to bypass frp Galaxy C9 Pro Android 7, Android 8, you can follow up any method which is relevant to your device android version, and bypass frp right now without using computer or software and sign in up with new google account, all steps can be followed from below.
Note: We highly recommend you to apply this method only on your own device, if you are not owner of this Galaxy C9 Pro device, or you found this from some where, you must return this device to its real owner.
| Method 1: Remove FRP Samsung C9 Pro [Android 8] New |
| Method 2: Remove FRP Samsung C9 Pro [Android 7] |
Method 1: Bypass FRP Galaxy C9 Pro [Android 8]
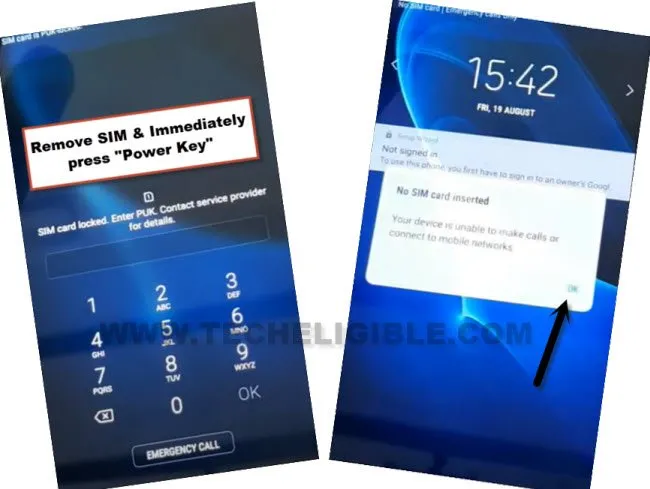
-Prepare a PIN locked SIM card using any other android phone, after that insert PIN locked SIM card in your Galaxy C9 Pro device.
-Now you will see Passcode typing screen, just remove SIM tray, and immediately press “Power Button”.
-Press Power button again to wakeup the screen, and there you will have (Not Signed in) homepage, tap to “OK” from no sim card inserted popup box.
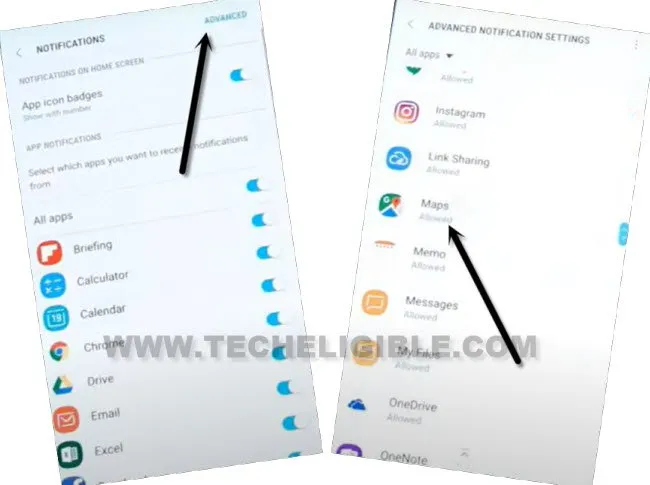
-Swipe Right or Left (Not Signed in) message, and tap to “Bell icon”, and then go to “Notification Settings”.
-Tap to “Advanced” from top corner and then go to “Maps” from app list.
-Hit on “in app notification settings”, now the map app will be launched.
-Hit on “Skip” from top right, and then tap to “Back Arrow” from top left corner.
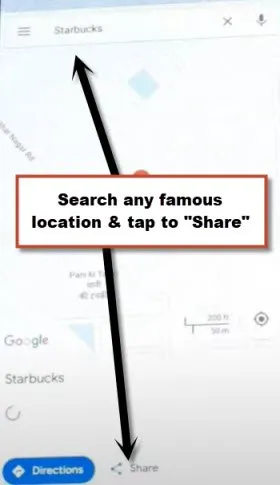
-Type any famous “Hotel or Restaurant” name top search area of the map.
-Tap on “Share” from bottom.
-Tap to “Message” icon from popup box.
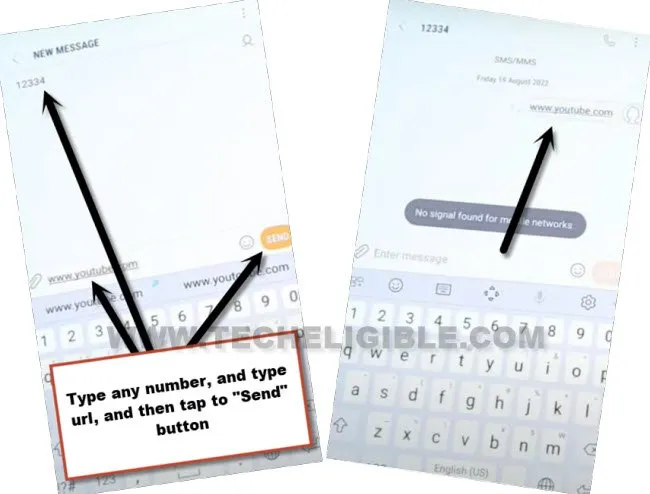
-Type message “www.youtube.com”, and then give number “123456” in top recipient field tab, now tap to “Send” button.
-The link will turn to blue hyperlink, just tap on that youtube link to launch youtube website.
Note: If you are failed to open youtube link, just go back to MAP app, and search new location and try again from message app to send message with youtube link.
-Samsung internet browser will be launched, now tap to “Start”, and then tap on “Cancel” from update Samsung internet popup message.
Download FRP Apk Applications:
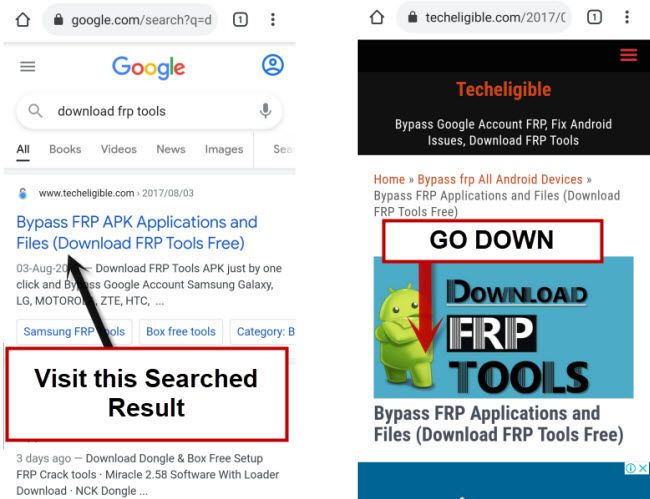
-Congrats, we are now inside Samsung internet browser, just search in top search box “Download FRP Tools“.
-Visit our website searched result.
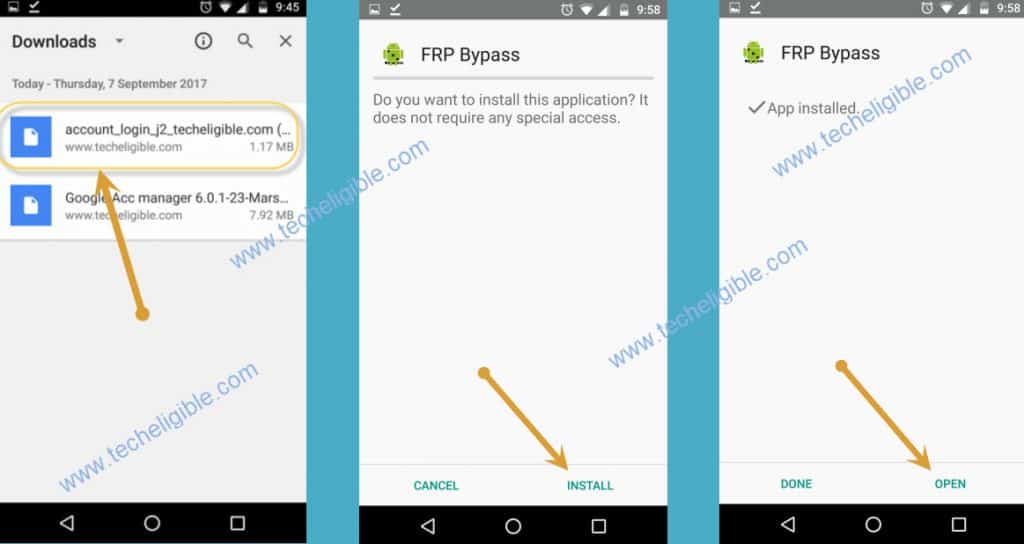
-Download from there 2 apk apps “Google Account Manager 6.0 and also Account Login” app to Bypass FRP Galaxy C9 Pro.
-Download google account manager according to your device android version, if your device android version is 7, go for (Google Acc Manger 7), if its 8, go for (Google ACC Manager 8) and so on.
-Downloads “Account Login” app too.
-After downloading process completes, tap to “Bookmarks > History > Downloads History”.
Note: If you do not see (Bookmarks) at bottom, just get back to screen where you typed “Yout”, from that screen you will be able to get (Bookmarks) icon at the bottom.
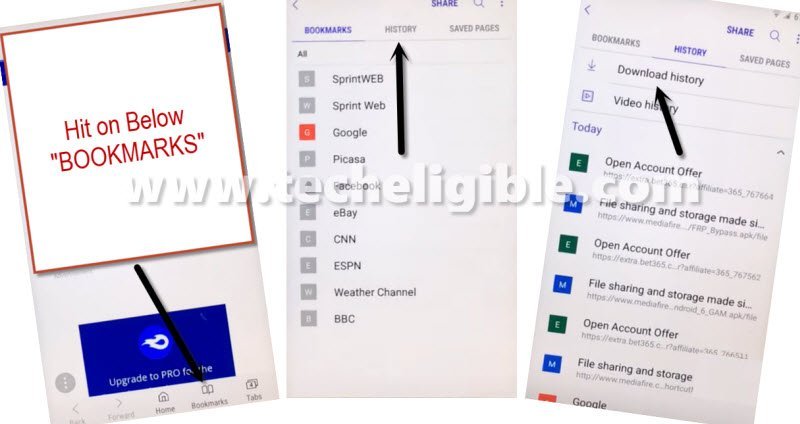
-There you will be able to see both downloaded applications, just tap at “Google Account Manager 6“.
-You will get a popup message of Samsung internet, just tap to “Settings”, and turn on button “Allow from this sources”.
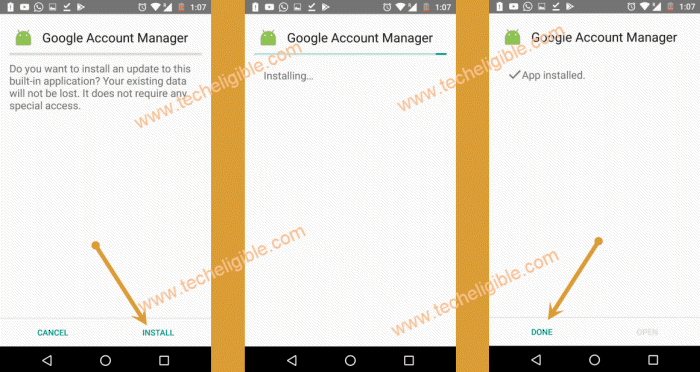
-Tap on “Google Account Manager” and install it.
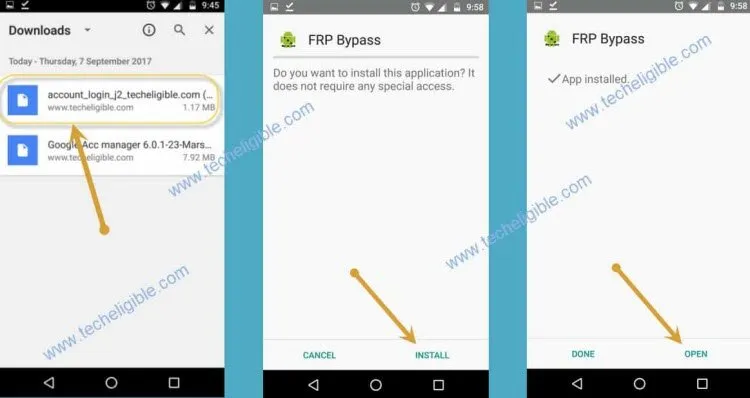
-After that, go back, and then tap on “Account Login”, and then tap on “Install”, once the installation finish, just tap on “OPEN”.
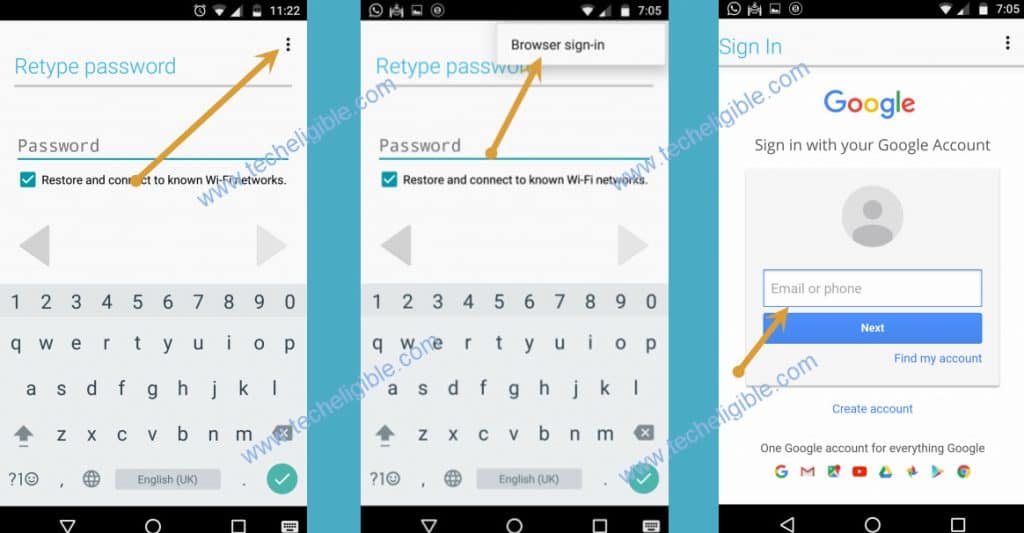
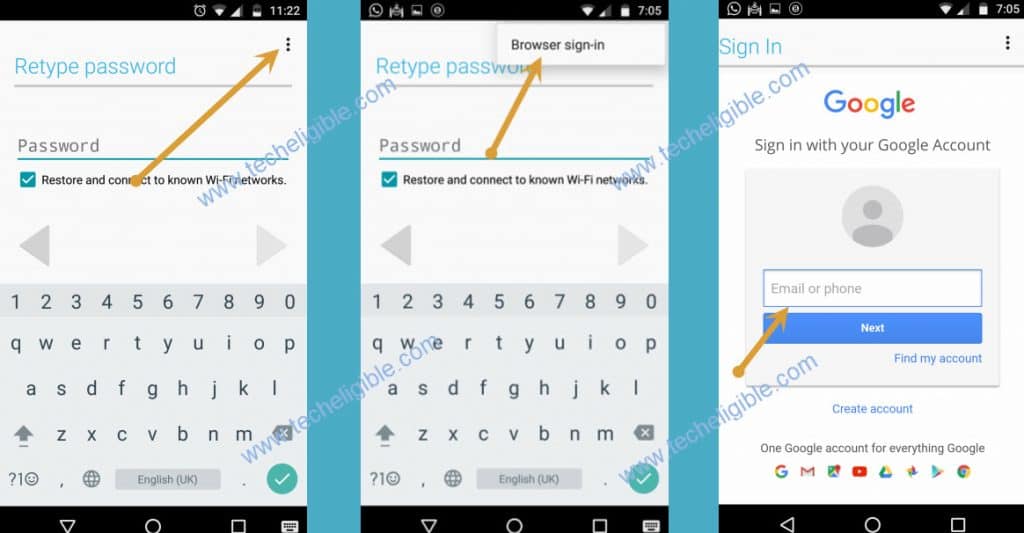
-Go to > 3 dots > Browser Sign-in > Login with any active Gmail account to bypass frp account.
-Now restart your device, and finish setup wizard again, this time you will not face any google sign in verification screen, because new acc has already been logged in, and your device has been setup with new google account for frp protection, thanks for visiting us.
Method 2: Bypass Google Account on Galaxy C9 Pro Android 7
Bypass FRP Galaxy C9 Pro Android 7.1.1, if you have forgotten your Gmail account, or you bought used device, so you came at right place to bypass google verification of galaxy C9 Pro. you need to downgrade android version before removing frp lock, otherwise you may face difficulty while removing frp lock on android 7.1.1. All steps have been described below on how to downgrade android version, and How to Bypass FRP.
Note: This method has been applied successfully on Galaxy C9 Pro Android 7.1.1 (SM-C900F).
Downgrade Galaxy C9 Pro Android Version:
-First of all, you need to downgrade android version to bypass frp lock.
-Click below link to “Downgrade C9 Pro Android Version” from Nougat to Marshmallow.
-You may lose your all data while following this method.
Downgrade Android Version
-Once you successfully downgrade android version to android 6.0, now you can easily Bypass FRP from your device C9 Pro device..
Let’s Start to Bypass FRP:
• Switch on Device.
• Connect Wi-Fi to Bypass FRP Samsung Galaxy C9 Pro.
• From “Wi-Fi” screen, go down and tap on “Add Network”.
• Type there any random text e,g “Techeligible“.
• Long tap on your typed text so that (Cut, Copy, Assist) options appear up.
• Tap on “ASSIST” and wait until “Google” open.
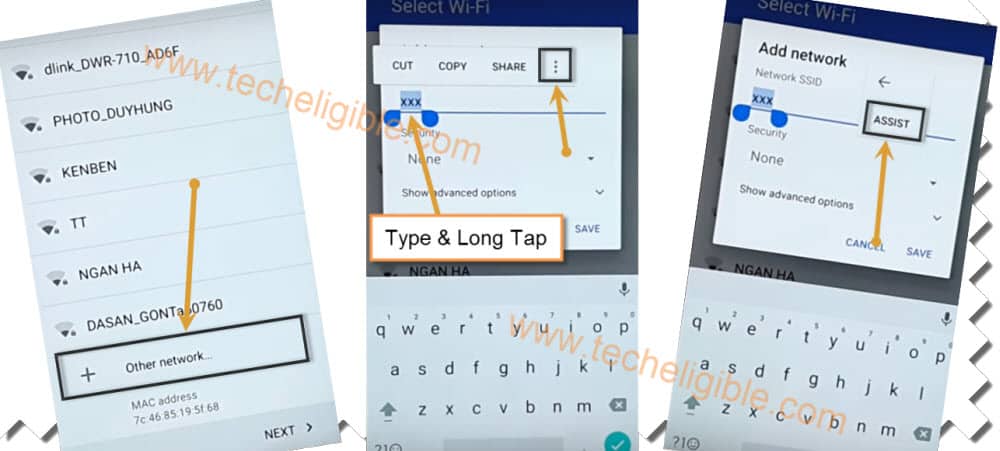
• Now tap on “No Thanks”
• Type in google search bar “CHROME”, and open then tap on “Chrome icon” to open google chrome browser.
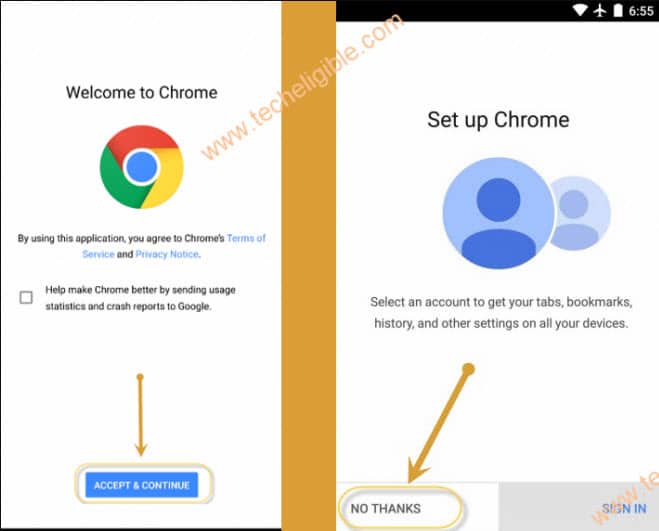
• Tap on “Accept & Continue”, and then “No Thanks”.
Download FRP Tools:
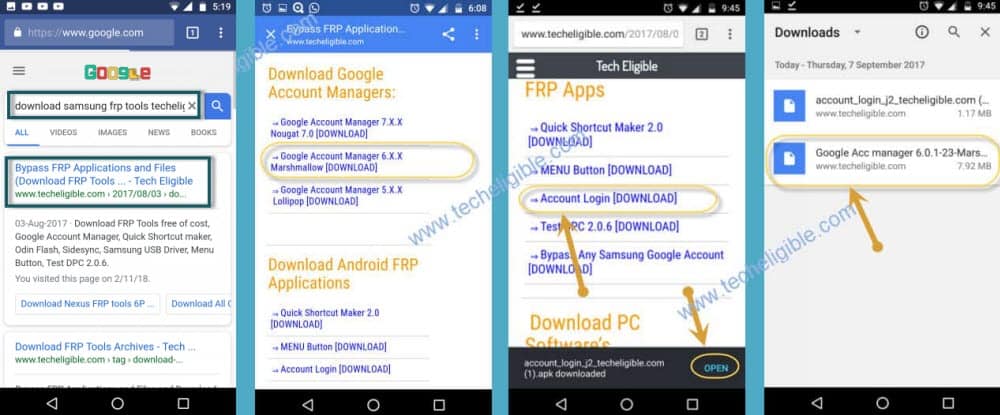
• Type in chrome search bar “Download Samsung Galaxy FRP Tools Techeligible“.
• Open 1st search result as shown in below image.
• Download from there 2 below apk apps
1/ Account Login.
2/ Google Account Manager 6.0.
• Wait until downloading finish, after that you will see popup bottom of your screen, tap on “OPEN” from that popup (See Below Image).
Install FRP Tools to bypass frp galaxy C9 Pro:
• Now tap on “Google Account Manager”, after that you will see a popup of “Installation Blocked”.
• Tap on “Settings” from popup, and then enable “Unknown Sources” from there.
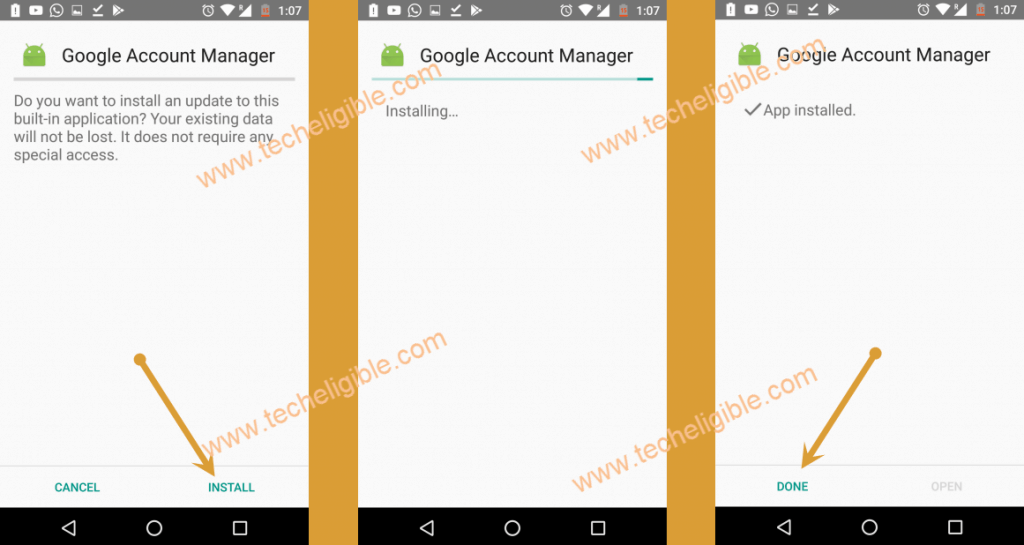
• Let’s install “Google Account Manager” by tapping on “Install”, after that “Accept”, and then “DONE”.
• Now tap on “Account Login”, and then “Install”, after that “Open”.
• You’ve accessed to “Retype Password” screen.
Let’s Add New Gmail Account:
• Tap on “3 Dots” from top right corner.
• Select “Browser Sign-in” option (This option will redirect you to chrome browser Sign-in page).
• Sign in with your any valid “Gmail Account”.
Read More:
