Bypass FRP Galaxy A12 Android 12, 11 Without Any Expert Help
You can follow up any method according to your device android version to Bypass FRP Samsung Galaxy A12 Android 12, Android 11, if you don’t aware of your device android version, you can try all methods one by one to easily bypass frp account and add new Google Account with new Security PIN protection, and use your device easily as you used to before, this process will not damage your device, but yeah you will lose your data, if you perform a hard reset task.
Disclaimer: We are creating this post to educate people about how to get back their lost device due to forgetting Google account. This method is only for device owner and for educational purpose only.
All Available FRP Methods:
| Method 1: Remove FRP Samsung A12 [ANDROID 12] New |
| Method 2: Remove FRP Samsung A12 [ANDROID 11] Old |
| Method 3: Remove FRP Samsung A12 [ANDROID 11] |
| Method 4: Remove FRP Samsung A12 [ANDROID 10] |
Method 1: Bypass FRP Samsung Galaxy A12 Android 12 (New)
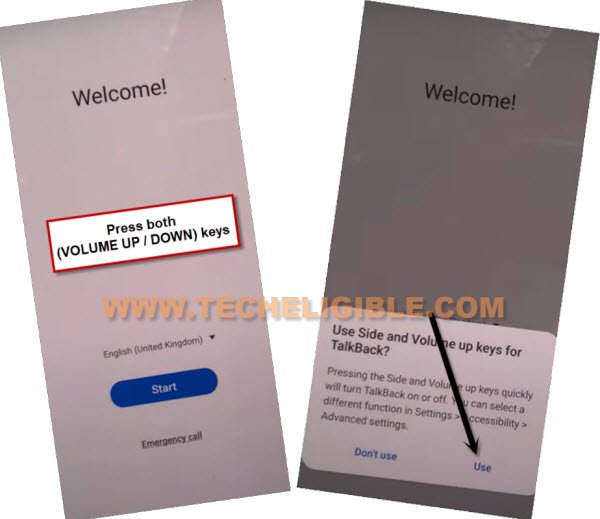
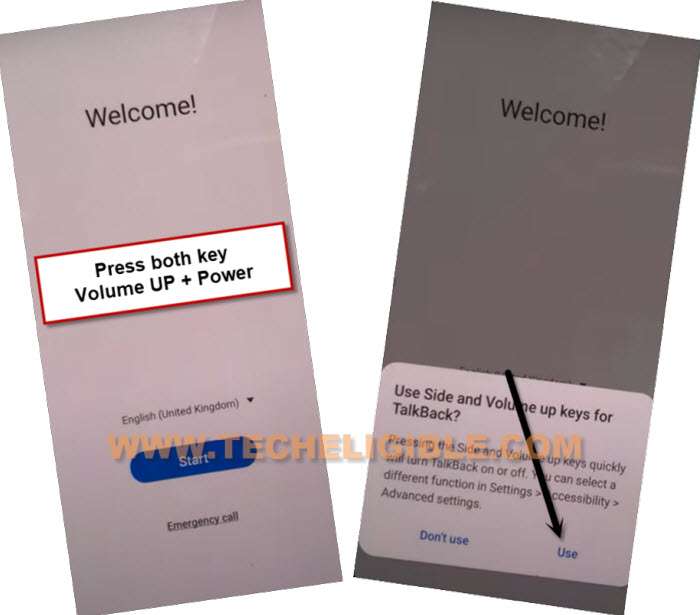
-Start this method by connecting WiFi, afterwards long hit on both (Volume UP + Down), and then double hit on “Use” to enable talkback.
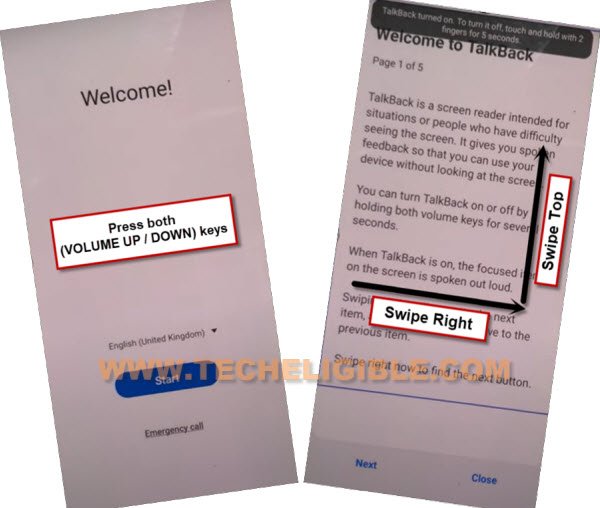
Note: If you are unable to turn on talkback using (Volume UP + Down), then press (Volume UP + Power) keys.
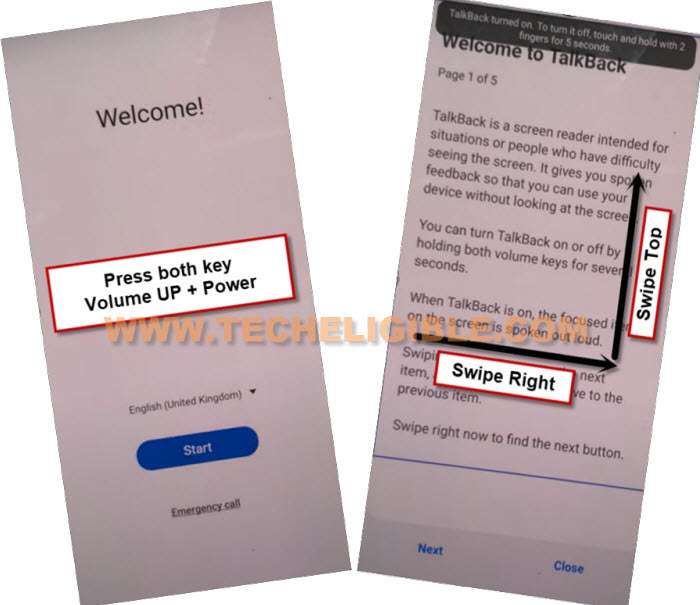
-Let’s hold again both (Volume UP + Down) or (Volume UP + Power) keys, and then draw a reverse “L” same as shown in below screen shot.
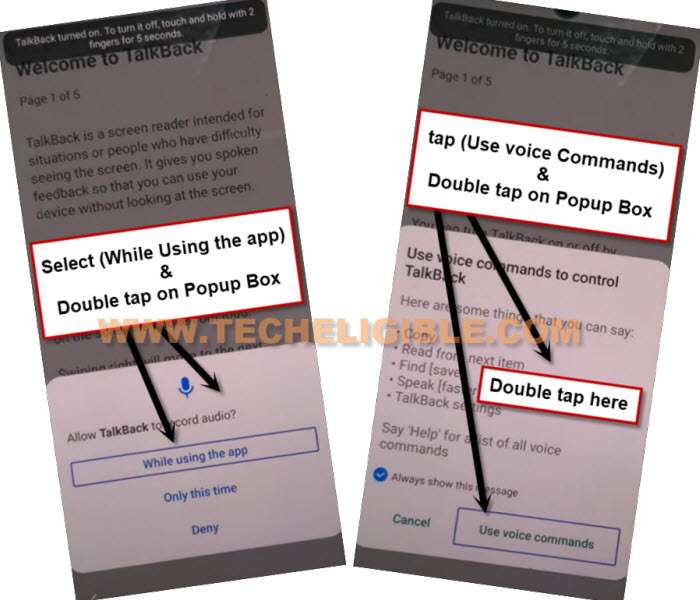
-After that, from popup box, just double tap to “while using the app”, and then double tap on “Use voice Command”.
-As soon you see green border, so speak there loudly “Open Google Assistant”, and then double tap to “Keyboard icon”.
![]()
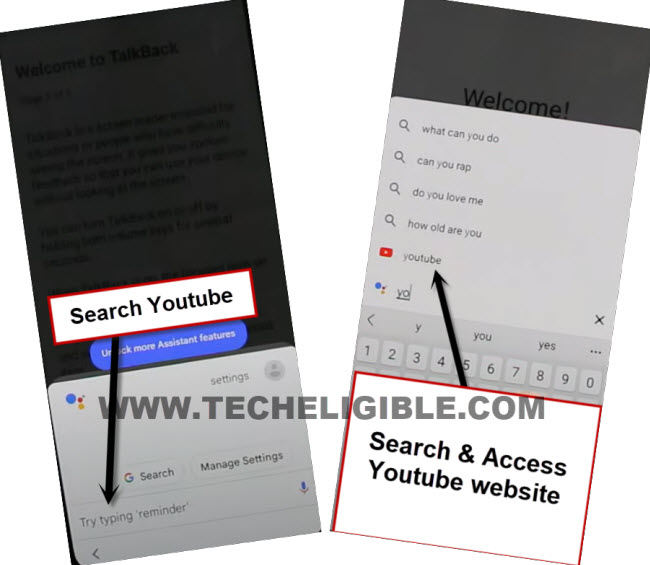
-Lets just turn off talkback by long press (Volume UP/DOWN) or (Volume UP + Power) keys, after that search there “Youtube”, and tap on “Youtube” from searched result.
Note: If you don’t see (Youtube) icon, just type “Youtube”, and tap to “Send” button from bottom right corner, you may see google search window again, repeat same process, tyupe “Youtbe”, and tap to “Send” button again.
-Afterwards, you will be redirected inside youtube official website.
-Tap “Profile icon” from top corner, and go to “Settings”.
-Go to > About > Google Privacy Policy.
-After reaching chrome browser, tap to > Accept & Continue > Next > No Thanks.
Lets Start to Download FRP Apps:
-Search in chrome browser “Top Samsung frp tools Techeligible“, and visit our website official Samsung frp tools page.
-Download from there below applications.
1/ Package Disabler Pro.
2/ Notification Bar.
-Now, we have download & install another app directly from galaxy store, this is very essential app to Bypass FRP Samsung Galaxy A12.
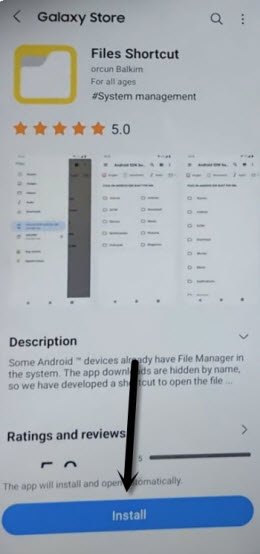
-Tap to “Open File Shortcut App” from same frp tools page, and you will be redirected inside galaxy store.
-From there tap to “Install” button.
-But you are supposed to sign in with Samsung Account. (You can create your free Samsung Acc directly from Samsung website).
-Sign in with your Samsung account while installing an app.
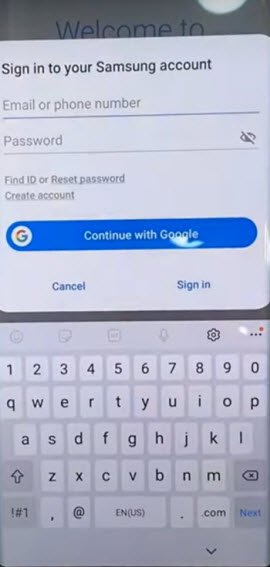
-After installing successfully “Files Shortcut” app from galaxy store, just tap to “Back Arrow” from bottom left corner to get back to Samsung frp tools page.
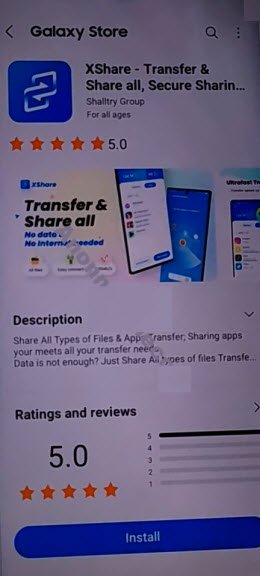
-Now tap on “Open XShare App“, and this is also required to be installed from Galaxy store.
-After that, go back to “Download FRP Tools” page, from there tap to “Access Device Settings” link to reach directly inside your Samsung Galaxy settings.
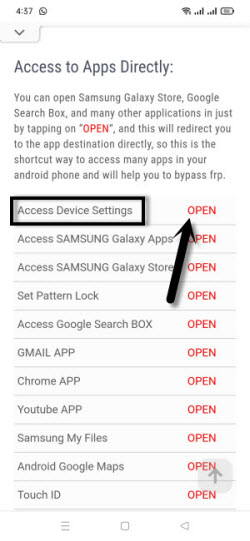
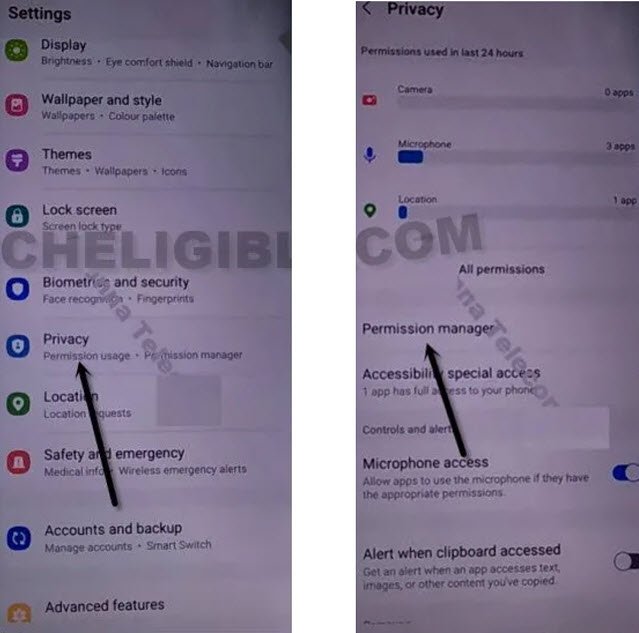
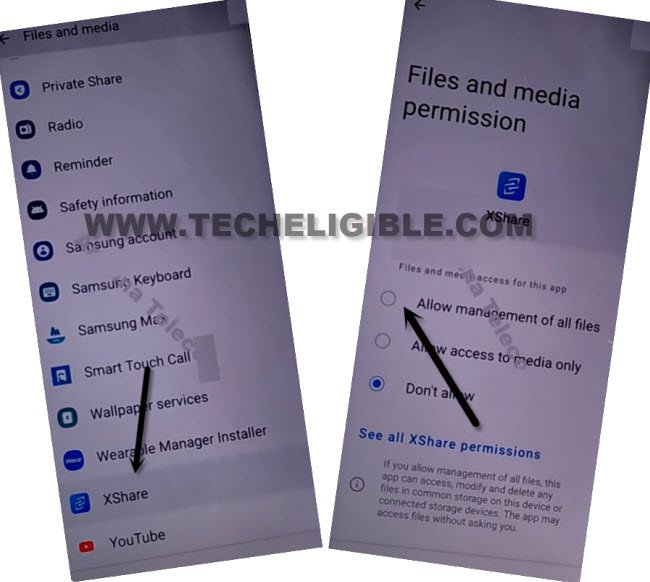
-Scroll down, and go to > Privacy > Permission Manager > Files and Media.
-Hit on “3 dots” from top right corner, and tap to “Show System”.
-After that, just go down, and hit on “Xshare” app from app list.
-Select “Allow management of all files”, and then hit on “Allow” from popup.
-By tapping on back arrow carefully, just get back to again “Download frp tools” page.
-From there, hit again on “Open Xshare App“, and hit on “Open” button from galaxy store to reach inside this app.
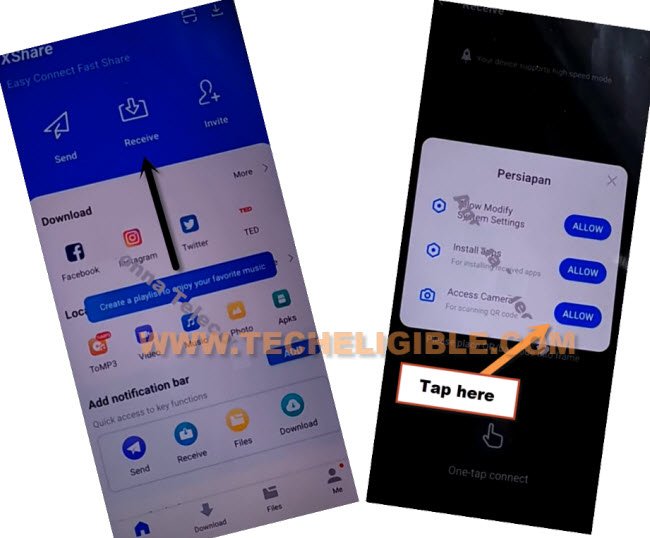
-Hit on > Agree and Continue > While using the app > Enter > Receive.
-From popup window, tap to 3rd option “Allow” from Access Camera, and then hit on “While using the app”.
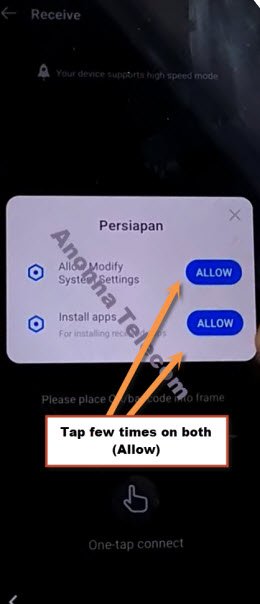
-Now, you will see there 2 option of “Allow”, so now hit 3 times on each (Allow) option.
-Go back by tapping (Back Arrow) from bottom left corner 2 times to reach back to (Xshare Galaxy Store) same as shown in below image.
-Search in galaxy store “File Shortcut”, and the tap to “Open” icon to launch this app.
-Hit on “Menu” icon from top left corner, and select your “Mobile Model” as storage.
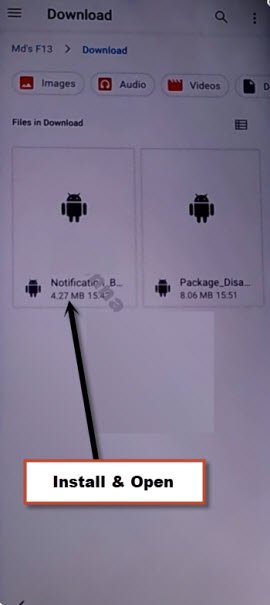
-Tap to “Downloads” option to reach inside the downloaded app folder, from there tap to > Notification Bar > Continue > Install > Open.
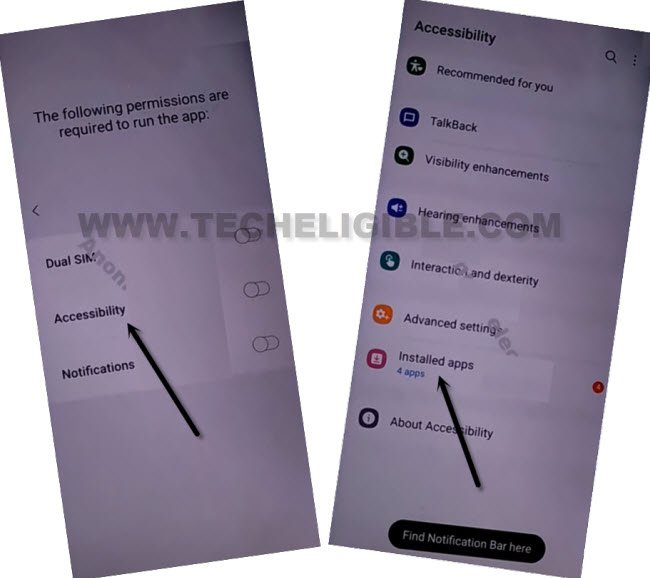
-Hit on > Accessibility > Installed apps.
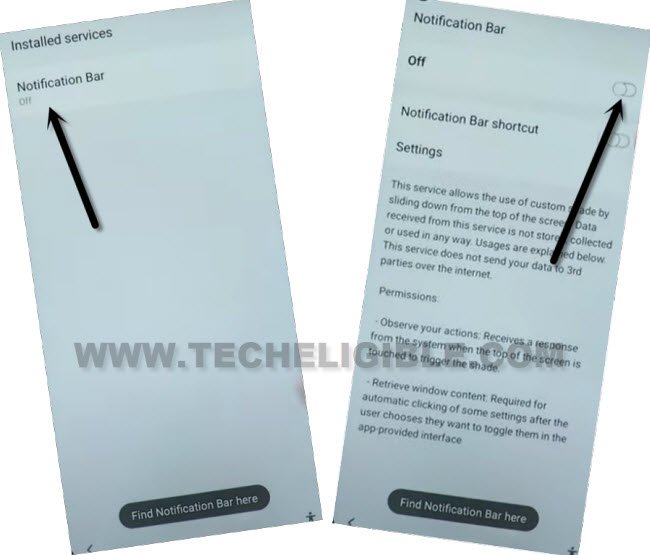
-Now hit on > Notification bar> Turn on > Allow.
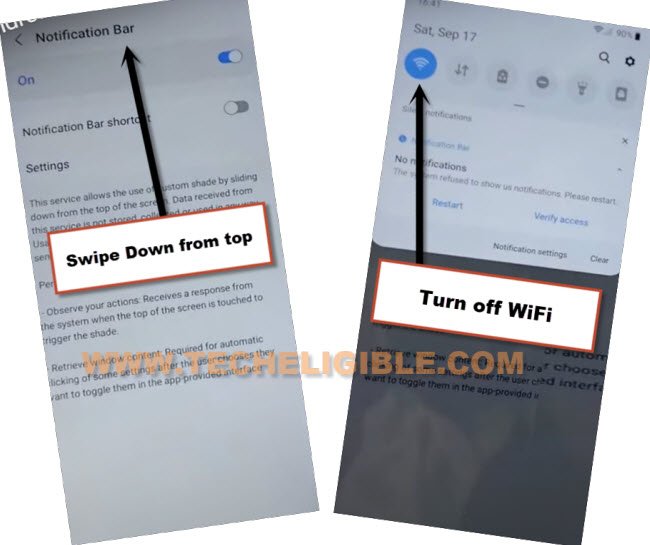
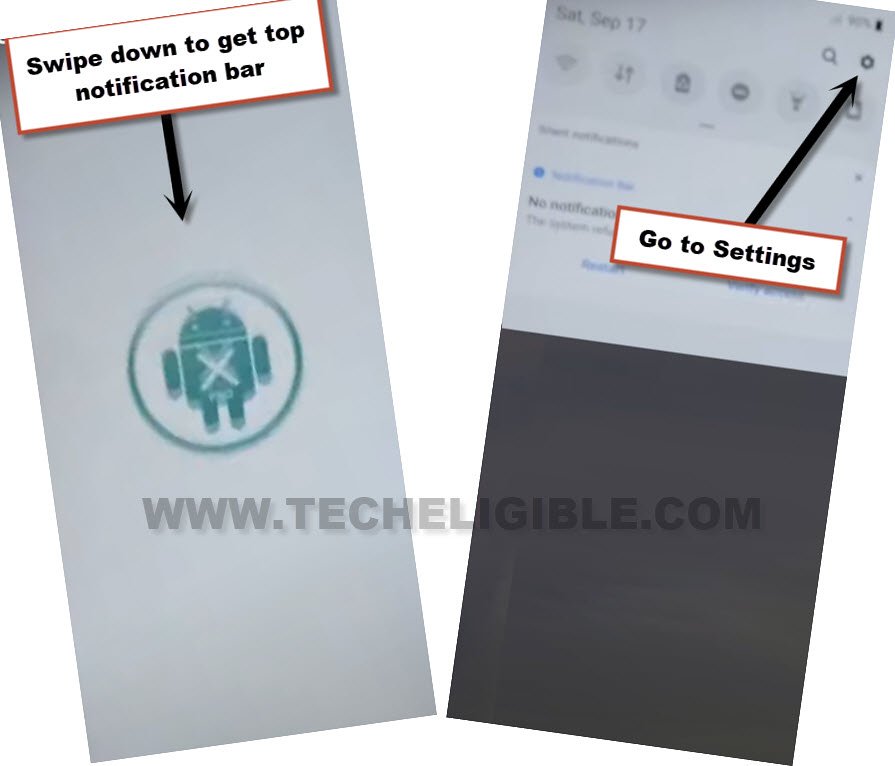
-Swipe down from top to get notification bar, and this will come out, now turn off “WiFi”.
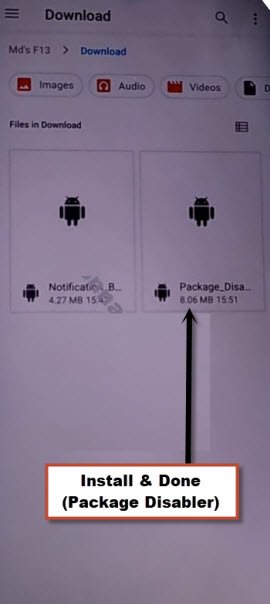
-Tap 4-5 times on back arrow from bottom left corner to get back to download folder, where from we are gonna installed (Notification bar) app.
-Now tap to > Package Disabler Pro > Continue > Install > Open.
-Tap to “Allow”, and hit on white screen anywhere, the screen will just start blinking.
-Now you have to bring back (Notification) bar from top, and go to “Settings”.
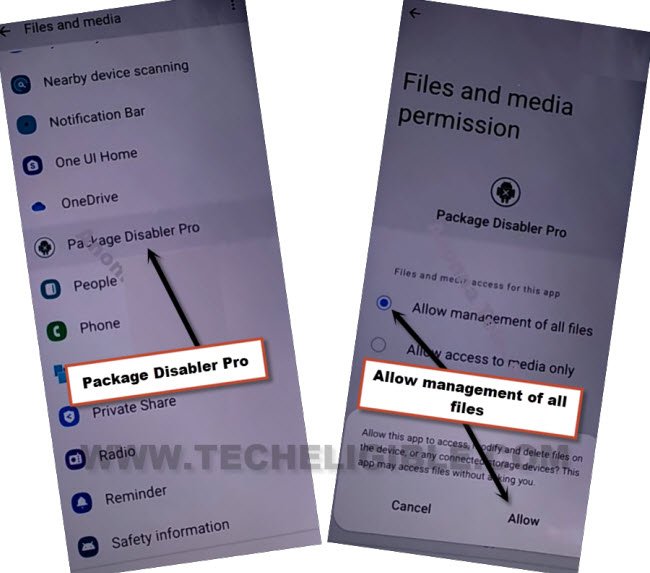
-Go to > Privacy > Permission Manager > Files and Media.
-Just go to “3 dots” from top corner, and tap to “Show system”, from the app list, just go to “Package Disabler Pro”
-Select “Allow management of all files”, and then tap to “Allow”.
-Tap to back arrow 2-3 times to reach back to “Settings” page.
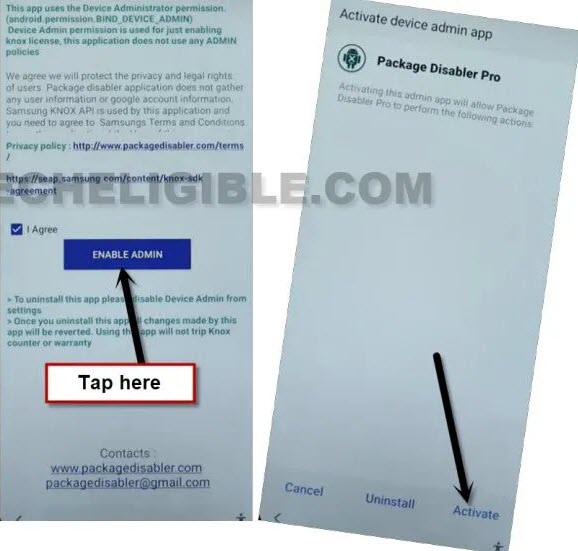
-Now tap to “Back Arrow”, and there you will have a same screen shown in below image, just hit on “i agree” option, and tap to “Enable” button.
-Tap to > Activate > Agree.
-Bring back notification bar, and turn on “WiFi” from there, and wait over there.
-Now hit on “Agree” button from package disabler pro app.
-There you will see a flash message of “Knox license validation completed successfully”, we did this all effort just to activate this somehow, once you done this, now we are only few steps behind from completely Bypass FRP Samsung Galaxy A12.
Final Step to Access Device HomeScreen:
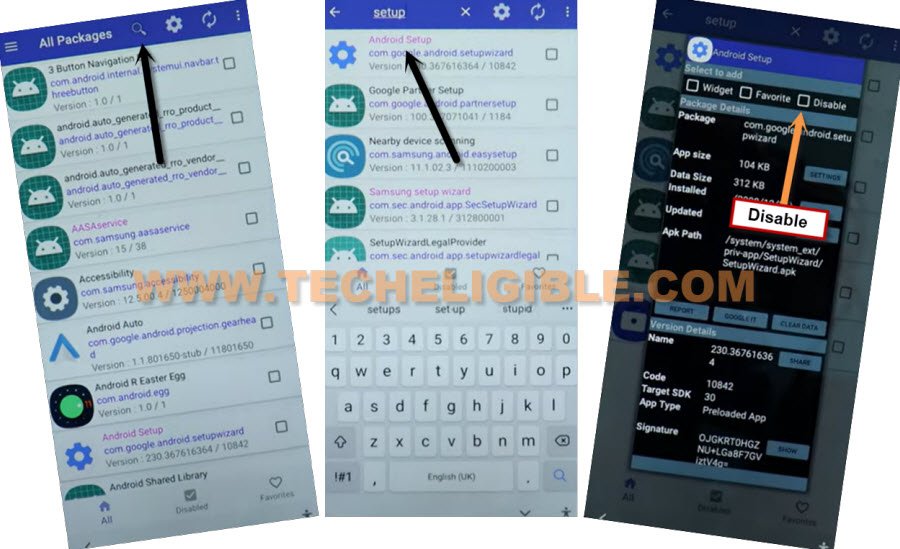
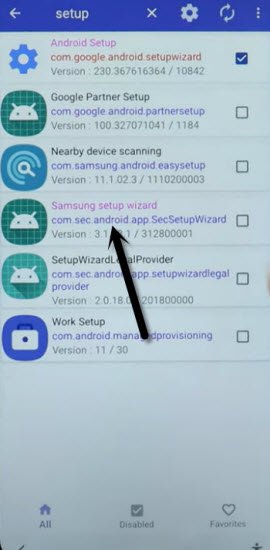
-Hit on “Search icon” from All packages screen, and Type “Setup”, and go to “Android Setup” from there, check mark top “Disable” option (Follow below image).
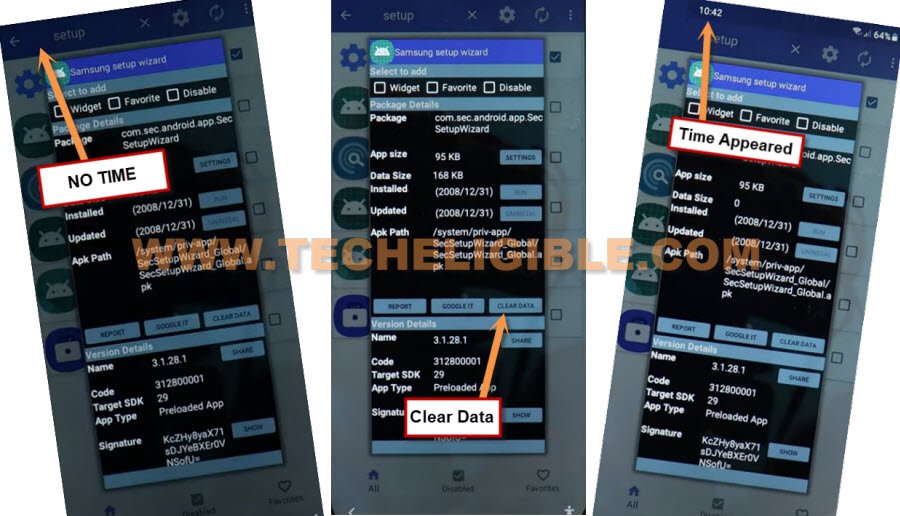
-type “Setup”, and go to “Samsung Setup Wizard“.
-Just tap on “Clear Data” button, and the time will start appearing up at top bar.
-Tap on back arrow 2 times, and wait, you will be redirected to Samsung Setup wizard screen, finish rest steps and access your Samsung Galaxy device homescreen, and don’t forget to setup your new google account & Security Lock.
Method 2: Bypass FRP Samsung Galaxy A12 Android 11 [2022]
Bypass FRP Samsung Galaxy A12 Android 11 Without Restore and update and without Samsung Cloud Account, you are not required to backup (Alliance Shield x) app, without all of these, you can easily bypass frp from your device, that is very simple and straight forward method, good news is that, the (Alliance Shield X) app has also been updated in Samsung Galaxy Store, so all we need to access galaxy store and install this app without any Samsung Account.
-We are going to turn o talkback to reach google chrome browser easily, so long hold both “Volume UP Buttons + Power Buttons” simultaneously, after that tap on “Use”.
Note: If (Volume UP + Power) do not work, then try with long press both (Volume UP + Volume Downs buttons) to turn on talkback, even then, if you are failed to turn on talkback, then you will have to go for an alternate method to launch browser via PC.
–Keep holding both keys again (Volume UP + Power), and this time the talkback feature will turn on completely, you will also have a flash message on screen.
–Now just make “L” shape by swiping on screen from right to left, and then swipe top. (See below image).
-Tap once on “while using the app”, now double tap on anywhere on screen.
-Tap once on “Use Command Voice” option, and again double tap on popup box.
–You have to speak very loudly (Google Assistant), and you will see a (Try Saying) popup window.
-Long press both buttons (Volume UP + Power) to just turn off talkback feature, if these 2 keys do not work for you, so press both (Volume up/down) keys, and the talkback will be turned off successfully, afterwards, tap on “Keyboard” icon.
-Access to youtube website by searching “You”, and hit on “Youtube” icon.
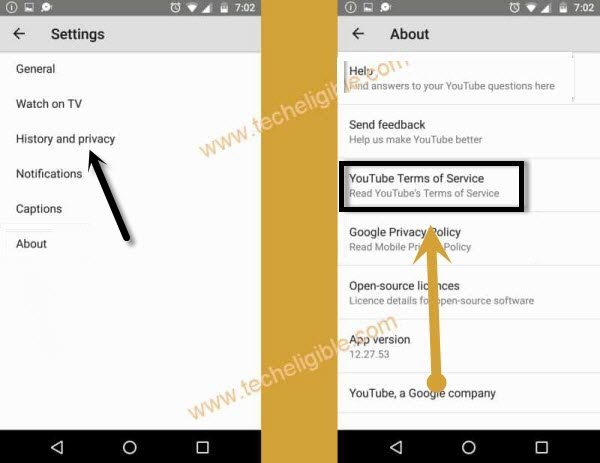
-You will see a human icon at top corner, just tap on that > Profile icon > Settings.
-Tap to > History and Privacy > Youtube terms of service.
-Go to > Accept & Continue > No Thanks.
Go to FRP Tools Page:
-Type “Top Samsung FRP Tools Techeligible“, and visit our website searched result.
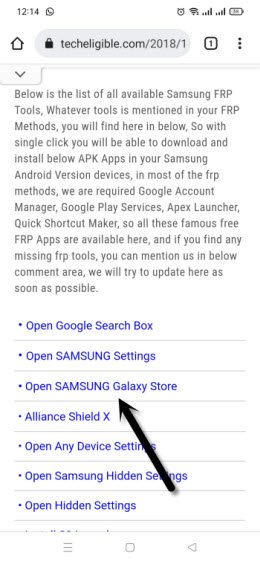
-From our website page, just go down and tap on “Open Samsung Galaxy Store“.
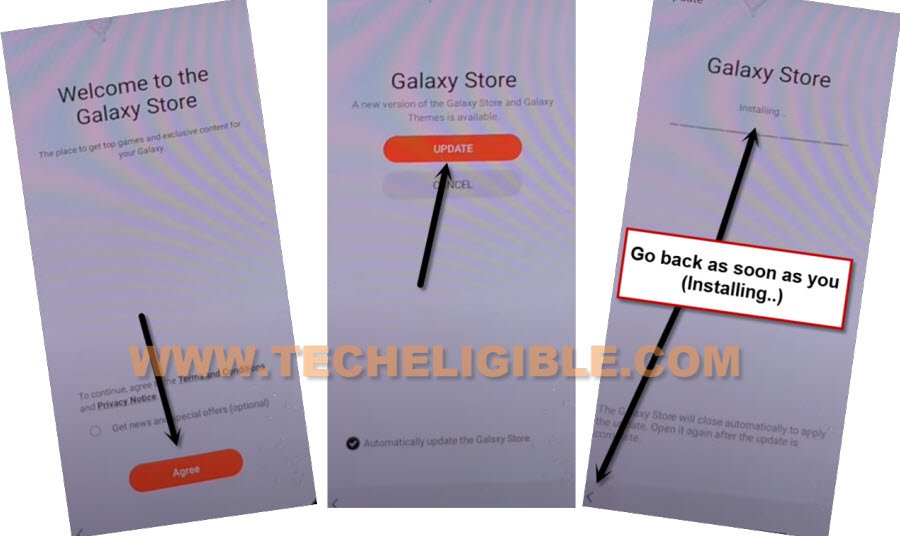
-Select “Get news and Special Offer”, and then tap to “Agree” option.
-You will have galaxy store update screen, tap on “Update”, just wait, as soon as you see “Installing…” screen, quickly tap on “Back Arrow” from bottom left corner before the installing finish.
Note: Do not let installing.. process complete, just tap on “Back Arrow” as soon as you see “Installing..”.
-You will see there galaxy store has opened, but wait for 1 minutes, you may could see again (downloading…) screen, if you see again, just wait there, hit again on back arrow as soon as you see “Installing….”, and you will get back to “frp tools” page.
-Tap again on “Open Samsung Galaxy Store” again, and this time without updating, you will reach inside Galaxy Store.
-Tap to > Continue > Skip.
-Give some app permissions by tapping on > While Using the app > English.
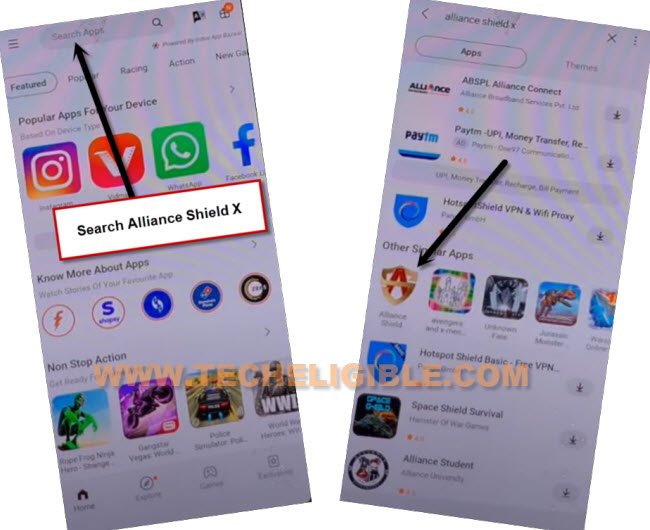
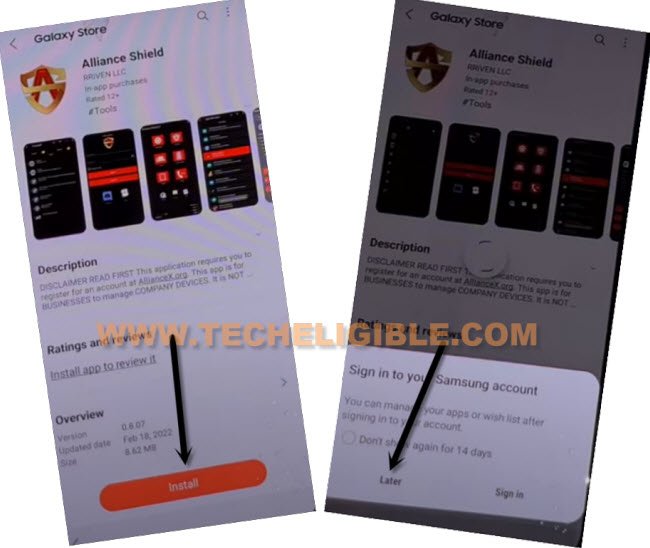
-Type in search box “Alliance Shield X”, and then tap to “Alliance Shield X” app icon.
-Tap on “Install”, and hit on “Later” from sign in window to Bypass FRP Samsung Galaxy A12 Android 11 without restore and Samsung Account.
-Tap to “OPEN” button to reach Alliance Shield X app, if you don’t have an account, so you can register new account by tapping on “Resister” option, otherwise just sign in.
Turn on ADB + MTP Option:
-Sign in with your Alliance Shield X account, if you don’t have, so register new one in free.
-Tap to “Next”.
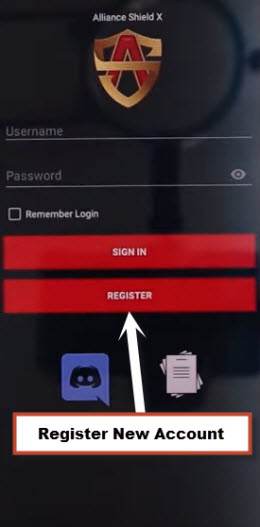
-Turn on “Device Admin”, and hit on > Activate > Next.
-Turn on “Knox”, and select option (i have read and agree…), and tap to > Confirm > Next > Finish, now hit on “App Manager”, and then tap “Close”.
-Tap to “Search icon” from top corner, and search there “Mode”, and tap to “Service Mode” from list.
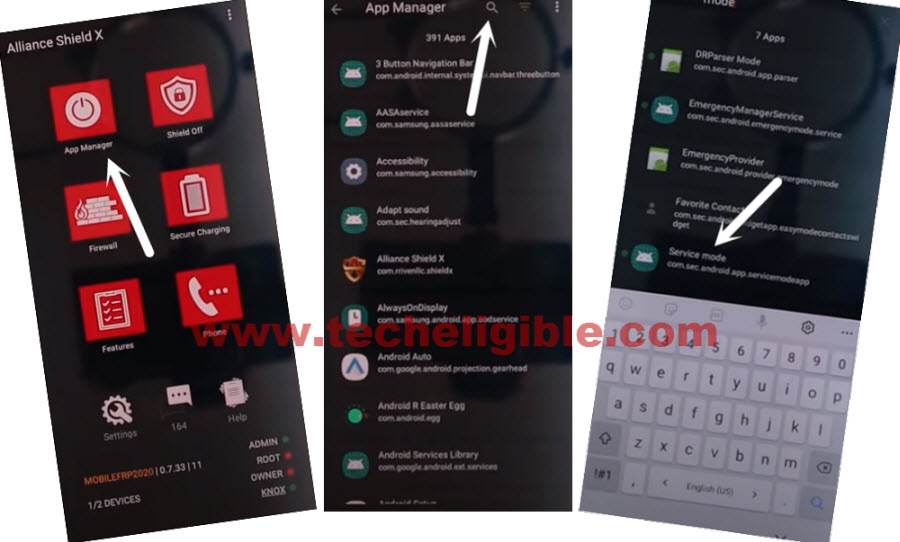
-From top tab, hit on “Activities”, go down and tap 3rd last option (com.sec.android.app.modemui.activities.usb.settings).
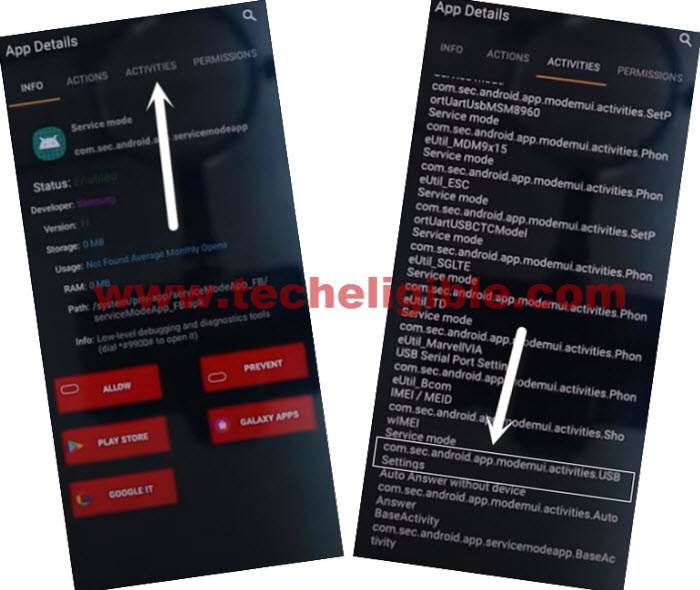
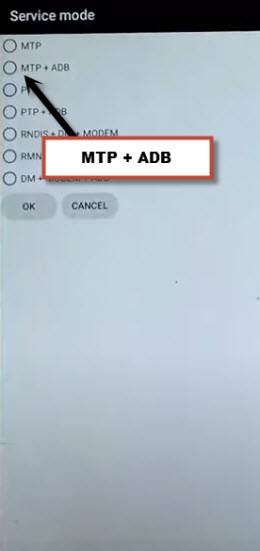
-Tap again on (com.sec.android.app.modemui.activities.usb.settings), and again hit on “OPEN”, and then select (MTP+ADB).
Note: If you cant enable “MTP+ADB”, you can easily enable that from outside, as soon as you hit on 3rd option from the last, you will see popup window, just tap on “Enable” option from there instead of “Open”.
Remove FRP by Free PC Tool:
-Open browser in PC, and Search “Download Top Samsung FRP Tools“.
-Visit our website searched result, and download from there “Samsung FRP ADB Tool & Drivers“.
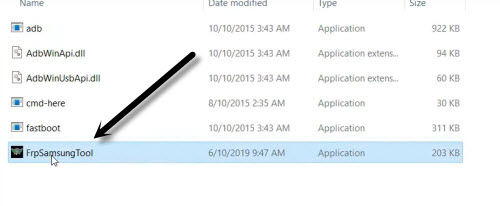
-Extract the downloaded file, and go to folder “FRP Samsung Tool”.
Note: If drivers are not install, so install drivers first.
-Open software “FrpSamsungTool”.
-Connect device with PC using USB Cable.
-Click to “Scan” button from the tool, once the device is detected.
-Click on “Remove Account Google”.
-You must see a popup window in your Samsung Galaxy device of allowing usb debugging, just hit on “Allow” option.
Note: If you see an error window on PC screen, just tap to “Continue”.
-Click again on “Remove Account Google”, wait until frp bypass process complete.
-Disconnect device, and your device will get back to (HOME-SCREEN) automatically, this is how you can easily and freely Bypass FRP Samsung Galaxy A12 without any expert help, Thank You.
Method 3: Bypass FRP Samsung Galaxy A12 [Android 11]
With the help of single app (Alliance Shield X), we will be able to bypass google account, only we will transfer this app to our frp locked phone to enable ADB + MTP mode from (Service Mode), and then we will use free frp bypass tool, Follow Steps from below.
Required Tools for PC:
-Download Below tool in your PC.
1/ WiFi Connection
2/ Samsung Account [Create Free]
3/ Samsung USB Driver [Download]
4/ Easy Samsung FRP Tools [Download]
5/ Any Other Android Device.
6/ PC or Laptop
Let’s Start to Bypass FRP:
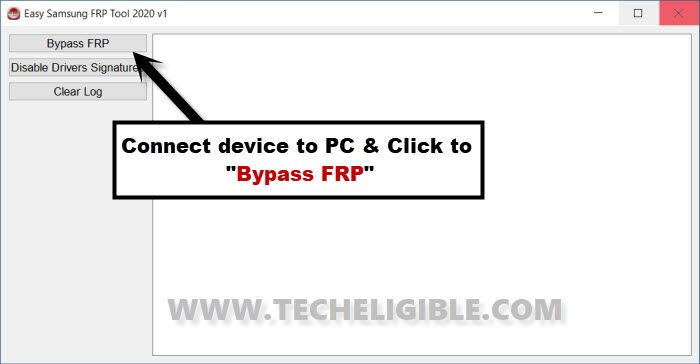
-Open “Easy Samsung FRP Tools” in PC.
-Turn on phone, connect WiFi, and Connect phone with PC.
-From the PC tool, Tap to > Bypass FRP > OK.
Note: In case, if the device is detected by PC, then install Samsung USB Driver, and then restart PC, after that open (Easy Samsung FRP Tools), and tap to “Disable Drivers Signature” button, and after that connect phone with PC, and then tap to “Bypass FRP” button, we hope this time your device will be detected.
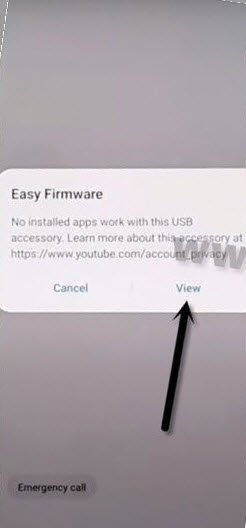
-From popup window (Easy Firmware), tap to “View”.
–From the Chrome screen, tap to > Accept & Continue > Next > No Thanks.
-Search in browser “Top Samsung frp tools Techeligible“, and access to our website searched result.
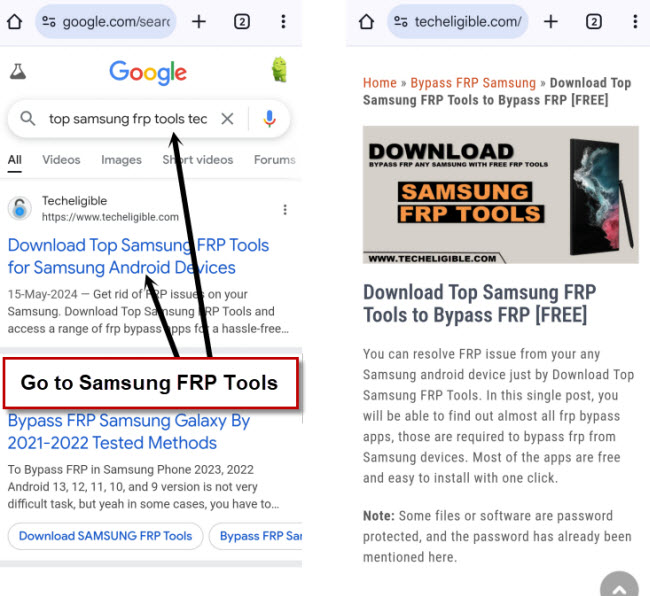
-Go down and tap on “Install S9 Launcher“.
-From the galaxy store screen, tap to > Agree > Update.
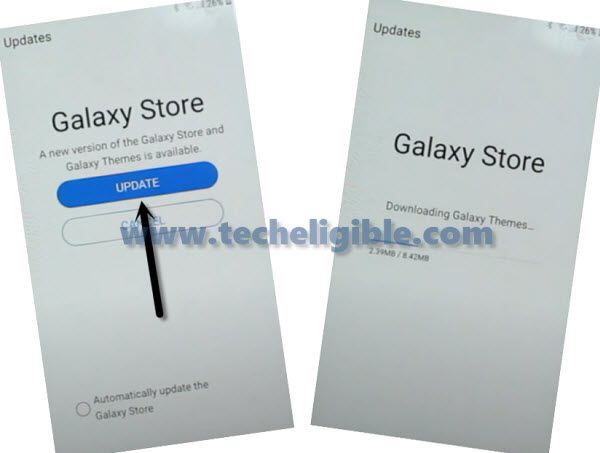
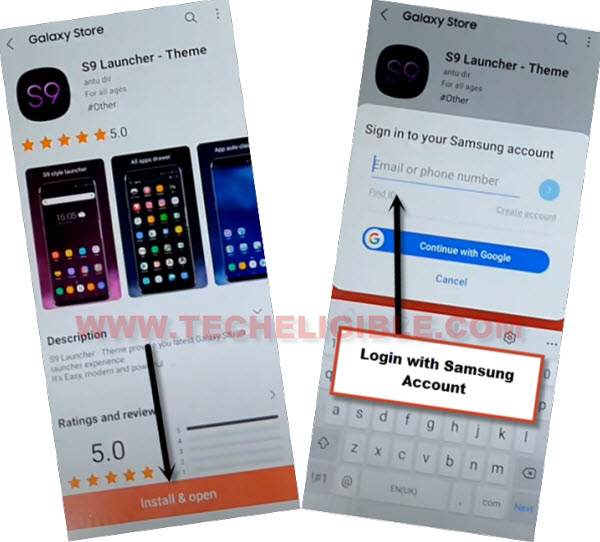
-Tap on “Install & OPEN” button from the S9 Launcher installation screen.
-You will be asked to sign in with (Samsung Account), so just enter your Samsung account there.
-After signing with Samsung account successfully, you will be redirected into your Galaxy A12 Home-Screen.
-Arrange other android device, because we will download (Alliance Shield X) app in other phone to Bypass FRP Samsung Galaxy A12.
Follow Steps in Other Android Device.
-Go to > Settings > Accounts & Backup > Accounts.
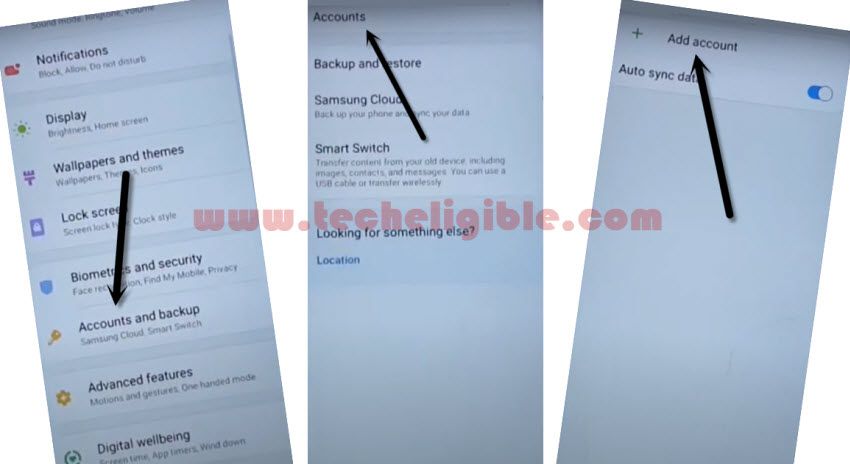
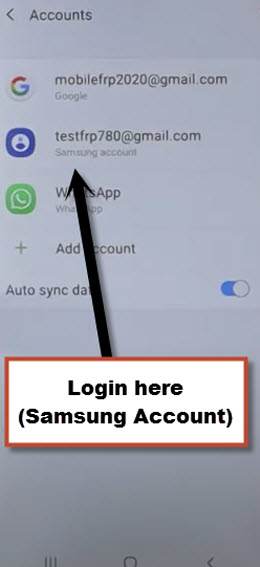
-Sign in with the same (Samsung Account) which is already added in Galaxy A12 (FRP LOCKED) device.
Note: Both devices should be connected on Same Samsung Account.
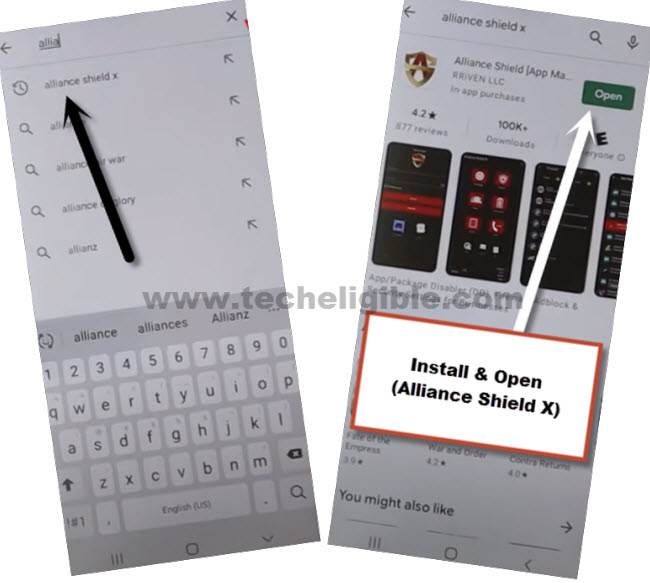
-Install & open “Alliance Shield X” app through Playstore.
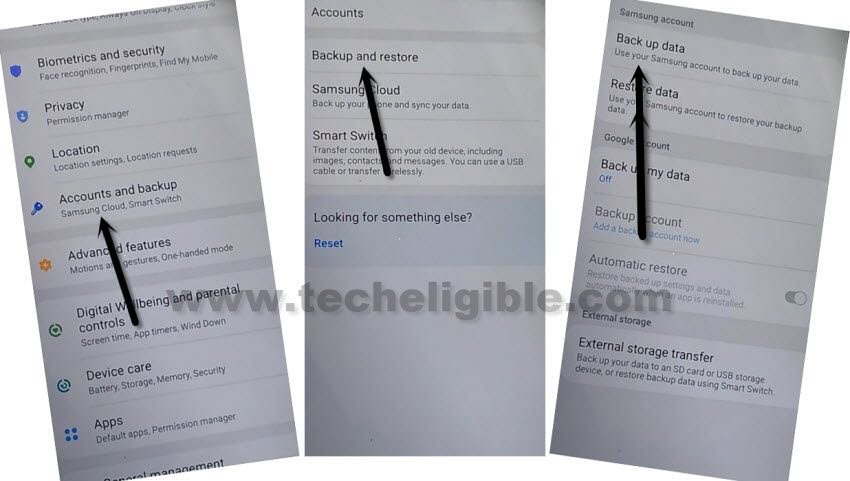
-Hit on > Settings > Accounts and Backup > Backup And Restore > Back up data.
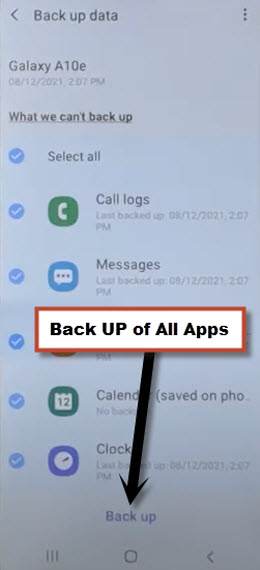
-Tap on “Back Up” button to add all apps in Samsung Account.
Follow Steps in Galaxy A12 Phone:
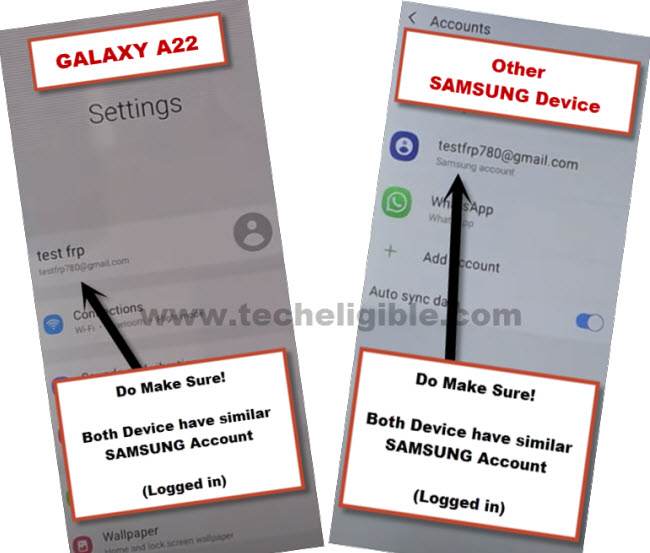
Note: Do make sure Galaxy A12 & Other Android phone are successfully signed in with the same Samsung Account.
-Go to “Settings”, and there at the top, you will see your signed in Samsung account detail in galaxy A12.
-From Galaxy A12 (Settings), just go to > Accounts & Backup > Backup and Restore > Restore Data.
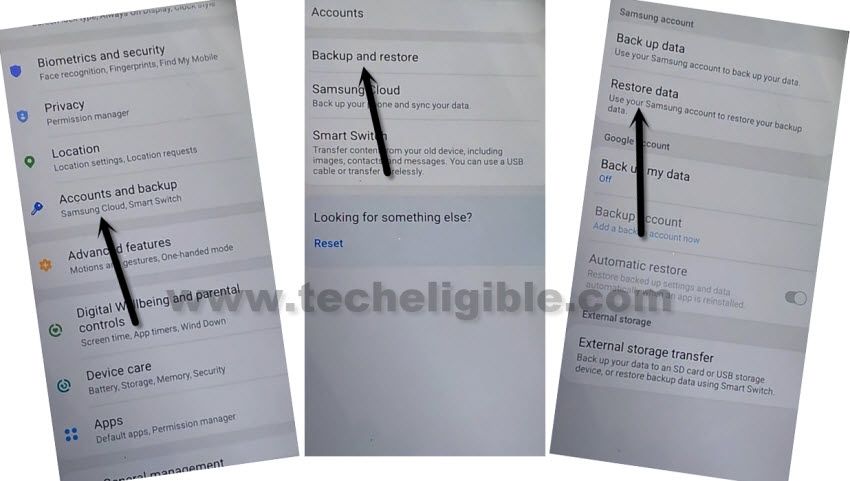
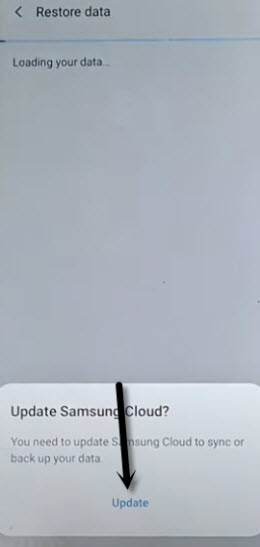
Note: You may have a (Update Samsung Cloud) popup window, just hit on “Update” button, after that tap to “Restore” and wait until this updating process done.
-After few minutes waiting, tap again on “Restore Data” option.
-Now you will see (Choose a verification Method) screen, just select “Email” and this email you a verification code to your gmail account.
-Click to “Verification” button from the gmail account to verify that it is you.
-Now tap to “Get Started” button and this will start restoring data.
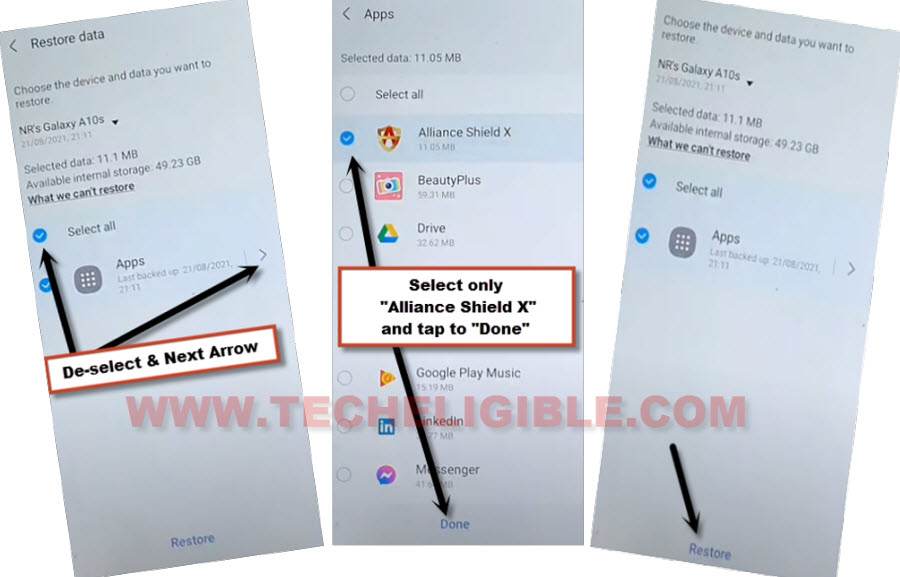
-De-select the “Select All” option, and the tap to “Next Arrow” which is right next to the (Apps).
-Select only “Alliance Shield X” app, and tap to “Done.
-Tap to > Restore > Install.
-Go to > MENU > Alliance Shield X.
-From the (Alliance Shield X) app, tap to > Next > Next > Next > Got it.
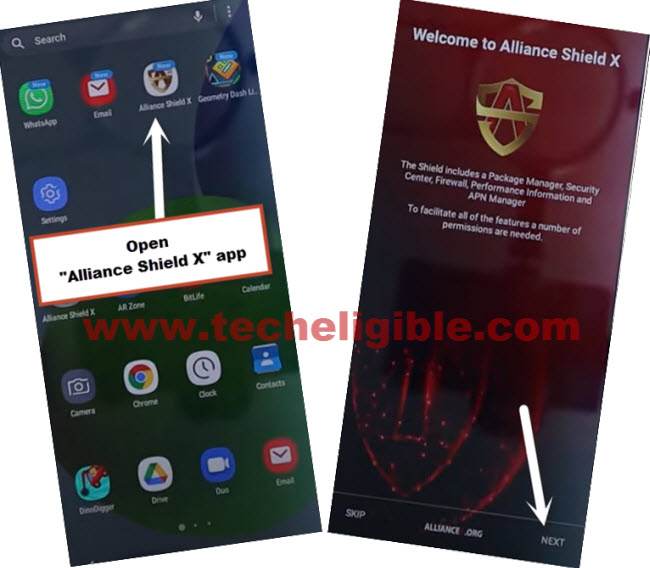
-Register your new account in (Alliance Shield X) .

-Sign-in with your registered account in (Alliance Shield X) app.
-Type any “Device Name”, and then tap to “Next”.
-Turn on “Device Admin”, and hit on > Activate > Next.
-Turn on “Knox”, and select option (i have read and agree…), and tap to > Confirm > Next > Finish.
-Tap on “App Manager”, and tap to “Close” from popup box.
-Hit on “Search icon” from top corner, and search there “Mode”, and tap to “Service Mode”.

-Tap to “Activities”
-Go all the way down, and tap on option (com.sec.android.app.modemui.activities.usb.settings).

-Tap again on (com.sec.android.app.modemui.activities.usb.settings), and again hit on “OPEN”, and then select (MTP+ADB).
Run ADB Tool in PC :
-Download & Open (Samsung FRP ADB) tool in your PC
⇒ FRP-BYPASS-ADB Tool [DOWNLOAD]
-Connect Galaxy A12 to the PC using a USB Cable.
-Extract & Open “FRP Bypass ADB Tool” in PC
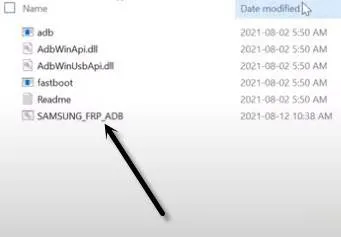
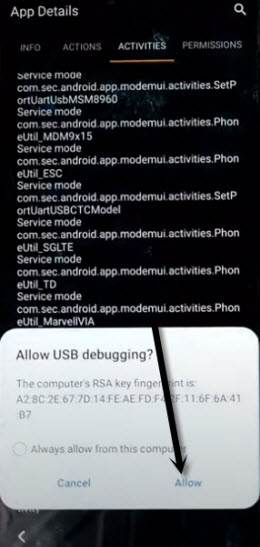
-From the (Allow USB Debugging) popup window, just tap to “Allow” button.
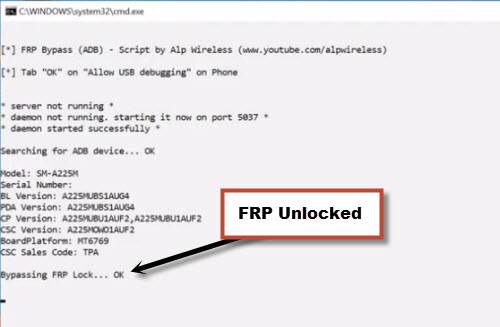
-Once the adb frp tool is run, your device will be free of frp lock in few seconds.
-Galaxy A12 will reboot, and then Select the (Setup Wizard) icon, and boom, you are in your device HOME SCREEN.
Perform Factory Reset Task:
-Go to > Settings > General Management > Reset > Factory Data Reset > Reset > Delete All.
-Enter your “Samsung Account Password”, and hit on “OK” option.
-Thank you for visiting us, and your device will be frp free once the factory reset process completes.
