New Guideline to Bypass Google FRP Lenovo TAB M8 Android 10
Bypassing FRP occurs in owner device, if owner forgets his own Gmail account after hard reset device. This new method is to Bypass Google FRP Lenovo TAB M8 (Android 10) 4th generation. We’ve 3 methods here in this single post, you can apply all one by one, and we hope, you will be able to setup new account in your Lenovo M8 device without wasting your time and money. Follow steps from below.
Warning: This method is only for device owner and for educational purpose only, do not try on a stolen phone, otherwise you could be jailed.
| Method 1: Remove FRP Account Lenovo TAB M8 (4th Generation) New |
| Method 2: Remove FRP Account Lenovo TAB M8 |
| Method 3: Remove FRP Lenovo TAB M8 (Old) |
Method 1: Bypass Google FRP Lenovo TAB M8 (4th Gen)
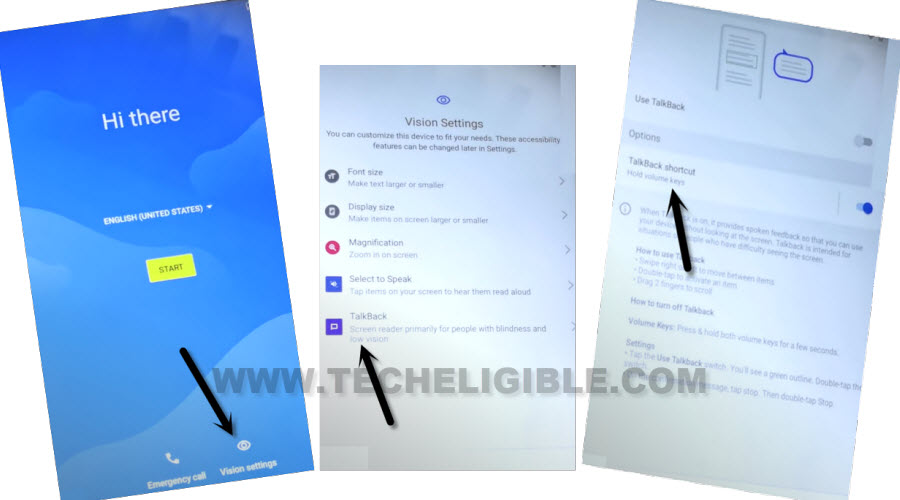
-First, connect WiFi, and go back on first “Hi there” screen, from there, tap over > Vision Settings > Talkback > Talkback Shortcut.
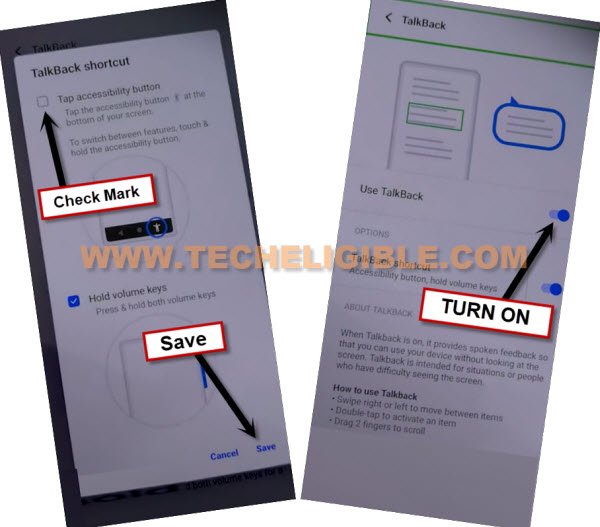
-Check mark “Talkback Accessibility button”, and then hit over “Save” option.
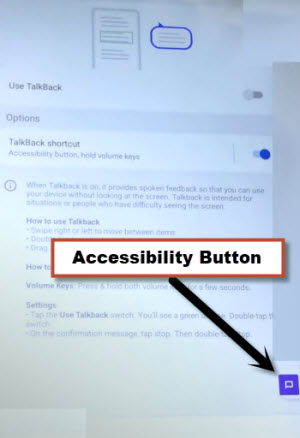
-This will bring for you a (Accessibility Button) at the bottom right corner.
-Tap on that “Accessibility Button”.
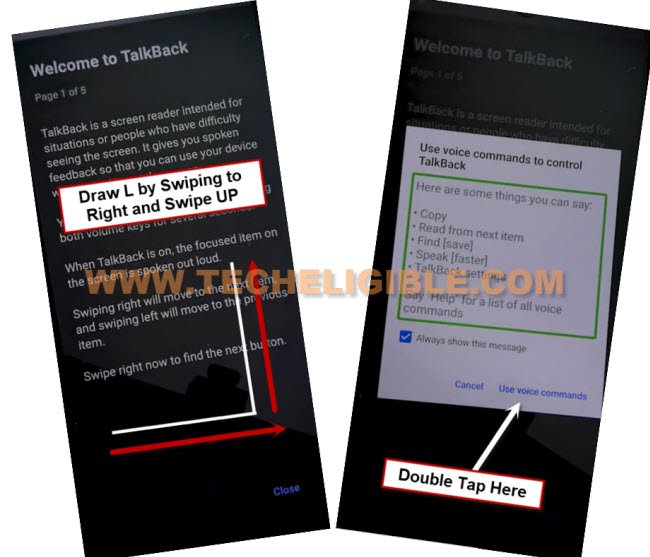
-Make a reverse “L” shape by swipe right and swipe up (See below image).
-Double tap over > While using the app > Use Voice Command.
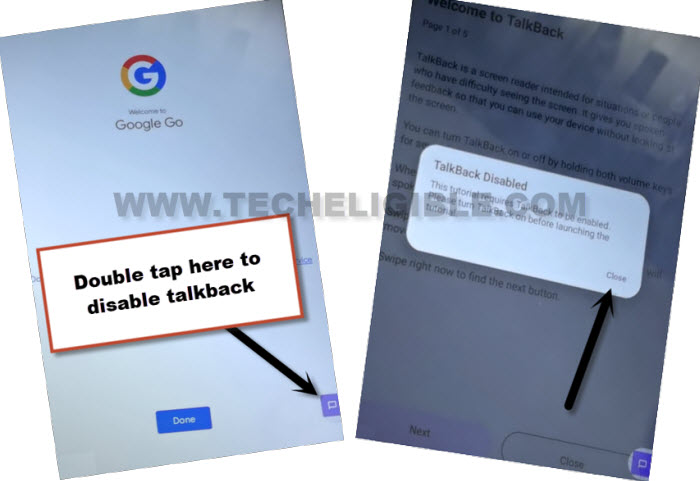
-We’re gonna disable talkback now, just double tap on (Accessibility Button), and hit on “Close” button from talkback disable button to Bypass Google FRP Lenovo TAB M8.
-After that, tap on “Done”.
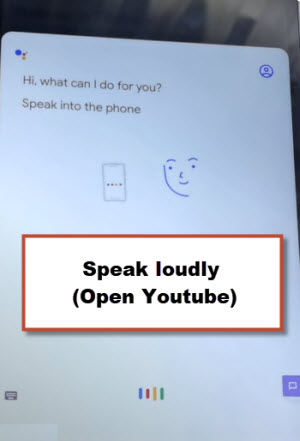
-You will have a (Listening….) screen, just say loudly (Open Youtube).
-Youtube website will be launched, just go to > Profile icon > Settings > About > Google Privacy Policy.
-Go to > Accept & Continue > No Thanks.
Open FRP Tools Page to Set new Pattern:
-We are gonna access to a frp tool page, from there, you can directly go to a pattern lock screen to set up new pattern lock.
-Search in browser “Download FRP Tools“, visit our website searched result.
-Go down and tap on “Setup Pattern Lock“.
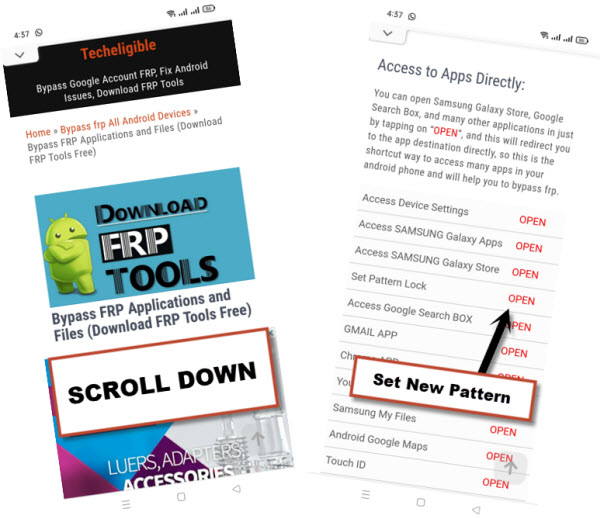
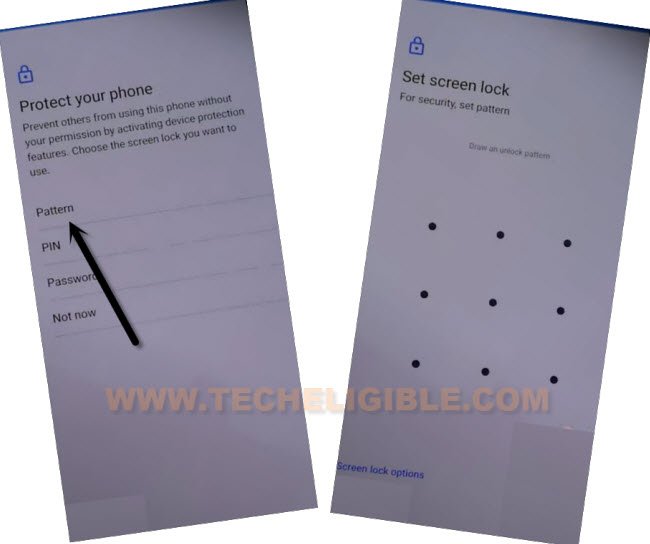
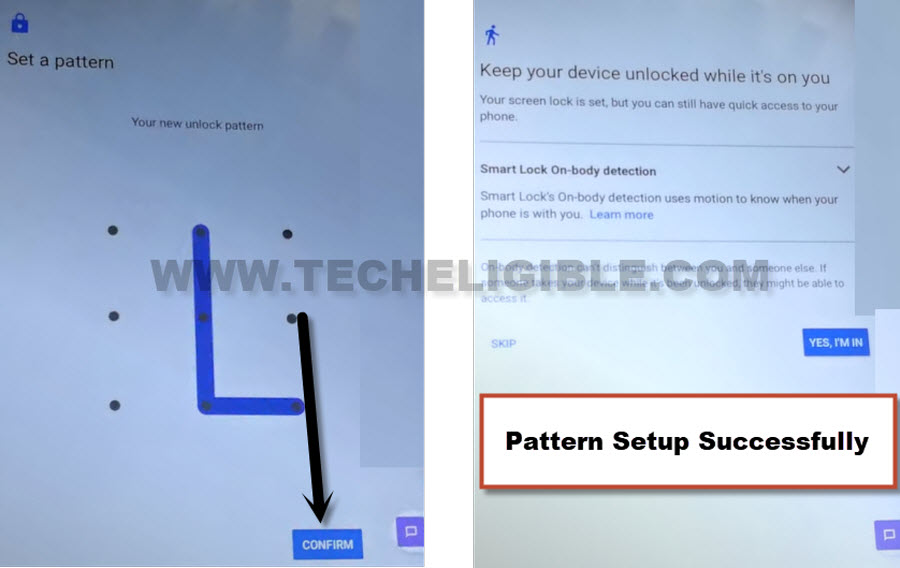
-Tap to > Pattern > Draw Pattern quickly > Next > Draw again same pattern quickly > Confirm.
-If, after hitting on “Confirm” option, you get back on “Pattern lock” screen, that means, the patter is not setup now. We have setup pattern again, do this very fast and repeatedly, until we see next screen of (Keep your device unlocked, while its on you), right after you hit on “Confirm” option to Bypass Google FRP Lenovo TAB M8.
-Lets do this quickly, quickly tap to > Pattern > Draw Pattern > Next > Draw Pattern > Confirm.
-Keep repeating above step very quickly until you see same screen as shown in below image.
-Once the pattern has been setup successfully, you will have a next screen of (Keep your device unlocked, while its on you), that means the pattern has been added into this device.
-Just to confirm, whether the Pattern has been setup or not, just press “Power” key once to turn off screen, and press again “Power” key to wake up the screen, there you will be asked to enter pattern lock, just draw recently setup pattern lock to unlock the screen. That means, now you can easily finish up initial setup wizard and can skip (Google Sign in) screen just by using pattern lock option.
Method 2: Bypass Google FRP Lenovo TAB M8 (New)
-You are required an SD card, that has (Quick Shortcut Maker) app, download this app from below into your SD card.
⇒ Quick Shortcut Maker 2.4.0 [Download]
-Insert SD card into your Lenovo TAB M8 device.
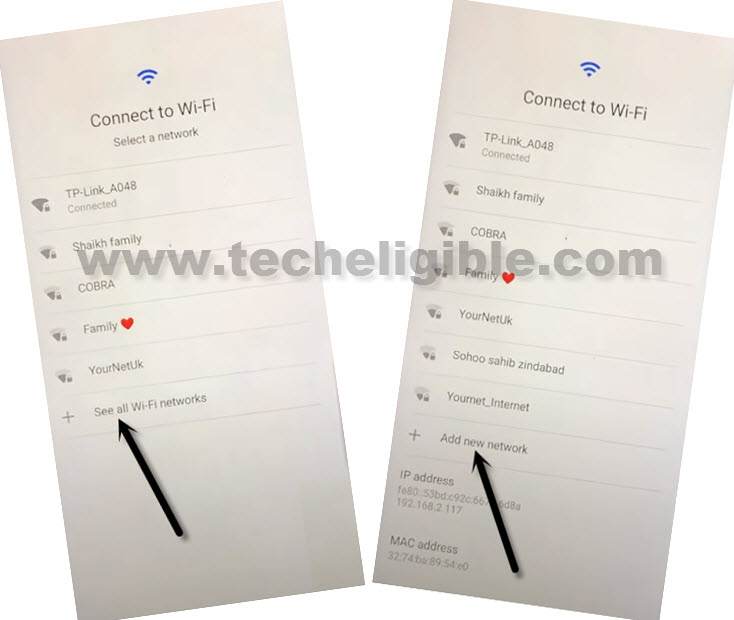
-Connect WiFi in your Lenovo tablet, from the same (Connect to WiFi) screen, tap to “Add new Network”.
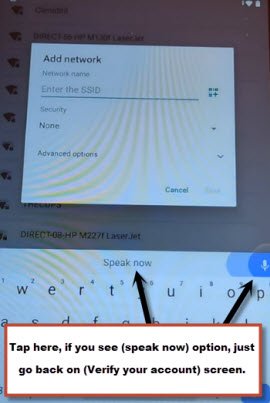
-You will get there a “Mic” icon from keyboard, just tap on that “Mic” icon, after that, you will notice that, Mic is not working, if you see there (Speak now), that means, its not working, we need to get back on (Connect to WiFi) screen.
Note: If you do not get any “Popup” window, go back on (Connect to WiFi) screen, and hit on your connected WiFi “SSID Name”, go to > Don’t Copy > Use my Google Account instead.
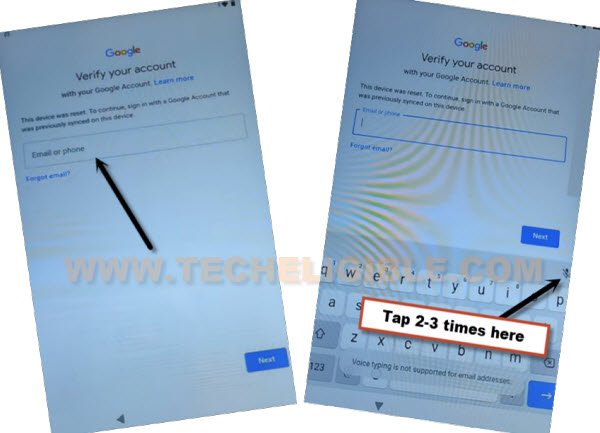
-Tap on “Email or phone” field tab to get keyboard, now hit from there on a “Mic” icon, hit on mic icon 2-3 times.
-Go back to (Connect to WiFi) screen, from there, tap again on “Add new network”.
–Tap to > Mic icon > Deny.
–Tap to > Mic icon > Deny & Don’t Ask Again.
-Tap to > Mic icon > Allow.
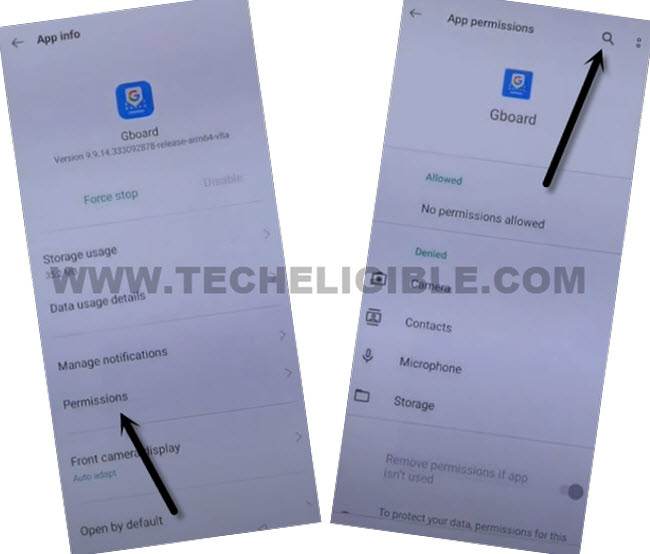
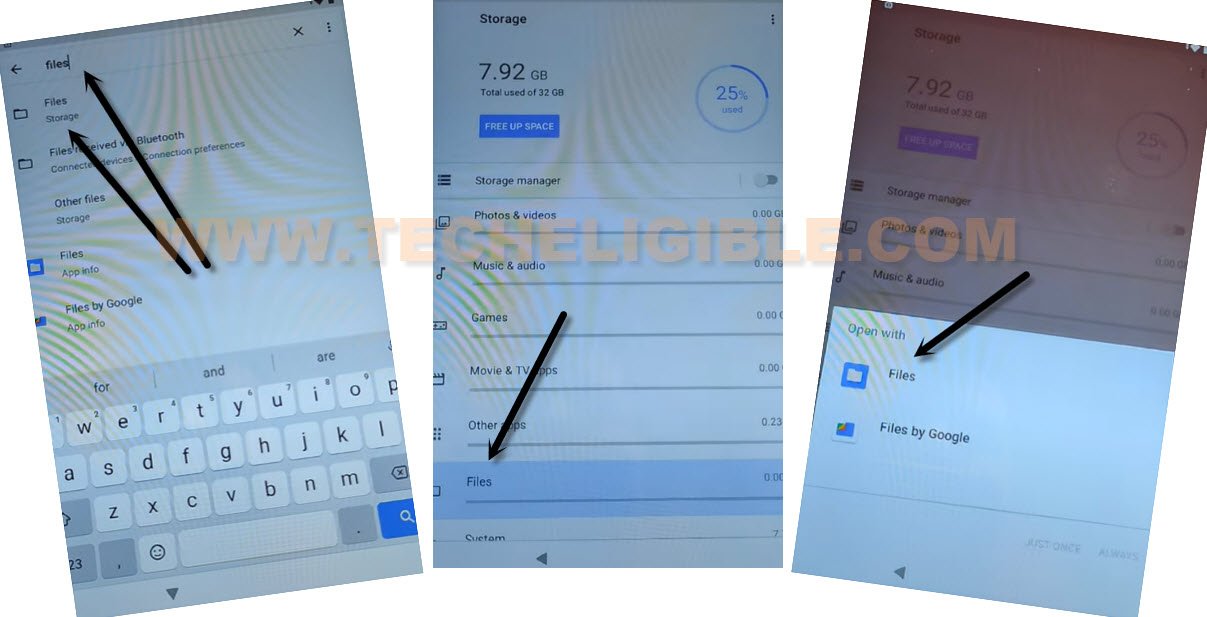
-Tap to “Permissions”, after that, hit on “Search” icon from up right corner.
-Search there “File”, and tap on “Files Storage“, after that, tap again on “Files”.
-From popup, hit again on “Files” from popup box.
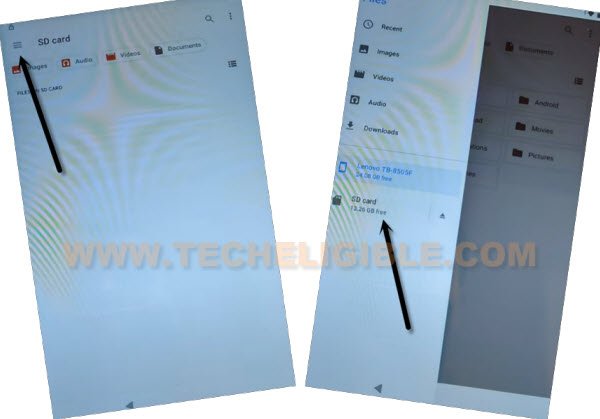
-Hit on “Menu” icon from top left corner, and then, tap in “SD Card”.
-There you will be able to see your already downloaded app, just tap on that app “Quick Shortcut Maker”.
-Hit on > Continue > Install > Open.
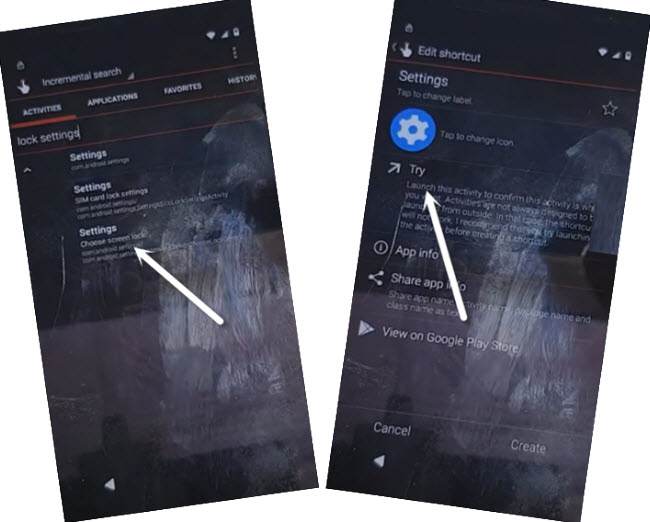
-You are now inside your quick shortcut maker app, just tap over “Application” from top center.
-From there, go to > Settings > Try.
-Congrats, you are now inside your device settings, we are few steps behind from Bypass Google FRP Lenovo TAB M8.
-From settings, go to “Security”.
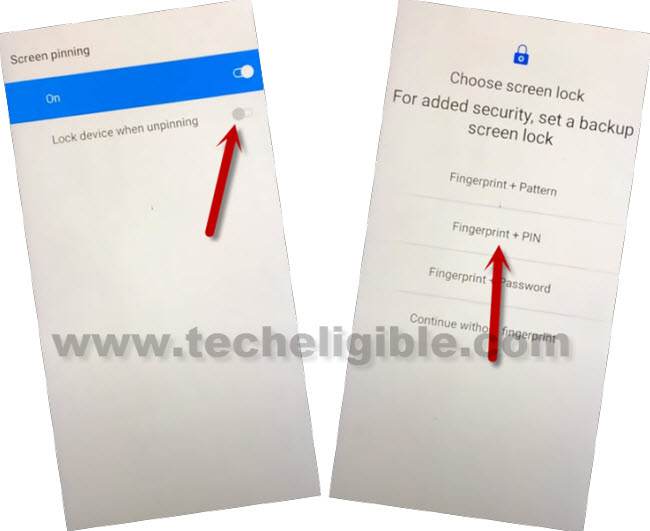
–Hit on > Screen Pinning > Turn on.
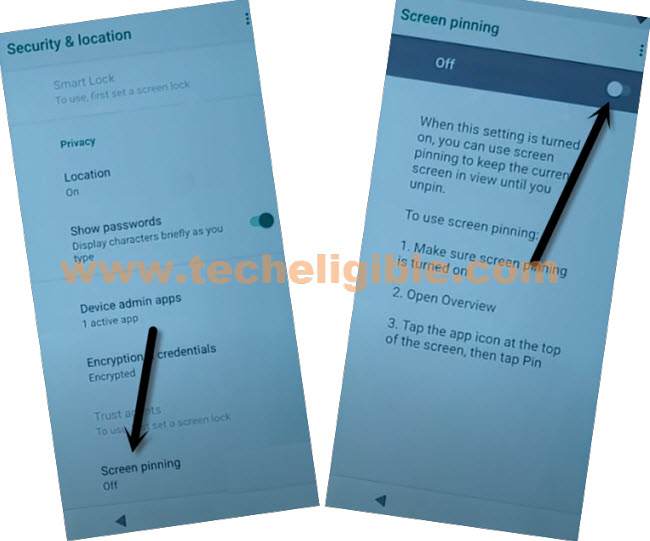
–Turn on “Lock Device When Unpinning”, and then tap to > PIN > No.
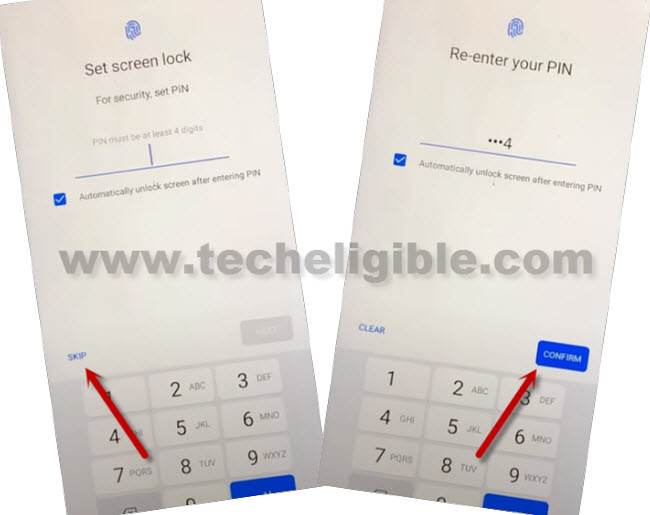
–Set any 4 digits pin code, and then tap to “Confirm”.
-Once you setup your 4 digits Password, just check that by pressing “Power” button once, after that, press “Power” button again to wake up the screen, and there you will be asked to enter PIN, give your already setup PIN there to unlock the screen, that means, the Password has been added successfully.
-Go all the way back on (Connect to Network) screen again, from there, tap on your connected WiFi name.
-Tap on “Don’t Copy”, after that, you will be asked to enter PIN code, give your recently setup PIN there.
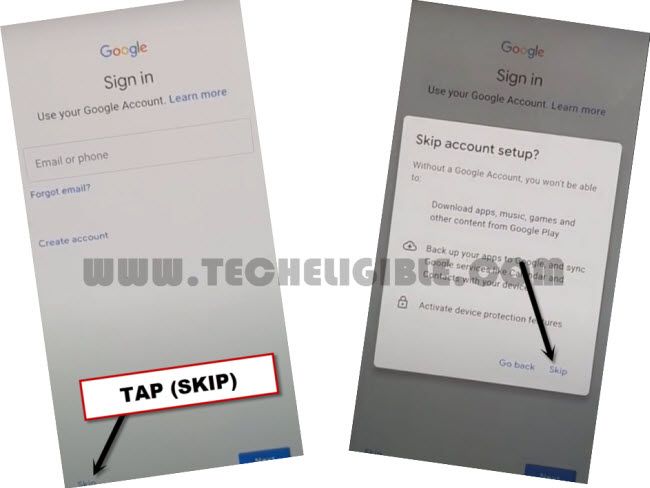
-You will see (Skip) option on your verify your account screen, just tap on > Skip > Skip.
-Now you can easily finish setup wizard by yourself, thanks for visiting us.
Method 3: Bypass Google FRP Lenovo TAB M8
With the help of this method, you can Bypass Google FRP Lenovo TAB M8 (Android 10) without using computer and laptop, through using a (Apex Launcher) app we can easily access inside our device home-screen, and from there we will just add new google account right after disabling the google play services.
-Connect WiFi first, and go back to first (home screen).
-Change language to “Chinese”.
-From popup window, tap at “First Option”.
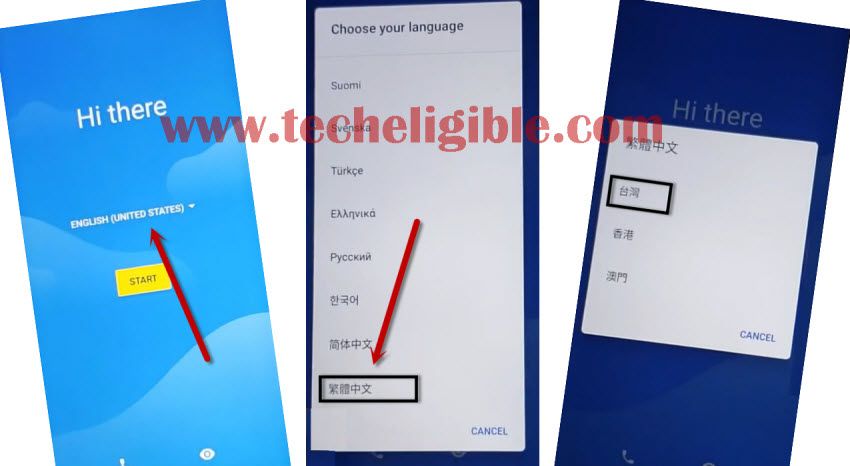
-Tap to > Yellow Button > Bottom Right Option > Bottom Right Option.
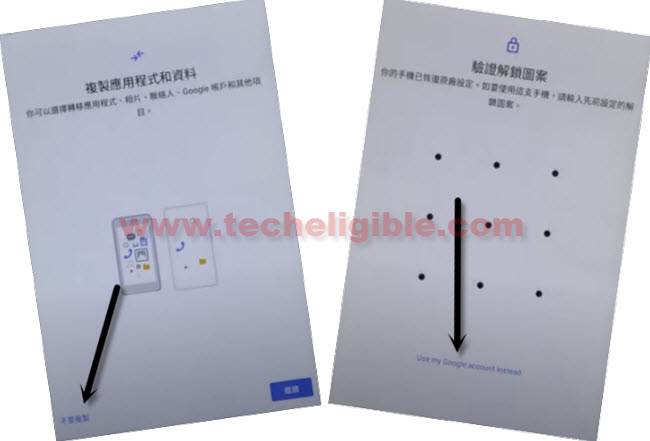
-Hit on > Bottom Left Option > Use My Google Account instead.
-From google services screen, again hit on > Bottom Right Option > Bottom Right Option > Bottom Right Option.
-Now tap to > Bottom Left > Bottom Right.
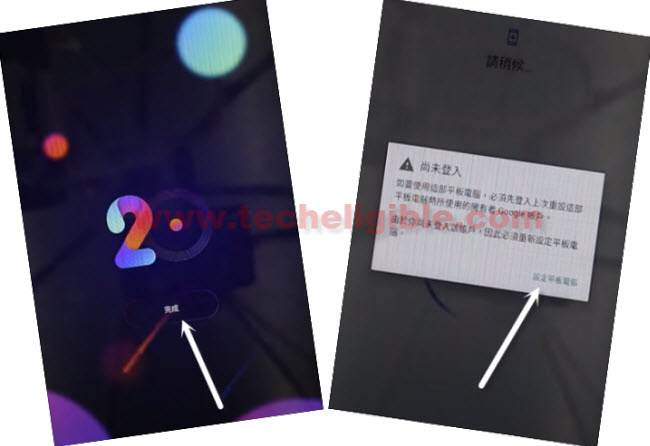
-From the (20) screen, tap to available “Option’, and then from popup window, tap at Chinese “Option”.
-Hit on “Option” from popup window, and you will be redirected back to the homescreen.
Try Again to Access the Google Verification Screen:
-Tap to > Yellow Button > Bottom Right Option > Bottom Right Option.
-Hit on > Bottom Left Option > Centered Chinese Option.
-From google sign in screen, tap at “Bottom Right Option”, and this will show you keyboard.
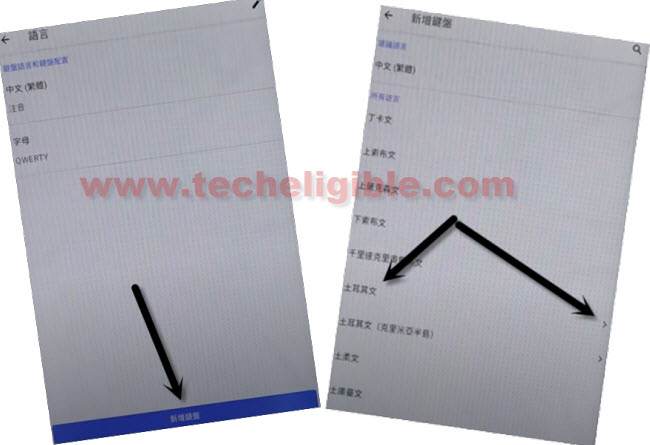
-Long tap at “World icon”, and then tap to “LAST OPTION” from popup window.
-Tap at “Centered Blue Button”, and then tap at any arrow indicated “Language” from the list.
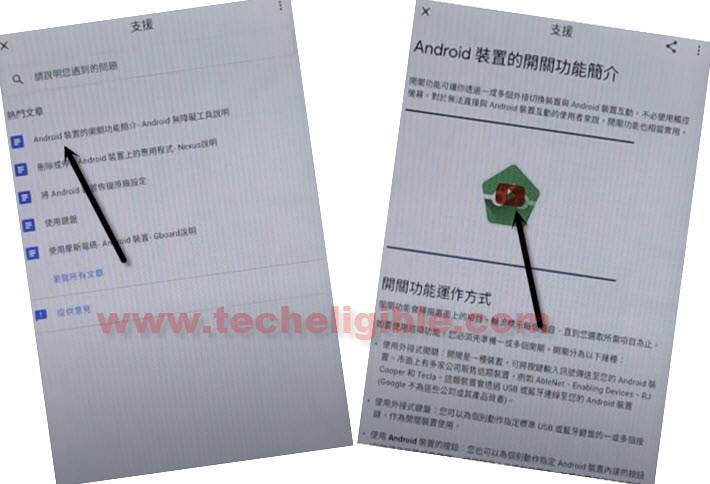
-Go to “3 dots” from top corner, and tap to “2nd Option”.
-Tap at first “Android” option, and then tap to “Video Play icon”.
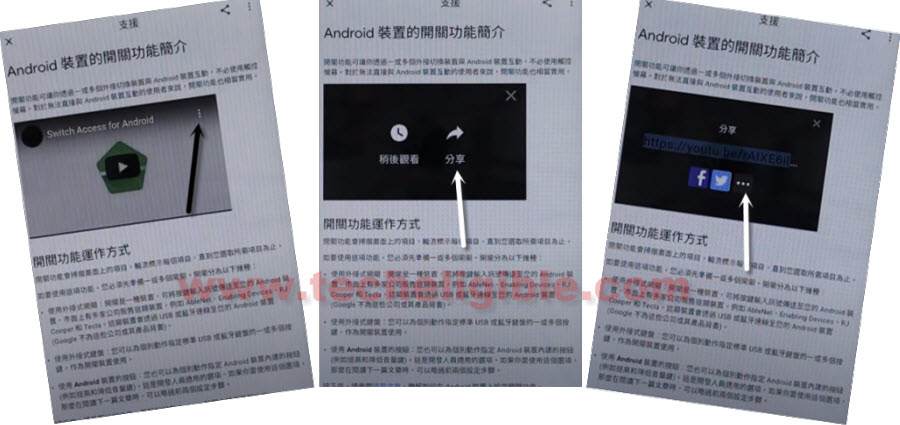
-From the video corner, tap at > 3 dots > Share Arrow > 3 dots.
-You will be redirected to the youtube website, just drag down the video, and tap “3 dots” from top corner, and then hit on “Terms & Privacy Policy” option.
-From chrome popup window, tap at “Centered Blue Option”, and then tap “Bottom left option”.
Download frp Apps:
-Search in browser “download frp tools“, and access to our website searched result.
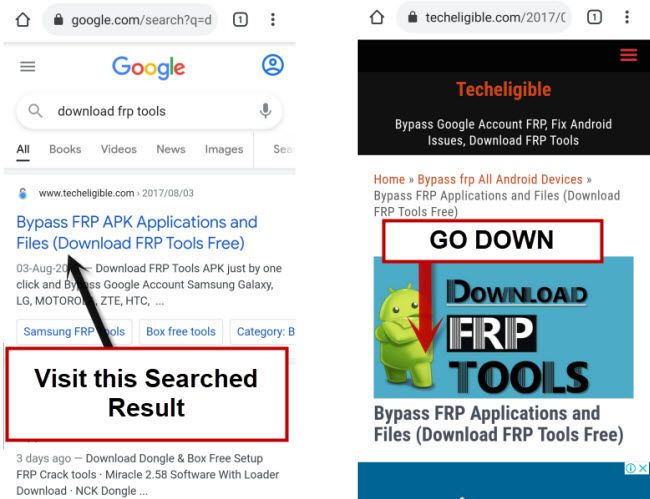
-Download “Google Play Services” app.
-Once downloading finish, you will surely receive a notification at the bottom of the browser screen, just tap at “Blue Option” from there.
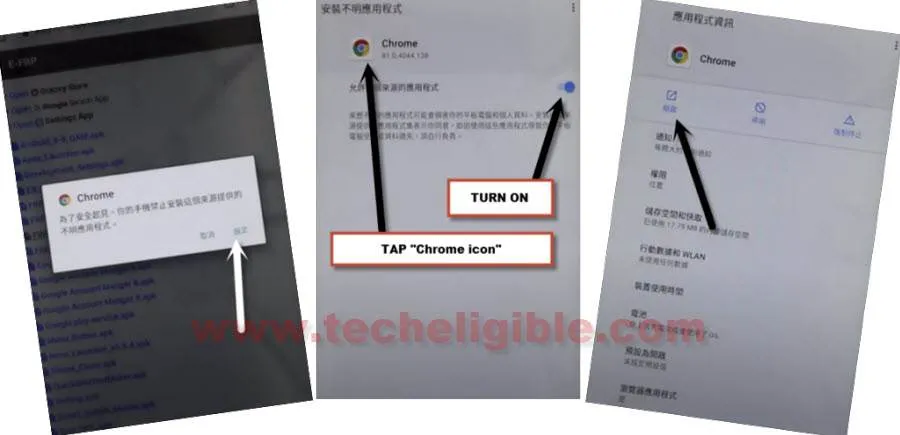
-From chrome popup window, tap at “Right Option”, and then turn on the “Disabled Button”.
-From the same window, tap at “Chrome icon” from the top.
-Hit on “Next Arrow icon” to open chrome browser again.
-From chrome popup window, tap at “Right Option”.
-Download again “Google Play Services” app.
-Once downloading finish, you will surely receive a notification at the bottom of the browser screen, just tap at “Blue Option” from there.
-From the installation popup window, tap at “Right Option”, and after installation done, tap at “Left Option”.
-Download also “Apex Launcher“.
-Once downloading finish, tap at “Blue Link” from bottom notification.
-From the popup window, tap at “Right Option”, and then tap at “Right Option” again to open the (Apex Launcher) app.
-Congrats, you have been redirected to the home screen of your Lenovo Tab M8 HD device.
Change Language to English:
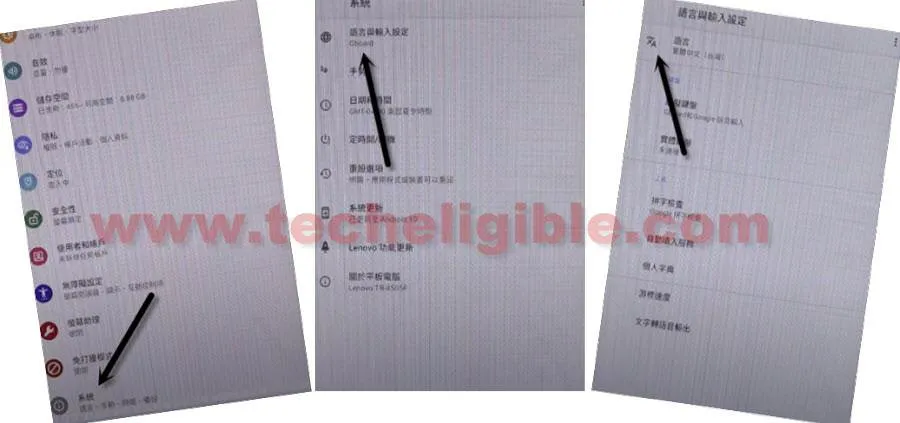
-Go to “Settings”, and go all the way down, and tap at “Exclamation Sign”.
-Tap to > World icon > A icon.
-Tap at “+” option, and then search and select “English”, and then select any country name.
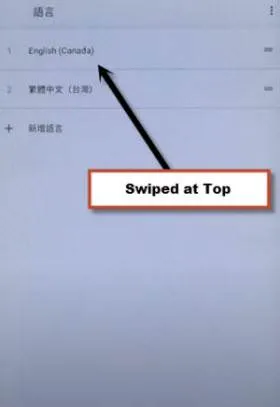
-Swipe to top the (English) language, after that your device language will be changed to English successfully.
-By swiping the screen from left to right, go back to “Settings” again.
-Go to > Security > Device Admin Apps > Android Device Manager > Deactivate.
Note: if the (Android Device Manager) is already deactivated, then don’t need to deactivate it again.
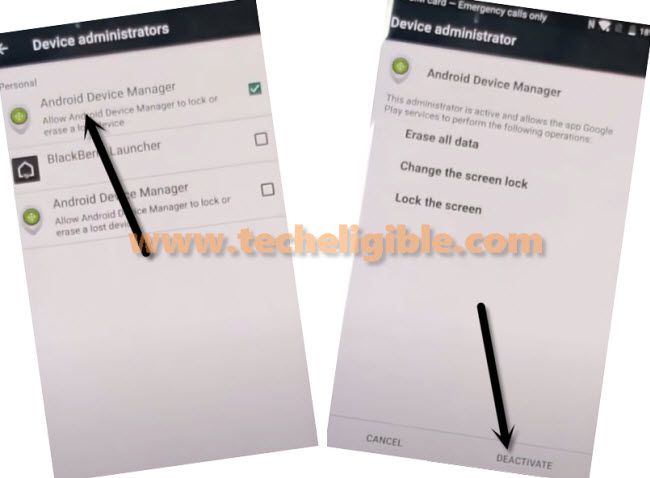
By swiping the screen from left to right, go back to “Settings” again.
-Go to > Apps & Notification > See All Apps.
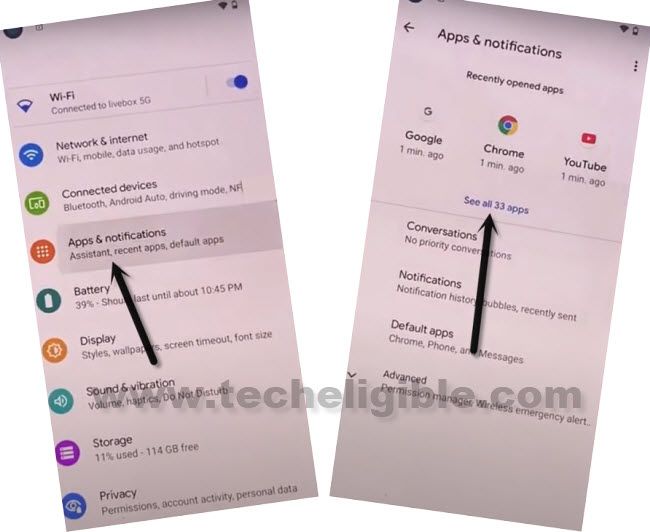
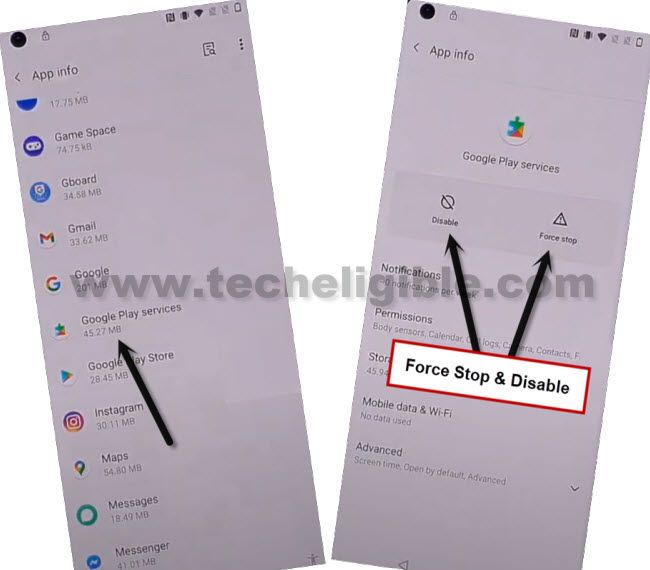
-Tap to > Google Play Services > Force Stop > OK > Disable > Disable App.
-By swiping the screen from left to right, go back to “Settings” again.
-Go to > Accounts > Add Account > Google.
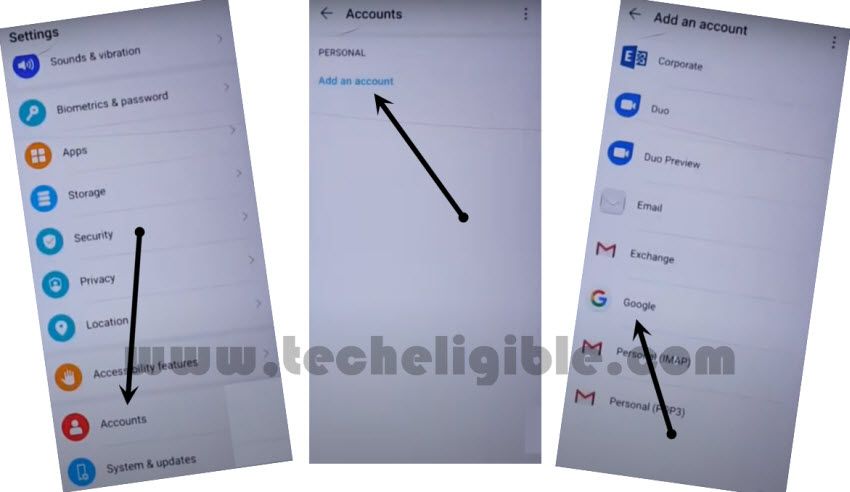
-Sign in there with your latest gmail account to Bypass Google FRP Lenovo TAB M8.
-Again, go back to “Settings”.
-Go to > Apps & Notification > See All Apps.

-All Apps > Disabled Apps.
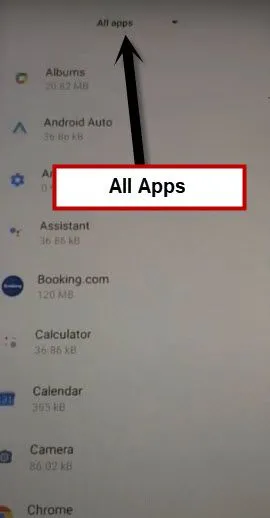
-Tap to > Google Play Services > Enable.
-Restart your Lenovo Tab, and finish initial setup wizard, Thank you for visiting us.
Read More:

