Remove FRP Account Samsung A51 Android 10
Here is another way to bypass FRP without using any PC or flashing tool, this is required only a PIN Locked SIM card, and through that you can get your own Samsung device, you don’t need to visit any hardware or software shop to fix this FRP problem, so lets go for bypass google account.
Note: We highly recommend you to apply this method only on your own device to bypass frp Samsung, if you are not owner of this device, or you found this from some where, you must return this device to its real owner.
Let’s Start to Remove FRP Account Samsung A51:
-Begin process by connecting WiFi connection in your device.
-Once the wifi is connected, just Go to screen of “Verify your account”.
-Hit on > Email or Phone > Settings gear icon > Swipe, Touch and Feedback > Touch Feedback.
![]()
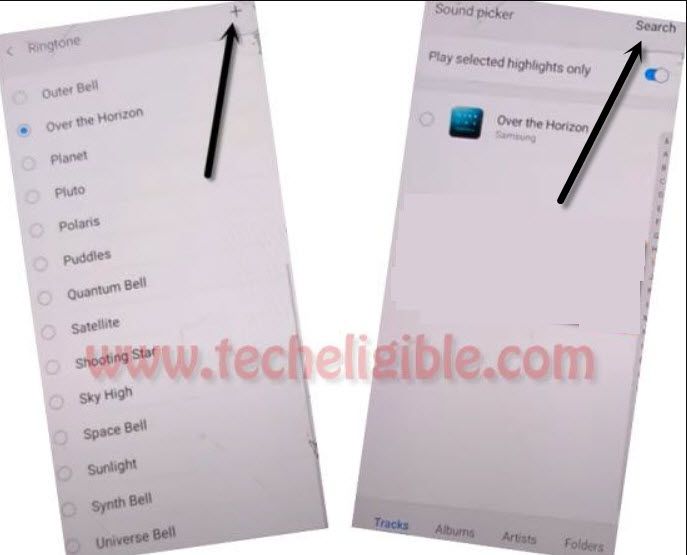
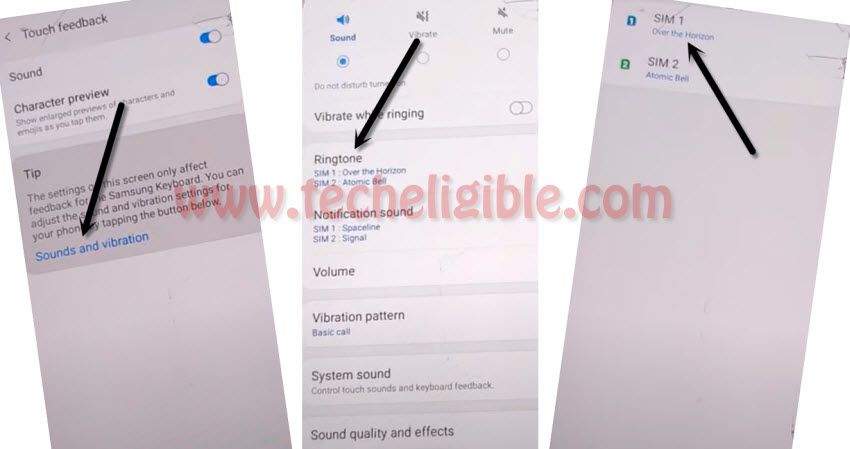
-Now you just have to tap > Sound & Vibration > Ringtone > SIM 1.
-From there hit on “+” sign from top right corner of the screen.
-Afterwards, hit “Search” option from top right corner.
-Setup 4 digits pin code in your any SIM using any other phone.
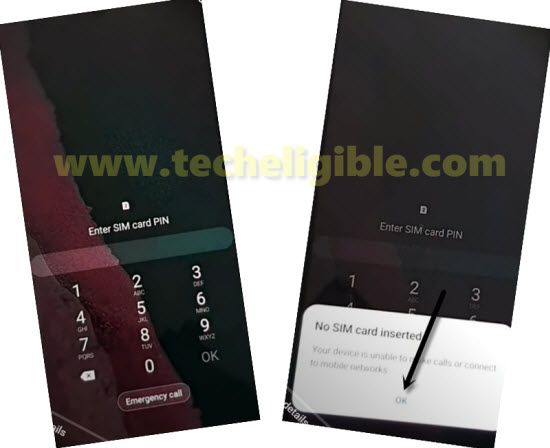
-Insert your PIN locked SIM card & Start tapping on “Mic” icon from top right corner until you have a screen of “Enter SIM Card PIN”.
-Rapidly remove SIM using SIM ejector tool.
-As soon as you see “No SIM Card inserted” popup window, just hit on “OK”.
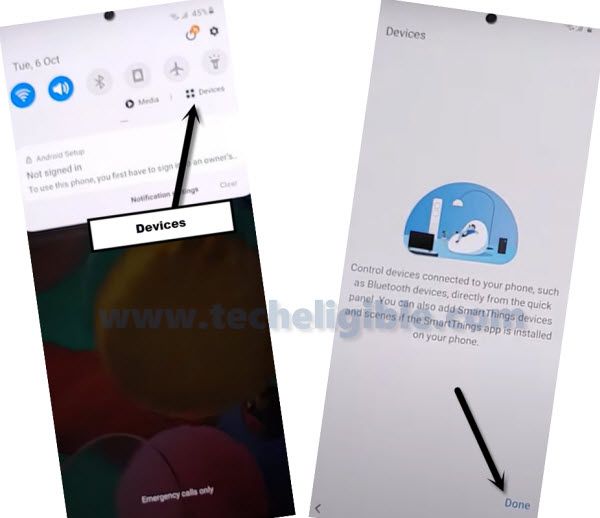
-Quickly Swipe date & time to right side, and do not lift up your finger keep holding date and time to right side, and with other finger quickly hit on “Lock icon“.
-Quickly swipe down “Not Signed in” popup message, this will bring (Top Notification Bar), tap 4-5 times on “Settings gear icon” from top right corner of the notification bar.
-From top notification bar, tap 4-5 times on “Settings gear icon”.
Note: You should do this very fast, using your index finger, swipe data & time to right side, while keeping it swiped, with other finger just tap on “Lock icon”, and then quickly swipe down the “Not Signed in” message, and then quickly tap 4-5 times on “Settings gear icon”.
Update Galaxy Store:
-Tap > Devices > Done.
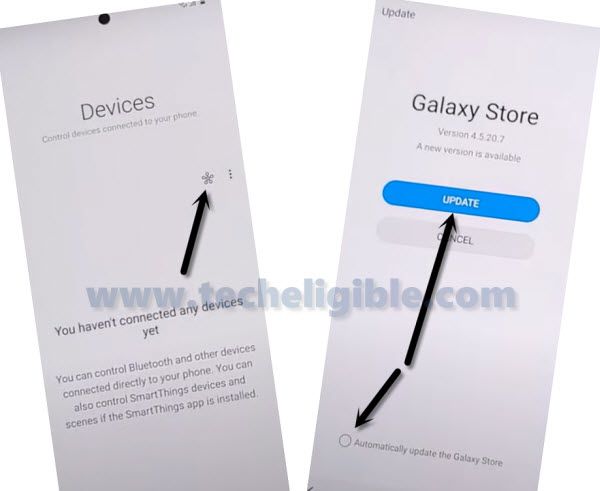
-Now tap “Smarthings” icon.
-Select option “i have read and agree….”, and then hit “Agree”.
-Tap on “Update” button, this will start downloading and installing “Galaxy Store”.
-Once the updating.. process done, you will automatically be redirected to the setup wizard.
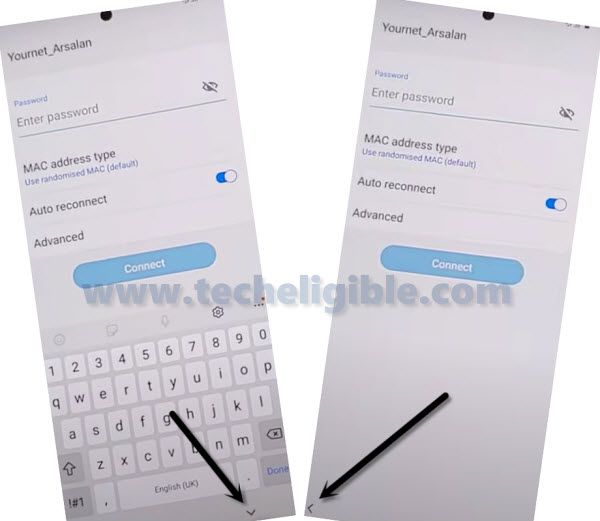
-Tap on “Down Arrow” icon from bottom, and then tap “Back Arrow” icon.
-From Choose a WiFi network screen, tap any random wifi SSID network.
-Now we are going to repeat all above steps to access the same screen.
Repeat All Steps:
-tap > Settings gear icon > Swipe, Touch and Feedback > Touch Feedback.
![]()
-Now you just have to tap > Sound & Vibration > Ringtone > SIM 1.

-From there hit on “+” sign from top right corner of the screen.
-Afterwards, hit “Search” option from top right corner.
-Setup 4 digits pin code in your any SIM using any other phone.
-Insert your PIN locked SIM card & Start tapping on “Mic” icon from top right corner until you have a screen of “Enter SIM Card PIN”.
-Rapidly remove SIM using SIM ejector tool.
-As soon as you see “No SIM Card inserted” popup window, just hit on “OK”.
-Quickly Swipe date & time to right side, and do not lift up your finger keep holding date and time to right side, and with other finger quickly hit on “Lock icon“.
-Quickly swipe down “Not Signed in” popup message, this will bring (Top Notification Bar), tap 4-5 times on “Settings gear icon” from top right corner of the notification bar.
-From top notification bar, tap 4-5 times on “Settings gear icon”.
Note: You should do this very fast, using your index finger, swipe data & time to right side, while keeping it swiped, with other finger just tap on “Lock icon”, and then quickly swipe down the “Not Signed in” message, and then quickly tap 4-5 times on “Settings gear icon”.
Access to Galaxy Store:
-Tap > Devices > Done.
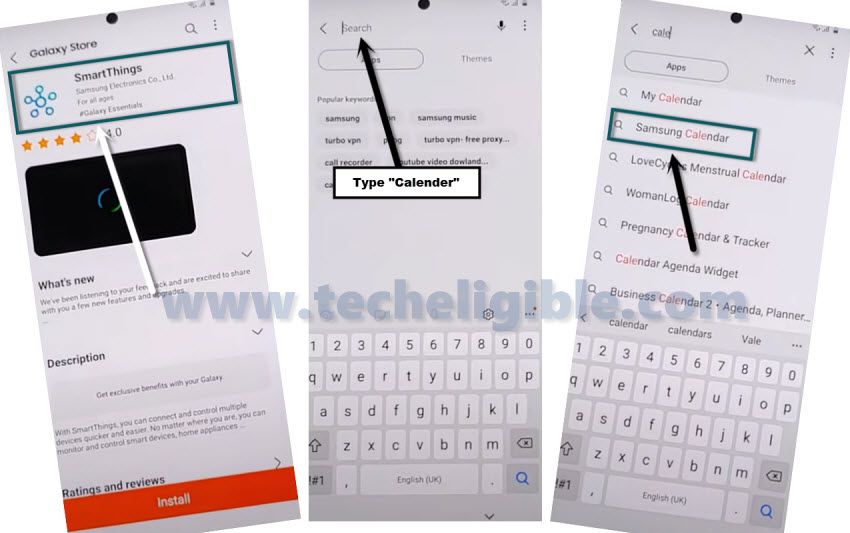
-Now tap “SmarThings” icon.
-You will be redirected to the Galaxy Store, from there tap on “Search icon” from top right corner.
-Type “Calendar”, and then tap on “Samsung Calendar” from the searched results.
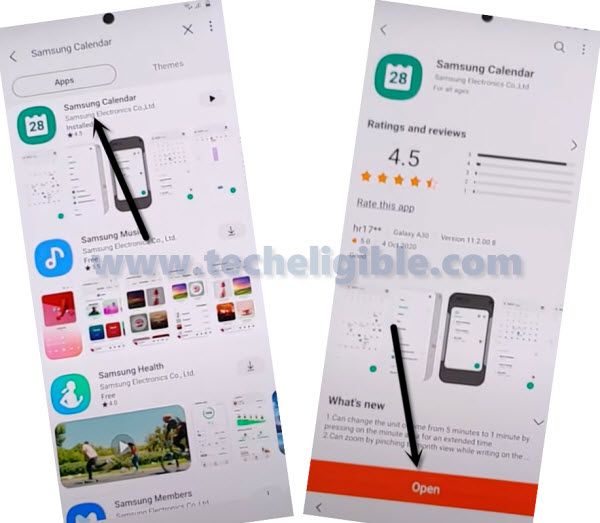
-Tap again on > Samsung Calendar > Open.
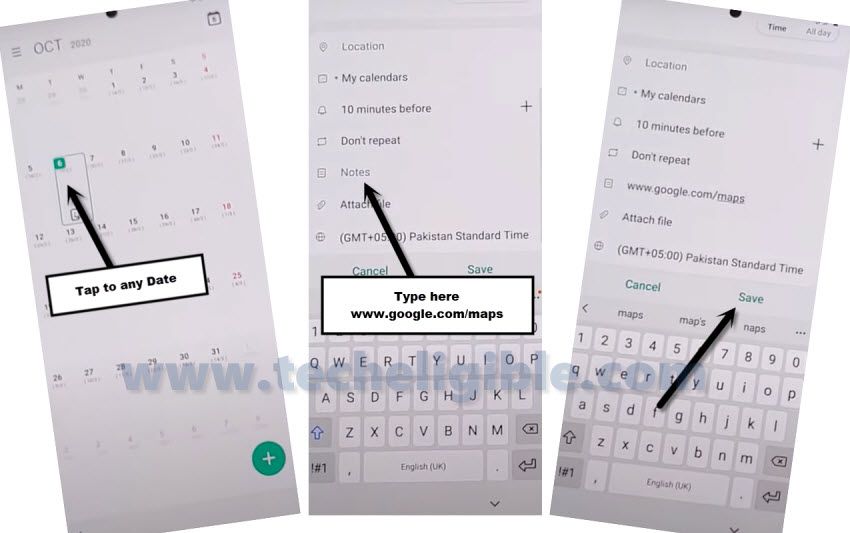
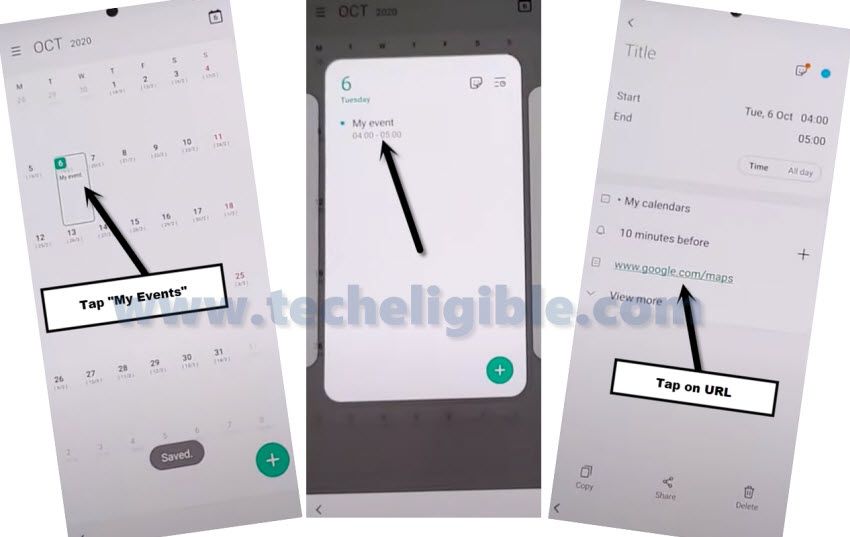
-Hit on any “Date” from there.
-Type in notes field “www.google.com/maps“, and then tap to “Save”.
-Tap on > My Event Data > My Events.
-Tap on url “www.google.com/maps”.
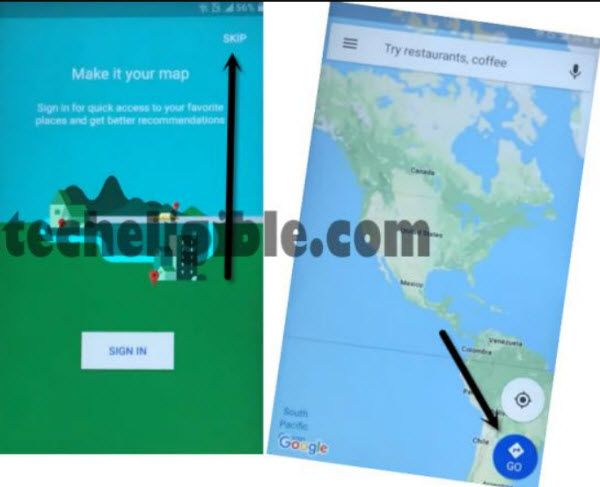
-This will open google map for your, from there, tap to “SKIP” from top right corner, and then tap on “GO” icon from bottom right corner.
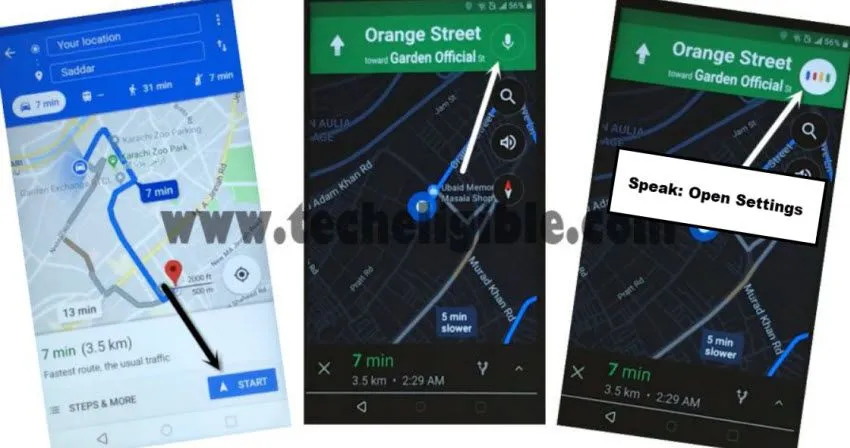
-Type your any (Location Name) in search area, and then tap to “Start” button.
-Tap “Mic” icon from top right corner, and then speak loudly “Open Settings”.
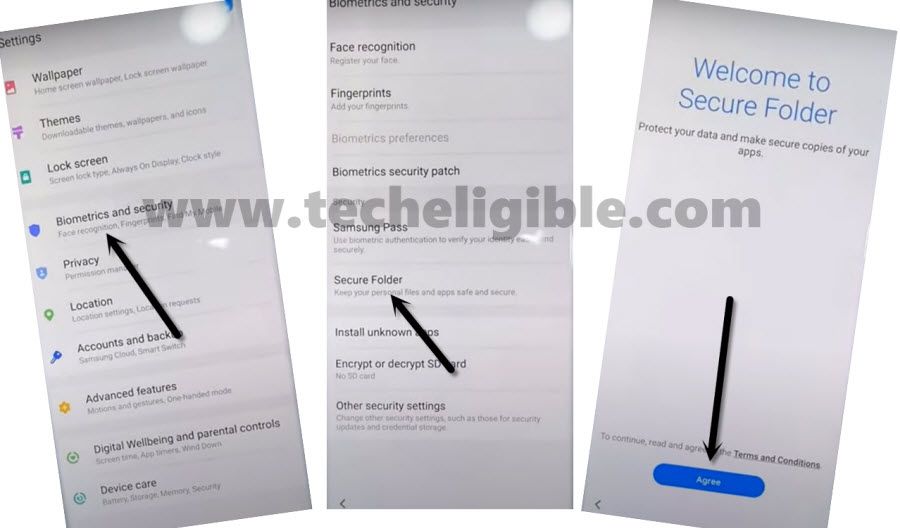
-You will be redirected to your Samsung Galaxy A51 settings.
-Now we are going to setup new PIN & Pattern to Remove FRP Account Samsung A51.
Go to Secure Folder for Setup PIN:
-Tap on > Biometrics & Security > Secure Folder > Agree.
-Just Sing in with your Samsung Account.
Note: if you don’t own any microsoft account, just create one in free of cost from microsoft site, and then sign in with that account (Easy).
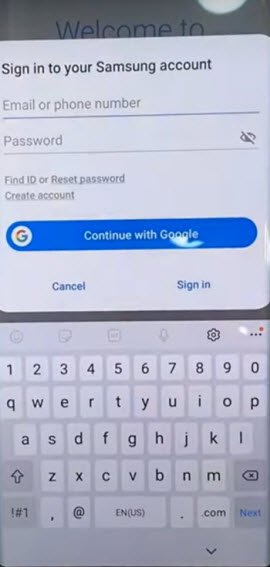
-If you get a popup window “Want a faster way to sign in”, just hit on “Cancel”.
-Wait on “creating a secure folder”.
-From there, tap on “PIN”, and then hit “Next” option from bottom.
-Setup your any desire PIN.
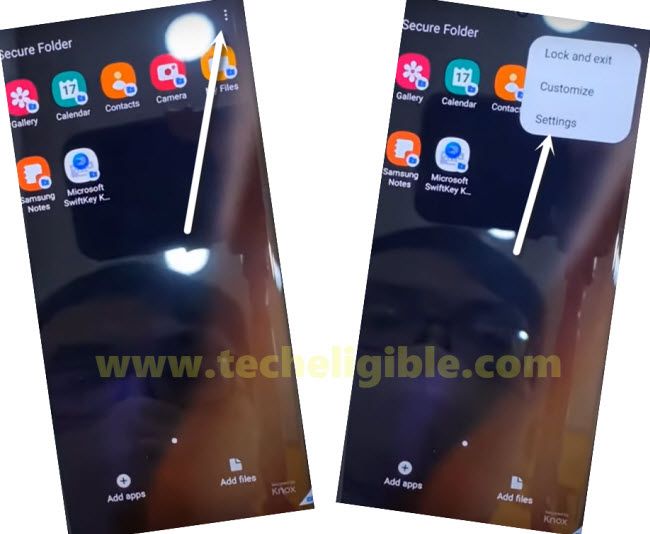
-After settings up PIN, you will be redirected to the secure folder screen, from there, tap “3 dots”, and then tap “Settings”.
-Tap on “Lock type” and give there same PIN, that you have setup already, and then tap to “Next”.
-Turn “Fingerprints” from bottom, and then tap on “Continue”, after that tap “Pattern”.
-Setup your any desire Pattern there.
-After that tap on “OK” from popup window, and then tap on “Back Arrow”, again tap on “Back Arrow”.
-You are almost done here to Remove FRP Account Samsung A51 (Android 10).
-Press once a (Power Button) to turn off screen only.
-Press (Power Button) again to wake up the screen.
-You will be shown a lock screen, just swipe up the screen, and give your already setup Pattern.
-Now enter your already setup PIN.
-Tap on > More Settings > Uninstall > Uninstall. (This uninstall secure folder).
Note: Uninstalling secure folder, will take us back to setup wizard screen, from there we can easily complete setup wizard just by using our PIN and Pattern.
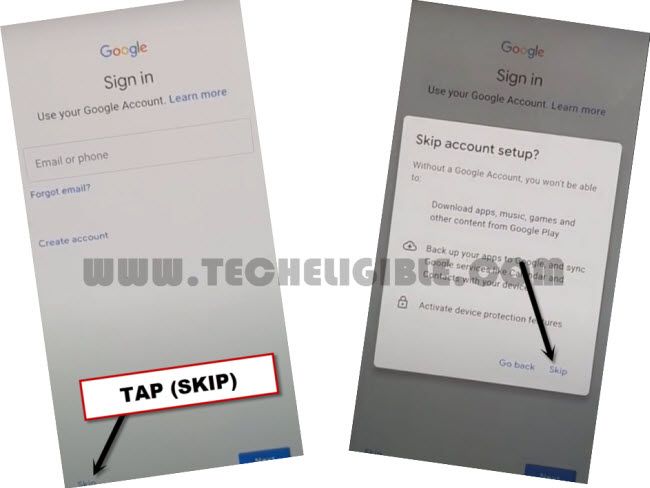
-If you see “Verify your Account”, hit on “SKIP” from bottom left corner, and then hit on “SKIP” from popup window.

