
Remove FRP Account Realme Narzo 50i Android 13, 12, 11
2 Best working methods available here to Remove FRP Account Realme Narzo 50i (Android 13, 12, 11) version devices. First, you can go with latest method, if your device has (Android version 13). Otherwise, you can try old (Method 2), if you are on old android version such as (Android 12, 11) etc.
Both methods are on without PC. So, you don’t really need for a PC tool and paid service, just follow easy steps from below, and within 10-15 minutes, you can fix FRP problem and setup new google account on Realme Narzo 50i device.
Warning: Do not try this frp method on a stolen phone, this is a serious crime, if you are trying to bypass frp on a stolen phone, you may also be jailed, this process is for device owner and for educational purpose only.
| Method 1: FRP Bypass Realme Narzo 50i [Android 13] |
| Method 2: FRP Bypass Realme Narzo 50i [Old Method] |
Method 1: Remove FR Account Realme Narzo 50i
-Switch on Realme Narzo device, and connect WiFi.
-From (Connect to WiFi) screen, hit on “Exclamation Sign” same as mentioned below.
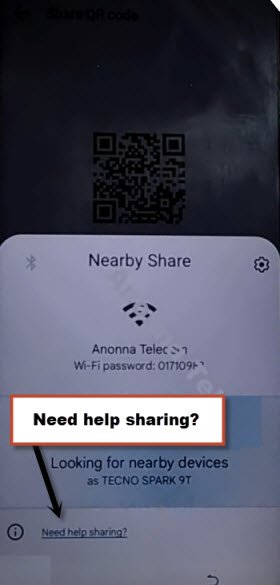
-Afterwards, go to > Share > Nearby.
![]()
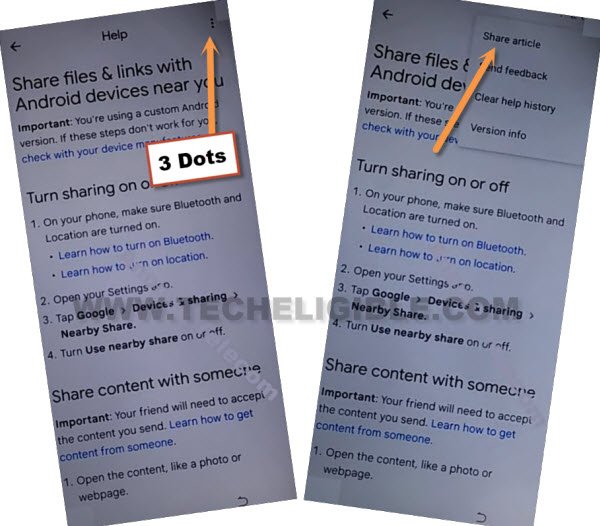
-Let’s go to > Continue > Allow > Need help sharing.
-You will be inside (Help) page, there would be “3 dots” icon upright, just go to that, and then, hit on “Share article”.
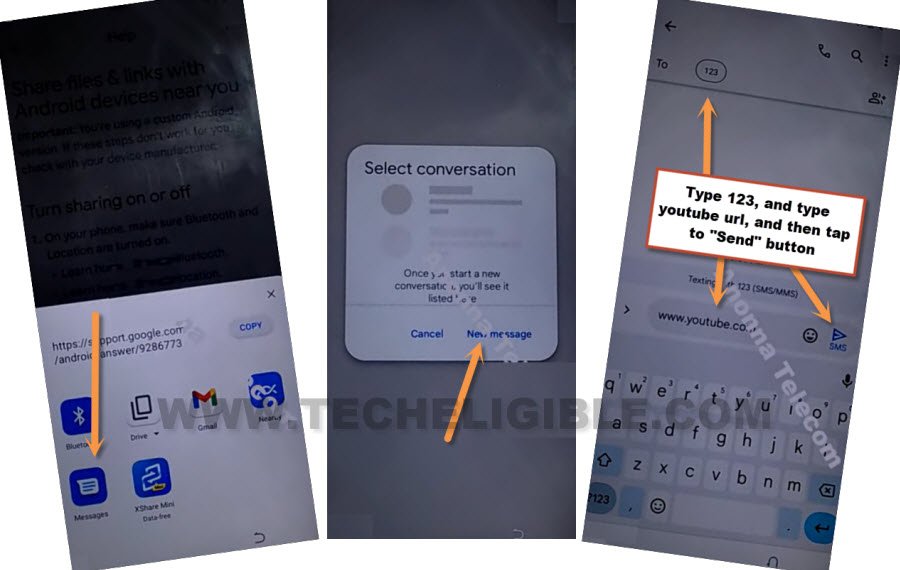
-Some share options will popup right after hitting on (Share Article) option, so go to > Message > New Message.
-Send url “www.youtube.com” as text to any random number.
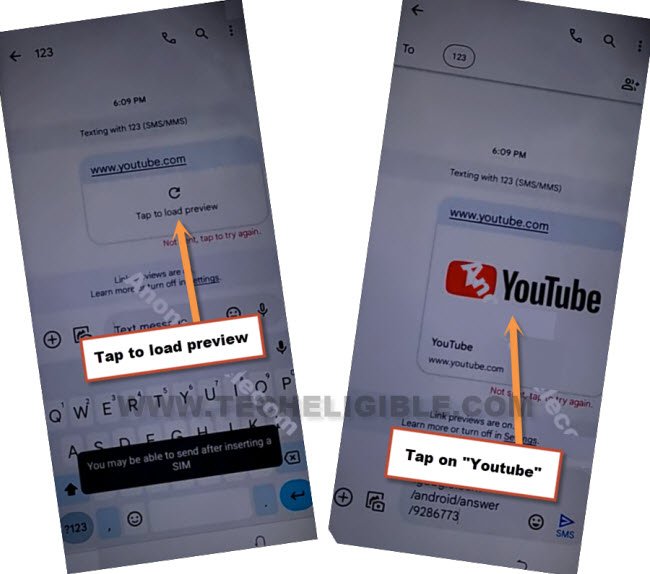
-Once the sending link turn to url, just tap on “Tap to load preview”, and then tap on “Youtube”.
-Tap on “Profile icon” from top corner, and go to > Settings > About > Youtube terms of services.
![]()
-Tap to > Use without an account > No Thanks. After that, the google chrome browser will be launched.
Reach Your Phone Settings Directly:
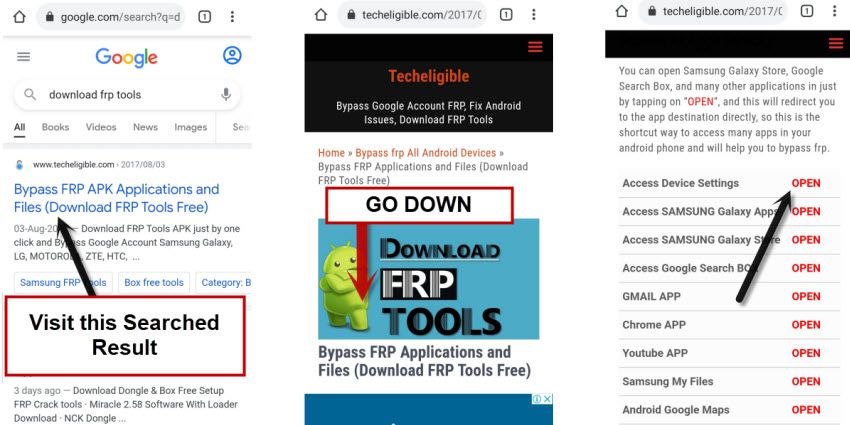
-Once we launched google chrome browser, so that means, we can now easily access inside our FRP Protected device settings by following below steps to Remove FRP Account Realme Narzo 50i.
-Search in browser “Download FRP Tools“. and visit our frp tools page result. Afterwards, hit on “Access Device Settings”
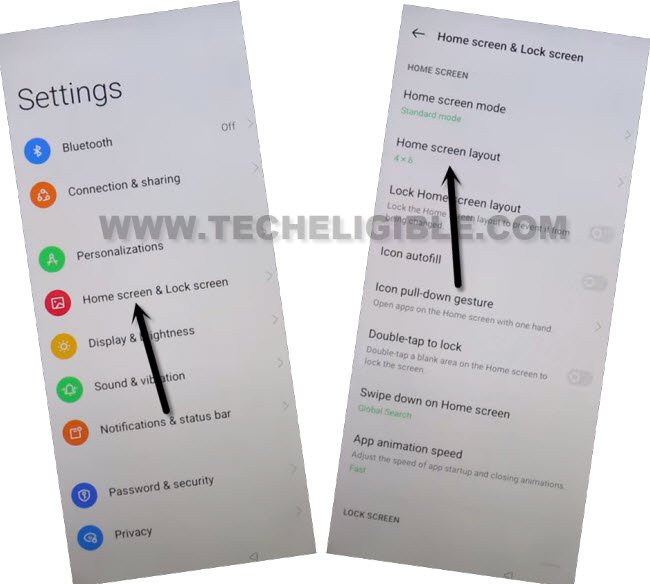
-Tap to > Home screen & Lock Screen > Home Screen Layout.
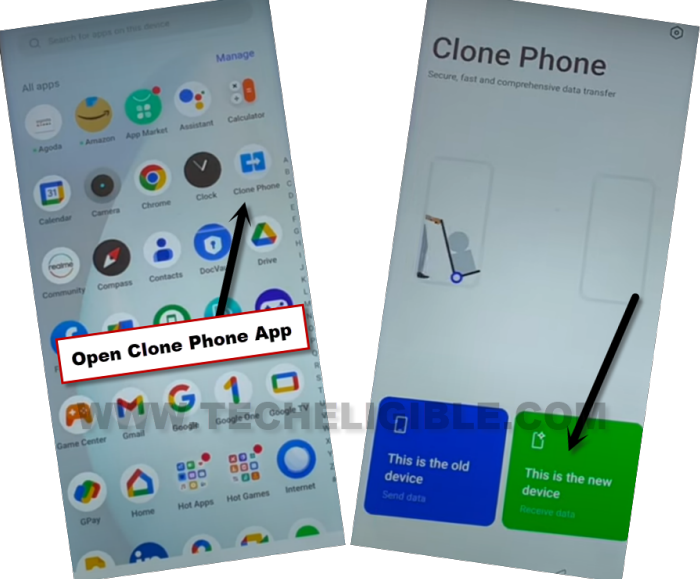
-Once you reach to device main home page, just open your device menu, and tap to “Clone Phone” app same as mentioned below.
-After that, tap on “This is the new device”.
-Hit on > Allow > Other Android.
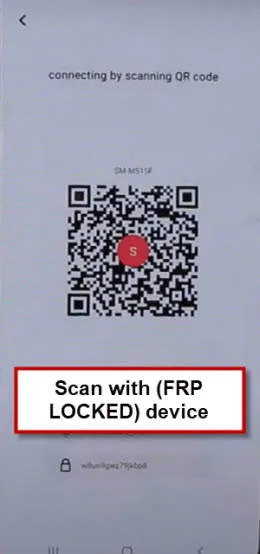
-QR Code will be displayed on your Narzo 50i screen.
We’re gonna Install OPPO Clone App in other Phone:
-As, we’ve already mentioned, that you are required another android phone to connect with through Clone phone application.
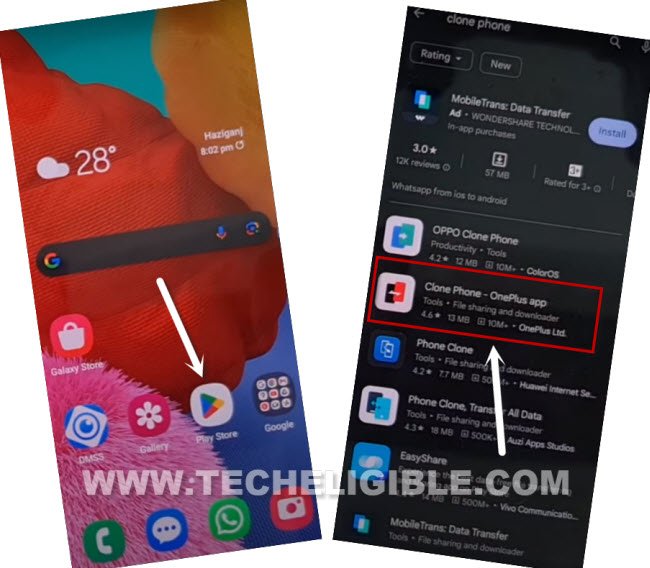
-So, open google play store in other android phone.
-Download “Clone Phone – Oneplus App”.
-One the downloading, and installation process is done, just tap to “Open”.
-Launch your installed app (Clone Phone – Oneplus), and hit on “Agree & Continue”.
-Once the installing process is done, just tap over “Open” to launch (Clone Phone – Oneplus App).
-Tap on “Agree & Continue”.
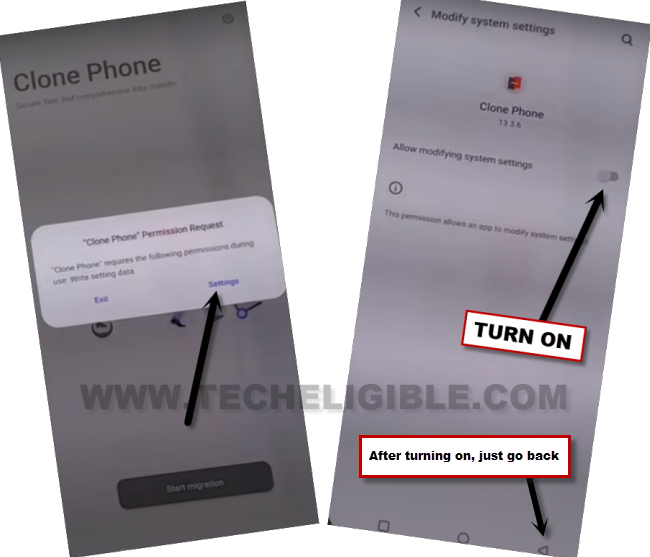
-You will be displayed a popup window of (Clone Phone Permission Request), just hit on “Settings”, and toggle on option of (Allow modifying system settings).
-Tap on “Back Arrow” from bottom to go back.
-You will see another popup, just hit on “Settings”, and turn on (Allow access to manage all files) option from there too.
-Go back by tapping on “Back Arrow” from bottom.
-Hit on “Start Migration”, and you will be shown another popup window, just tap to “Settings” from there.
-From app list, go to “Clone Phone”, and turn on (Allow display over other apps).
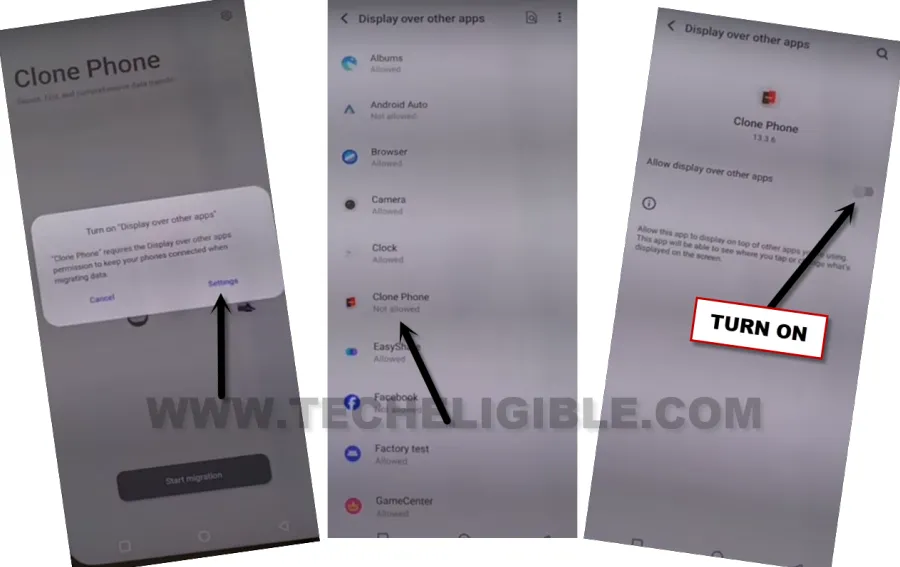
-Hit on “Back Arrow” from bottom to back to (Clone Phone) screen.
-You will see one more popup of (Turn on “Usage access”), just hit on “Settings”, and toggle on “Permit usage access”.
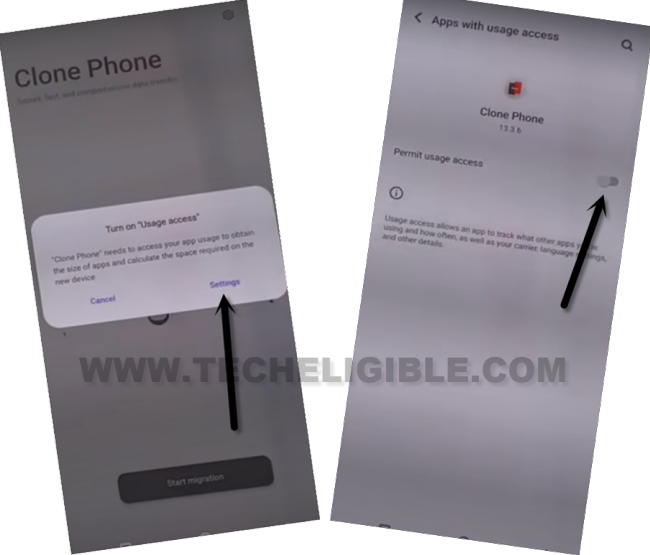
-Hit on “Back Arrow” from bottom, and then tap to “While using the app”, and hit on “Allow” few times, after that, tap to “OK”.
Note: Above 7-8 steps we did just to launch (Clone Phone) app, you may have different options, all you have to do is, allow and turn on access each time when you see any popup window. After that, QR Code scanner will come up.
-Finally, we will see (QR Scanner) on screen. That means the app has been launched successfully, and now ready to be connected with Realme Narzo 50i device.
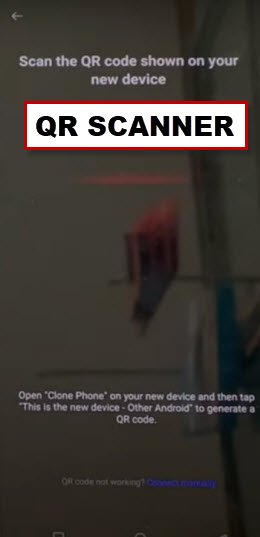
-Let’s scan QR Code of Oneplus device from other device QR Scanner to connect both devices together to Remove FRP Account Realme Narzo 50i.

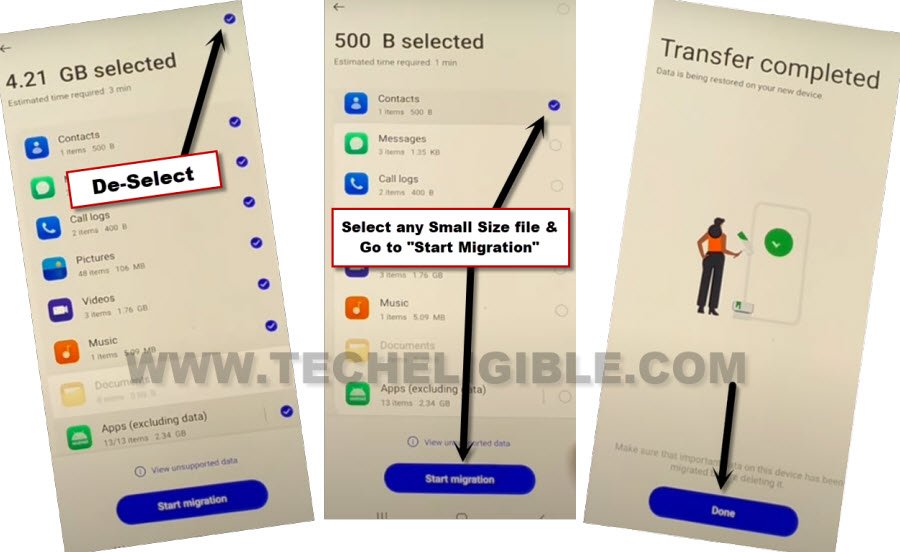
-Once your other android device is connected successfully, just deselect all selected apps by uncheck option from top right corner.
-Select any one Small MB Size file, and hit on “Start migration” button.
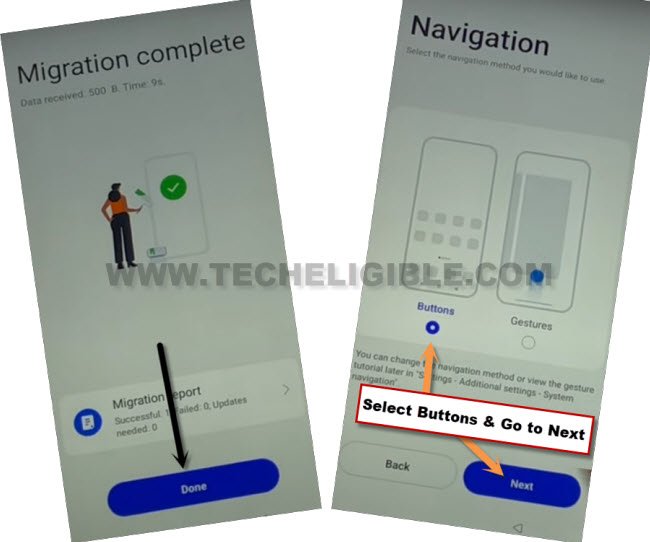
-Within few seconds or minutes, transferring process will be completed, after that, just hit on “Done”.
-From Realme Narzo 50i device screen, tap to “Done”, and select “Button”, and then, hit on “Next”.
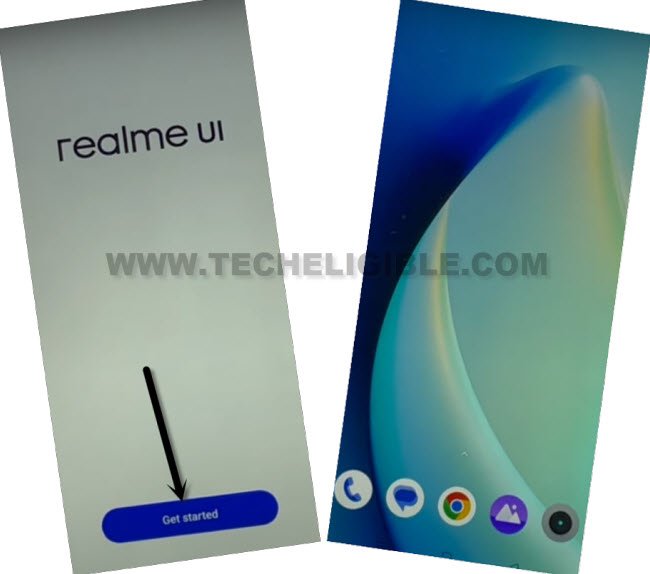
-Go to > Skip > Done > Get Started. You will be taken inside your Realme device main home screen without signing in with any google account and without complete setup wizard. You are all done from bypassing frp on this phone, now you can easily setup new google account and new security lock.
Method 2: Remove FRP Account Realme Narzo 50i
Remove FRP Account Realme Narzo 50i easily without using any frp apps and computer or any other paid tools, just through a one code, you can access inside your device homescreen without signing in with forgotten added Gmail account, you can try this method on your own device and this won’t harm your device by anyway, follow all steps carefully from below.
Let’s Start FRP Bypass Steps:
Step 1: Firstly, connect WiFi.
Step 2: Go back to (Select Language) screen.
Step 3: Hit on “Emergency Call” option.
Step 4: Type code *#812#, and tap on “Calling” button.
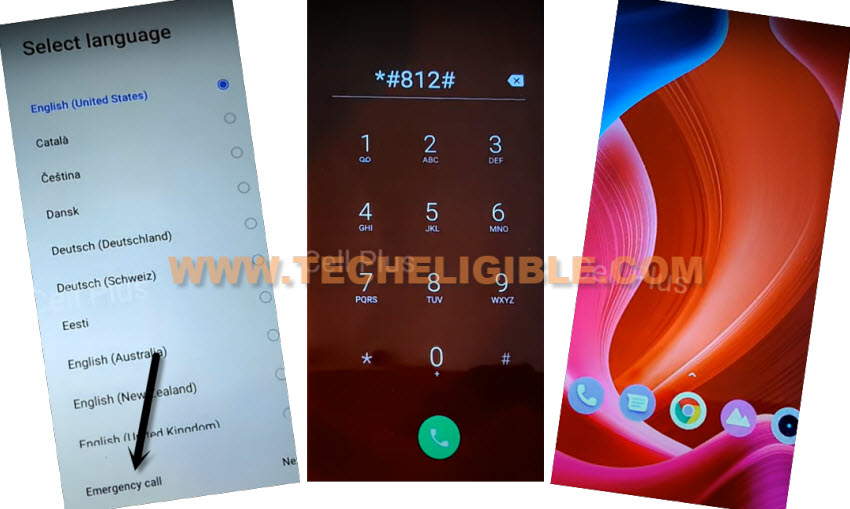
Step 5: Wait few seconds, you will be redirected automatically inside the device home-screen.
Step 6: Go to “MENU”, and then go to “Settings”.
Step 7: Tap on “Settings” gear icon to access inside device settings for changing the language.
Step 8: Scroll little bit down, and tap to “A”, and select “2nd Option” right corner.
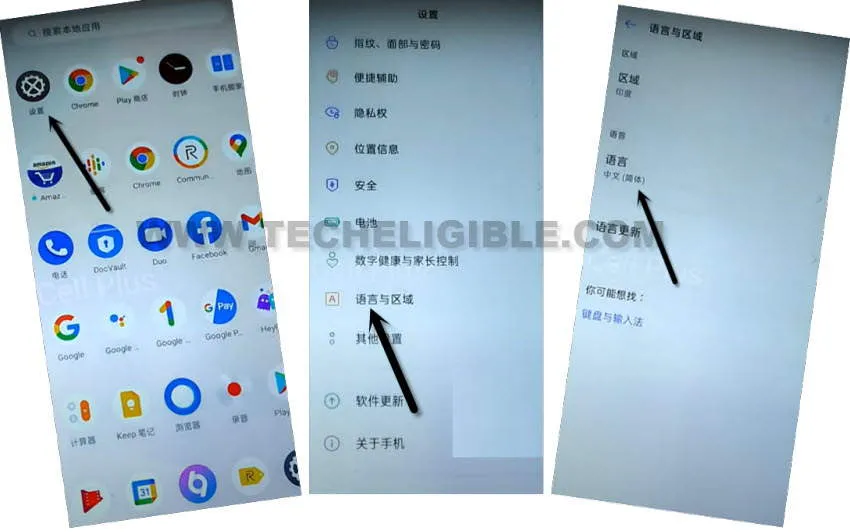
Step 9: Select “English”, and then tap on “Chinese” option from top to Remove FRP Account Realme Narzo 50i.
Step 10: Hit on “1st Option” from the bottom popup window.

Note: In below step, we are going to restart the device, if you wanna add your new account restarting the device, so you can add that easily just by going inside the device > Settings > Users & Accounts > Google > Add Account.
Final Step: Long press “Power Button”, and then swipe up to “Restart”, you are all done from removing frp lock.
Thank you for visiting us, if you have any question regarding this method, you can ask us in below comment sessions.