Remove FRP Account Moto G32 Android 13, 12 Without PC
Hey, have you lost access to your own device because of forgetting google account?. That means, your Moto device is on a FRP protection, and you cannot go through google sign in page until you verify your ownership using already signed in google account. In case of not remembering the google account, follow our this tutorial to Remove FRP Account Moto G32 (Android 13). We will access to this device settings, and disable google play services application in order complete setup wizard and go to through google verification screen.
Warning: Do not try this frp method on a stolen phone, this is a serious crime, if you are trying to bypass frp on a stolen phone, you may also be jailed, this process is for device owner and for educational purpose only.
| Method 1: FRP Bypass Moto G32 [Android 13] New |
| Method 2: FRP Bypass Moto G32 By Pattern Setup [Android 12] |
Method 1: Remove FRP Account Moto G32 [Android 13]
-We are gonna start this method by connecting WiFi first to our Moto device.
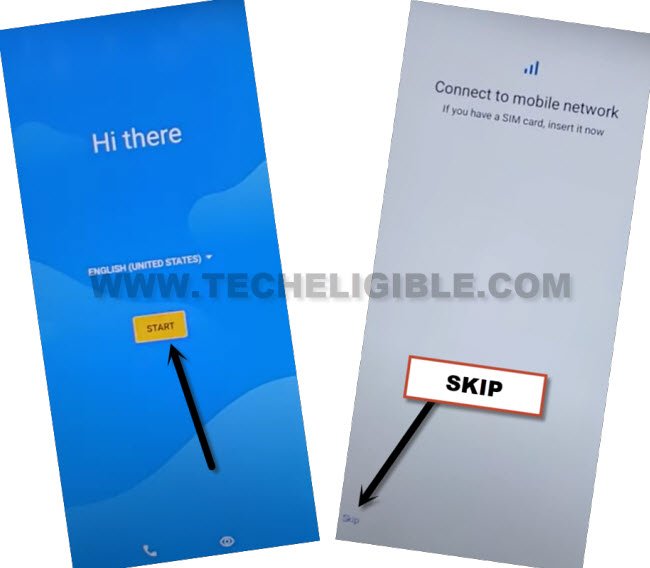
-After that, go all the way back on first “Hi there page”.
-From there, hit on > Start > Skip.
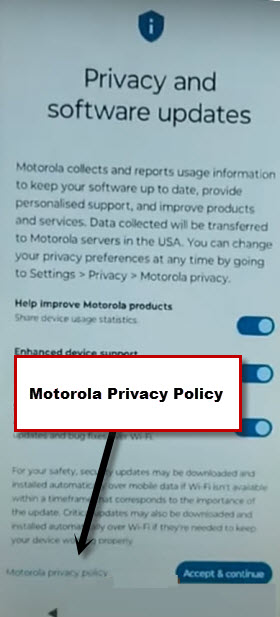
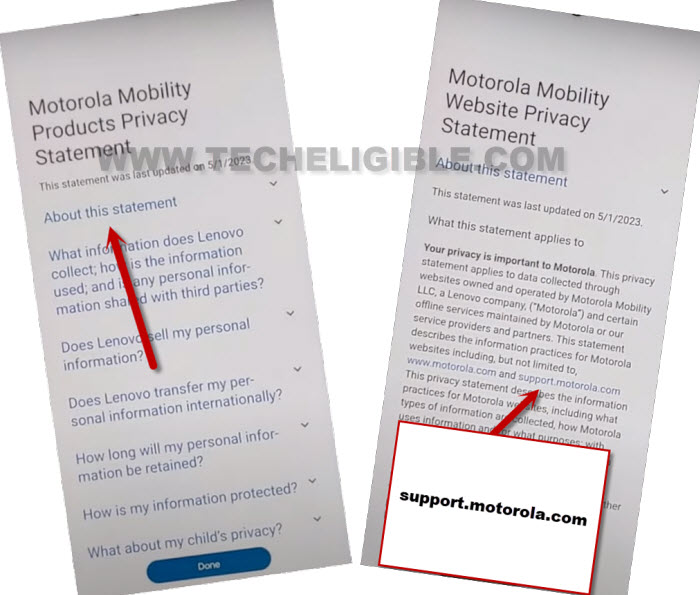
-After that, you will see (Privacy & Software Update) screen. Just hit on “Motorola Privacy Policy” option from there.
Note: If you are unable to see (Privacy & Software Update) page, you just go back on your (Connect to WiFi) page, from there, hit on your connected WiFi name, after that, you will be redirected on (Privacy & Software Update) page.
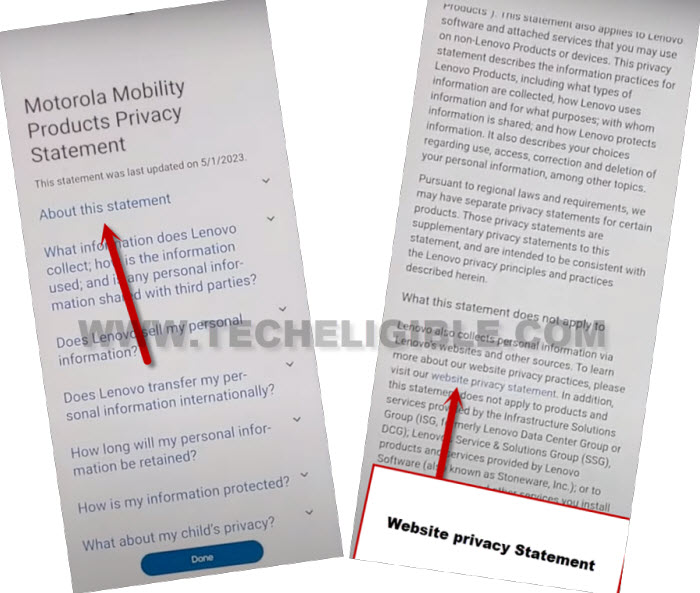
-Hit on “About this statement”. Scroll down on a text page little bit, tap to “website privacy statement” link from there.
-Tap again on “About this statement”.
-Now, hit on a link “support.motorola.com“.
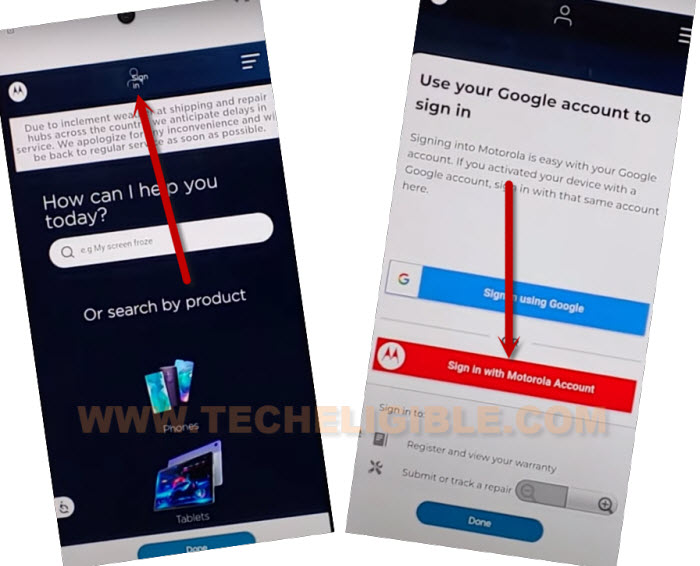
-You will be on a moto sign in page, just tap to “Profile” icon from top center of the screen (See below image).
-Hit on a button “Sign in with Motorola Account”.
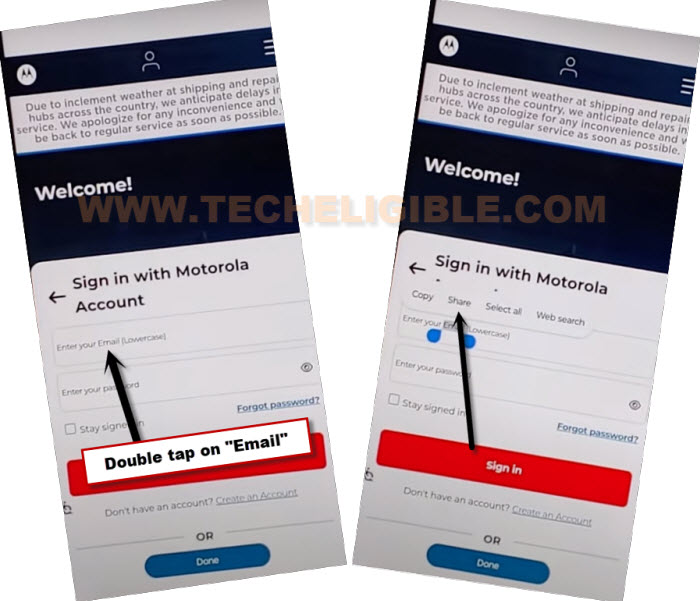
-Tap twice on (enter your email) text to get popup options, after that, choose “Share” option from there.
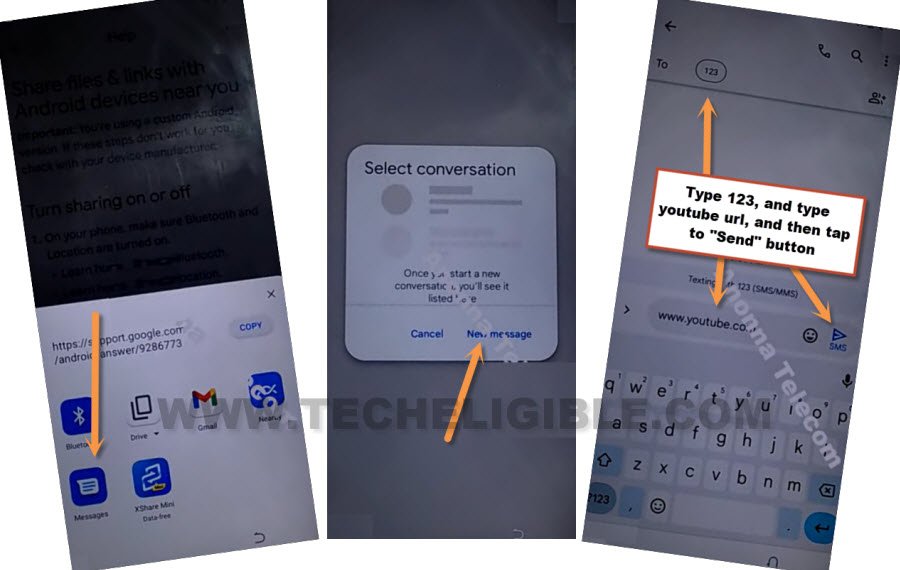
-After hitting on (Share) option, you will be displayed some share applications. Choose > Message > New Message.
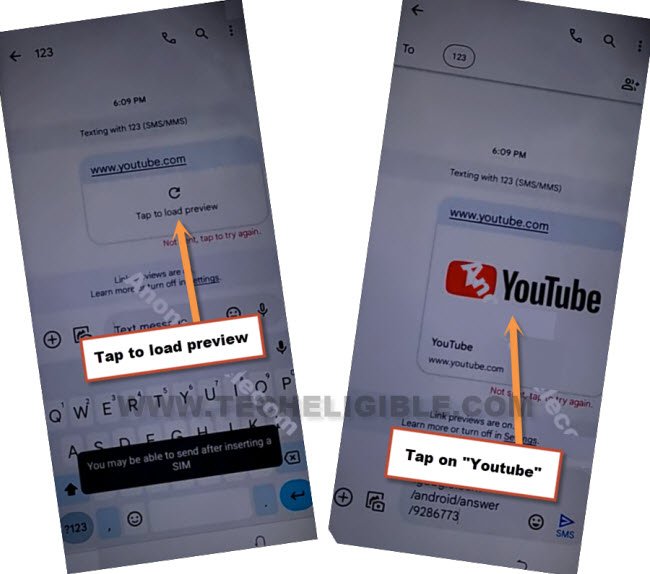
-We have to access youtube website, so, send “www.youtube.com” url to any random number as a text message. (See below image).
-The sending url will convert to a hyper link, just tap on “Tap to load preview”.
-After that, you will see youtube thumbnail. Hit on a “Youtube” image.
-Tap to “Allow” from popup.
-Congrats, we have reached on youtube website successfully. Let’s tap to a “Profile” icon from top right corner, and go to “Settings” to Remove FRP Account Moto G32.
-Go to > About > Youtube terms of services > Use without an account > No Thanks. We’re now inside google chrome browser application. We will search techeligible frp tools page from there.
Go to Techeligible FRP Tools Page:
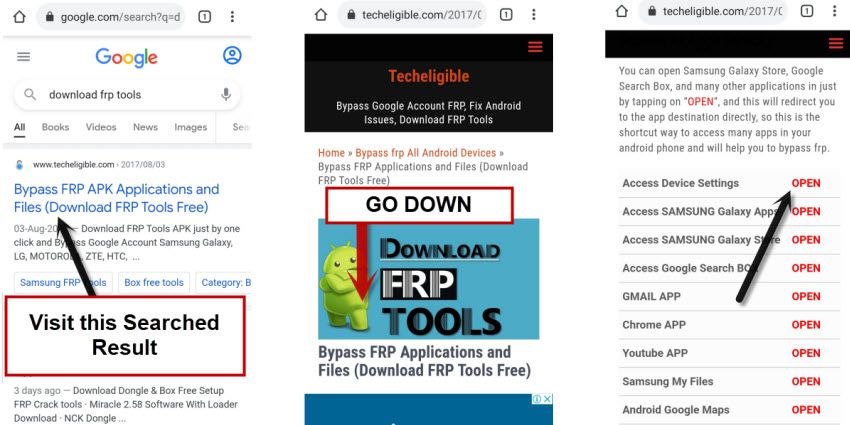
-Let’s search from there with “Download FRP Tools“, and visit our website 1st searched result.
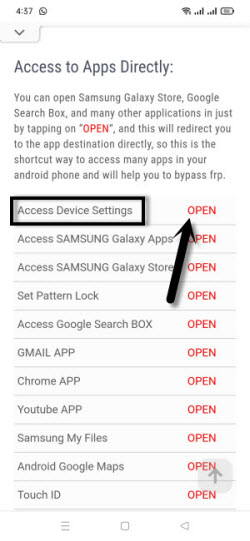
-After that, tap to “Access device settings” option from there to get inside your device settings.
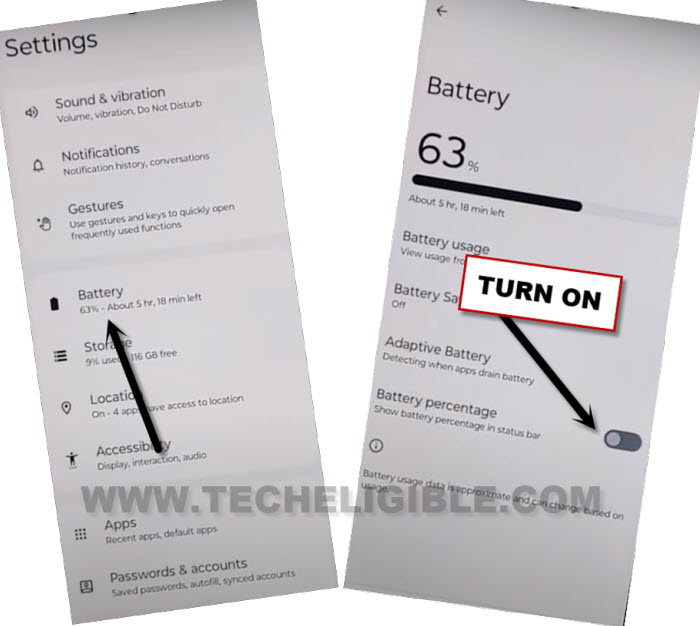
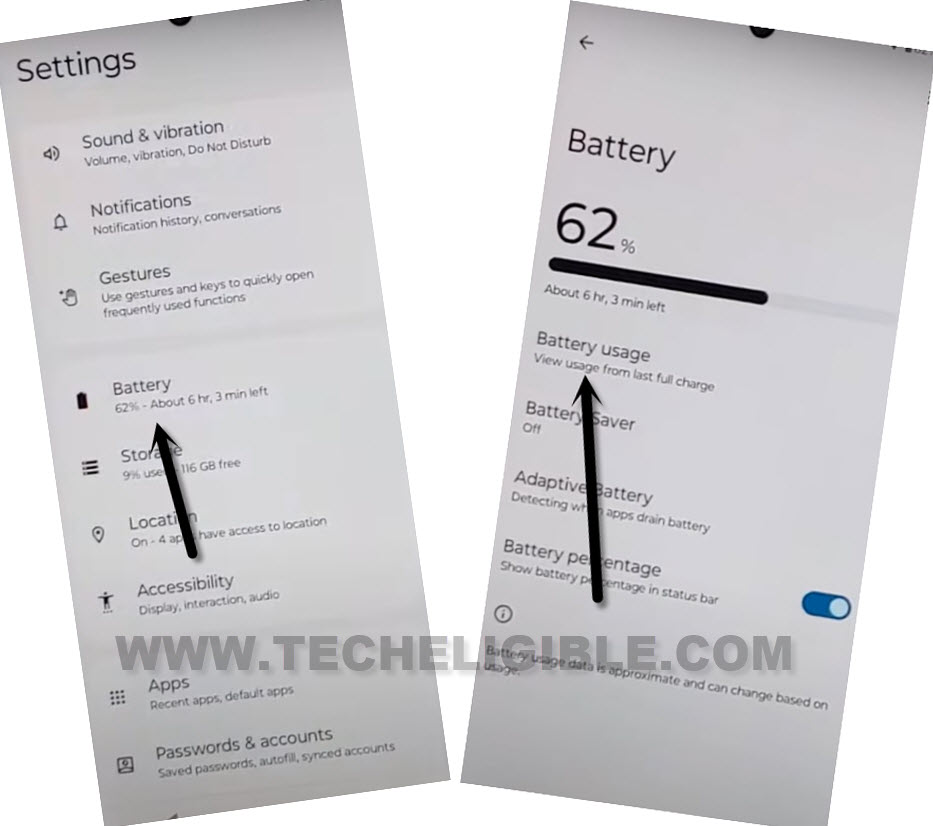
-After that, just go to “Battery”, and turn on “Battery Percentage”.
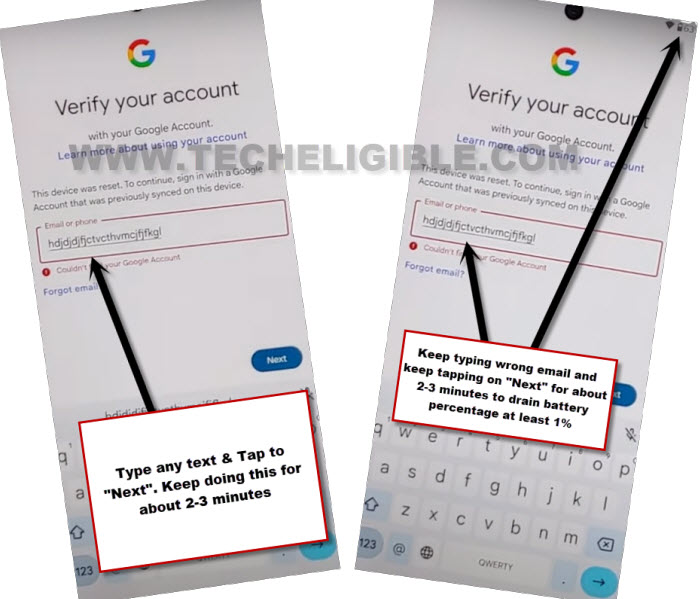
-We have to go back on google sign in page, and keep tapping over there wrong email and keep tapping on “Next” option for about 1-2 minutes. By doing this, battery will drain at least 1%, and after that, we will be able to see (Google Play Services) app in our (Battery Usage) option.
Go to Google Sign in page to type wrong email & pass:
-By hitting back arrow cautiously, just go back our (FRP Tools page).
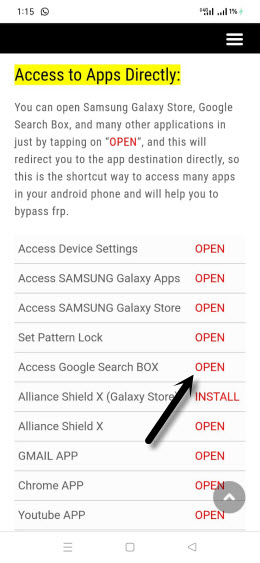
-From there, tap to “Access Google Search box” option. You will be redirected on a google app search box.
-Tap to “Profile icon” from upright corner, after that, hit on “Sign in” option.
-Go to “Use my google account instead”. After that, you will be on a (Google Sign in) page. On this screen, we will drain our device battery for about 1-2% by entering wrong email and tapping over “next” multiple times. By doing this, you will be able to see (Google Play Services) application on a battery usage page.
-Let’s type text in email field tab “aaa”, hit on “Next”. Type again, “aaa”, and hit on “Next”. Type again “AAAA” and hit on “Next”. Keep doing this for about 1-2 minutes until your battery usage drain little bit, at least 1%.
-Once battery is consumed by 1%, just go back the (Techeligible FRP Tools) page by hitting back arrow cautiously to Remove FRP Account Moto G32.
-Go back again on your device settings page just by hitting over “Access device settings” option.
-We are going disable google play services application from battery usage. Just go to > Battery > Battery Usage.
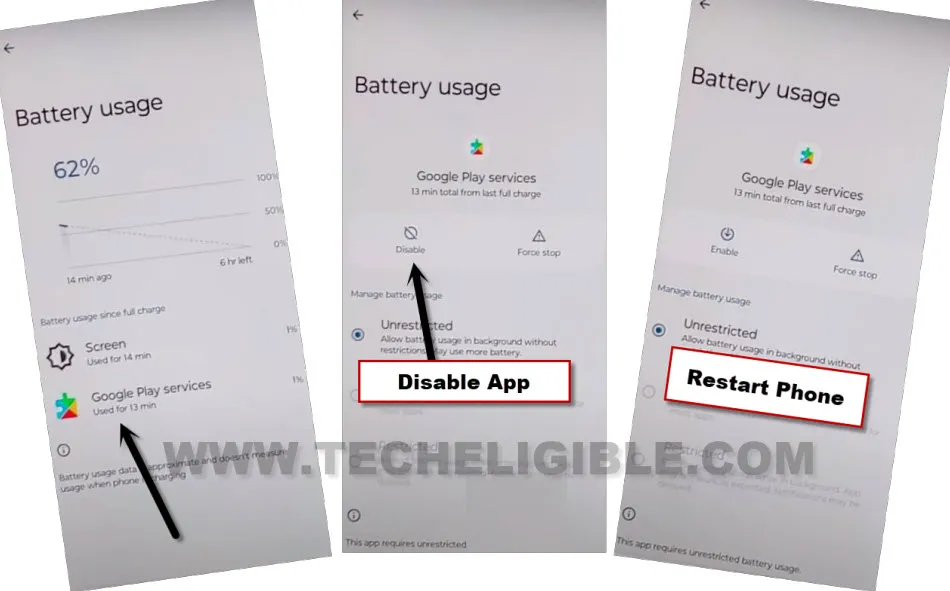
-Tap to > Google Play Services > Disable > Disable App.
-After disabling this app successfully, just restart your device.
Repeat Steps to Enable Back Google Play Services:
-After the the device is switched on. Just hit on > Start > Skip > Accept & Continue. Wait on (Getting your phone ready..) screen. After that, tap to “Don’t Copy”.
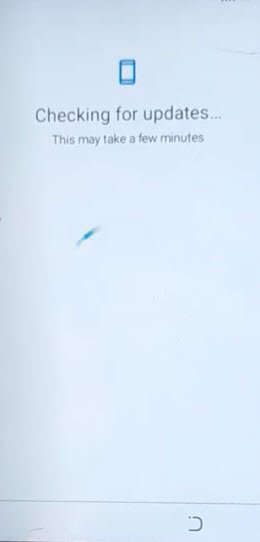
-Wait on loading screen till you go on (Checking for update…) screen. This loading scree will not finish up until we turn on back our (Google Play Services). So, we have go all the way back over first (Hi there) page.
-From first (Hi there) page, just tap on > Start > Skip.
-After that, you will see (Privacy & Software Update) screen. Just hit on “Motorola Privacy Policy” option from there.
Note: If you are unable to see (Privacy & Software Update) page, you just on your (Connect to WiFi) page, from there, hit on your connected WiFi name, after that, you will be redirected on Privacy & Software Update) page.
-Hit on “About this statement”. Scroll down on a text page little bit, tap to “website privacy statement” link from there.
-Tap again on “About this statement”.
-Now, hit on a link “support.motorola.com“.
-You will be on a moto sign in page, just tap to “Profile” icon from top center of the screen (See below image).
-Hit on a button “Sign in with Motorola Account”.
-Tap twice on (enter your email) text to get popup options, after that, choose “Share” option from there.
-After hitting on (Share) option, you will be displayed some share applications. Choose > Message > New Message.
-We have to access youtube website, so, send “www.youtube.com” url to any random number as a text message. (See below image).
-The sending url will convert to a hyper link, just tap on “Tap to load preview”, after that, hit on “Youtube” image.
-You will reach on youtube website successfully. Skip below some steps, if you have already reached on a youtube website page.
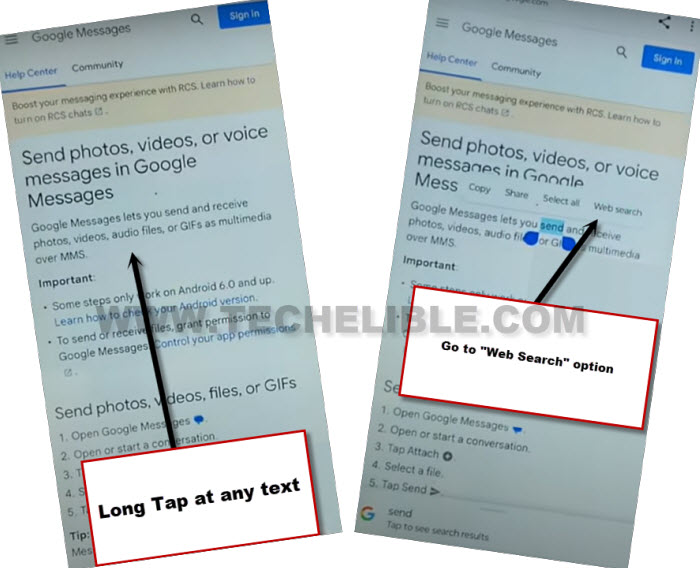
| Note: If you are unable to reach on youtube and the youtube is automatically close down again and again, so, you can try another way to reach google chrome browser. -Tap to “image or camera” icon from keyboard, after that, hit on “Learn more”.
-Long tap at any text, and tap to “Web search”. You will reach on google chrome browser. -Follow below steps from (Searching frp tools page). |
-Congrats, we have reached on youtube website successfully. Let’s tap to a “Profile” icon from top right corner, and go to “Settings”.
-Go to > About > Youtube terms of services > Use without an account > No Thanks. We’re now inside google chrome browser application. We will search techeligible frp tools page from there to Remove FRP Account Moto G32.
Go to Techeligible FRP Tools Page:
-Let’s search in google chrome browser with “Download FRP Tools“, and visit our website 1st searched result.
-After that, tap to “Access device settings” option from there to get inside your device settings.
-Go to > Apps > See all apps.
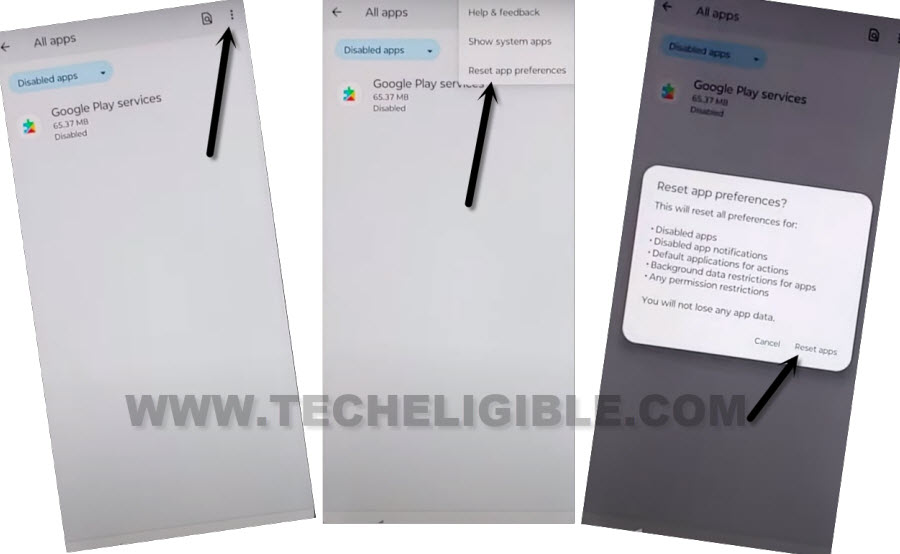
-We have to enable back google play services. So, tap on “3 dots” from top right corner of the screen. After that, go to > Reset App preferences > Reset apps.
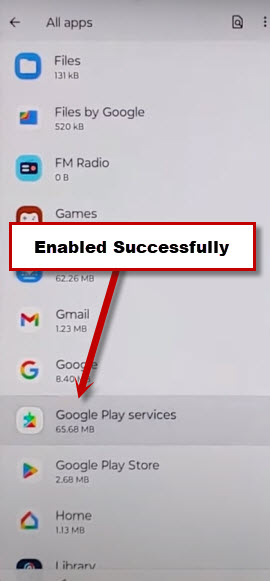
-After that, the google play services app will be enabled by itself. You can verify from your device (All Apps) page.
-By tapping on back arrow cautiously, just go back to (Connect to WiFi) page.
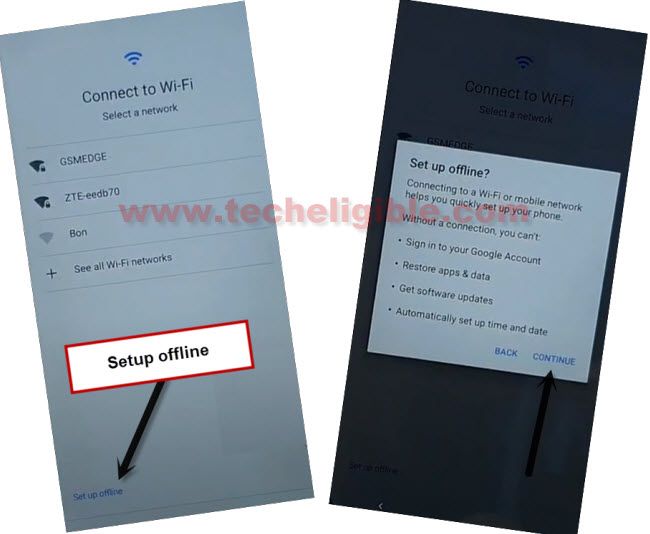
-Let’s get back to (Connect to WiFi) page by hitting back arrow several times. From there, tap to > Setup offline > Continue.
-Complete the setup wizard without WiFi / Mobile data.
Method 2: Remove FRP Account Moto G32 By Pattern Setup [Android 12]
-We are gonna turn on talkback feature in order to successfully bypass from this device.
-First of all, turn on phone, and connect WiFi.
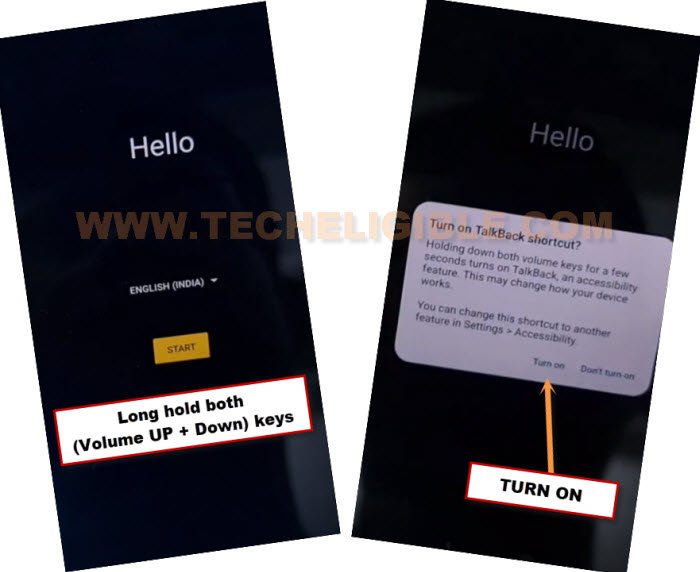
-Afterwards, go all the way back over first “Hello” screen. Long press both (Volume UP + Down) keys at the same time. From popup window, hit on “Turn on” option same as shown in below image.
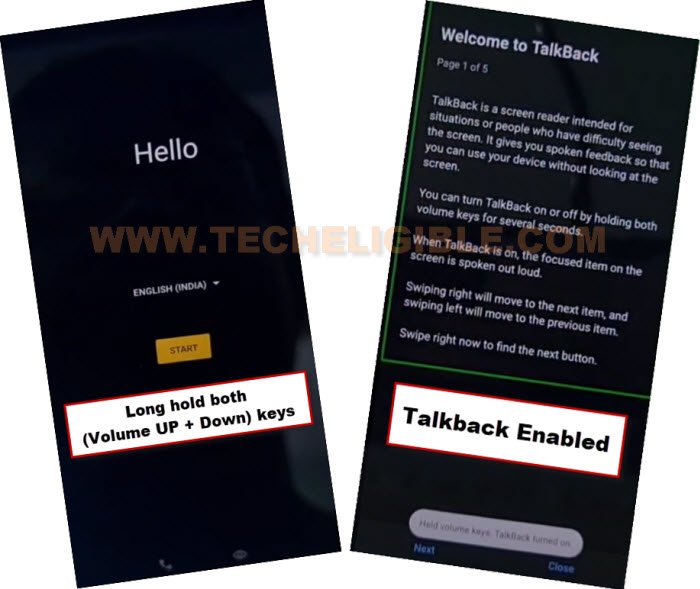
-Repeat step to completely turn on talkback, so long press again both (Volume UP + Down) keys.
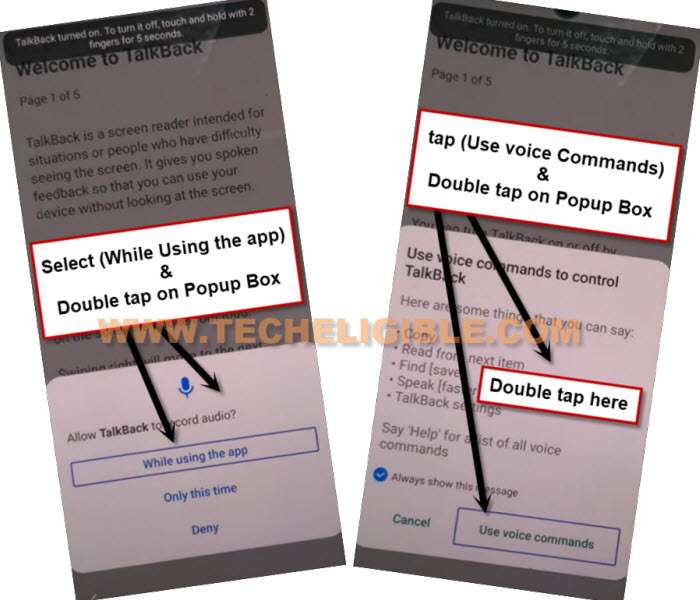
-You will have a (Welcome to Talkback) screen, that means, the talkback has been enabled successfully.
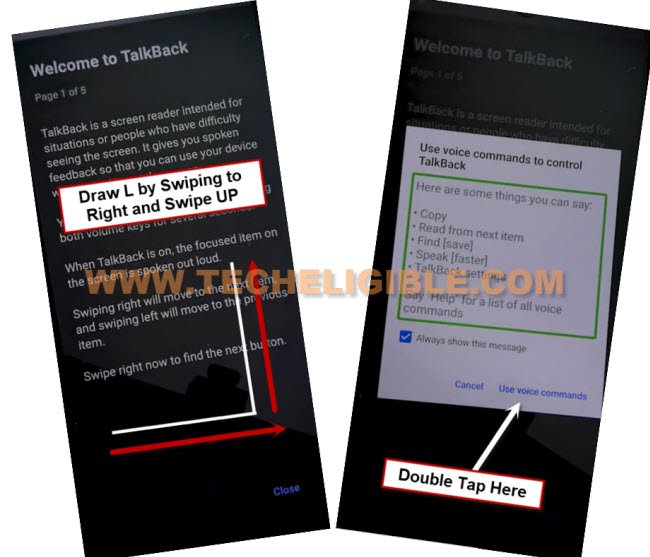
-Draw a reverse “L” shape by swipe right and then swipe up, now double tap on “Use Voice Command”.
-Hit on > Allow > Use Voice Command.
-Once you see “Green Border” on screen, just speak loudly “Open Google Assistant”.
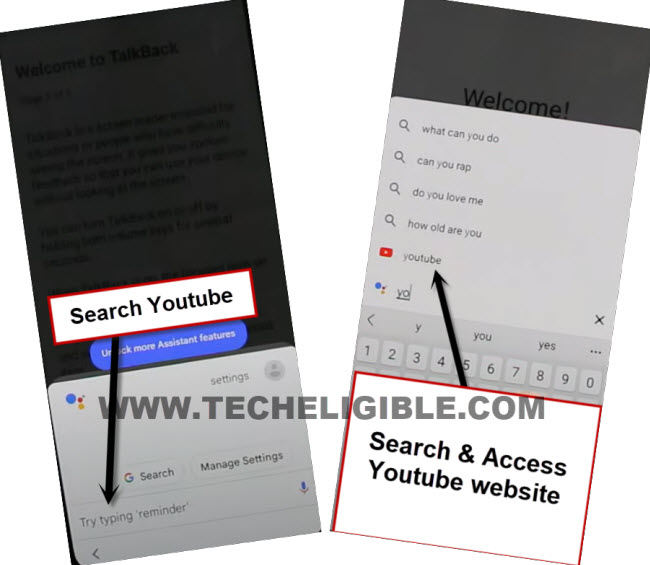
-Now you need to say loudly “Open Google Assistant” as soon as you see green border.
-After that, you will see there a (Google Assistant) is launched, just tap over “Keyboard” icon from there (See below image).
![]()
-Turn off talkback by long press both (Volume UP/DOWN) keys. After that, search there with “Youtube”, and go to “Youtube” searched result.
-Tap on “Profile icon” from top corner, and go to > Settings > About > Youtube terms of service.
-From chrome window, tap to > Accept & Continue > Next > No Thanks.
Access to FRP Tools Page to Setup new Pattern:
-We can setup new pattern, after that, the FRP will be bypassed completely.
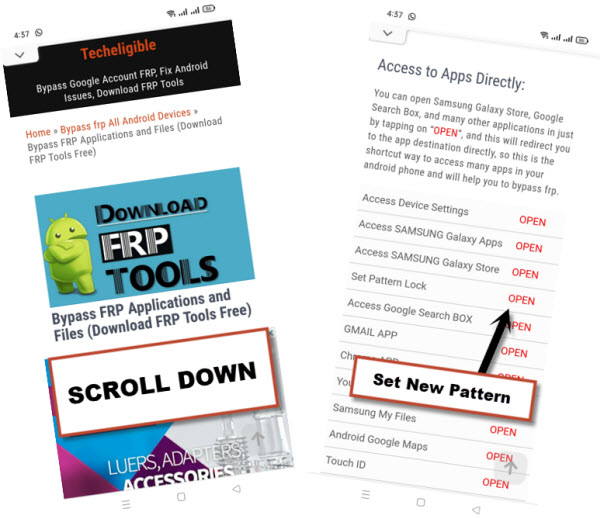
-Search in google chrome browser with “Download frp tools“, and visit our website searched result.
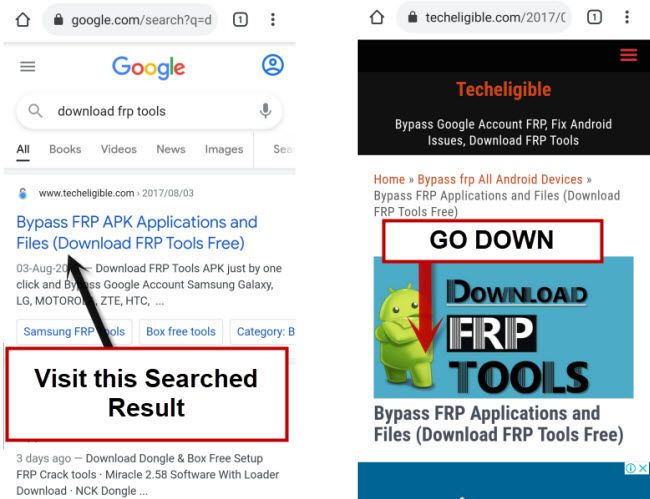
–Scroll down, tap on “Set Pattern Lock” to be redirected to pattern lock setup page.
-We have to follow below steps 8-10 times until we see new screen of (Keep your device unlocked while its on you).
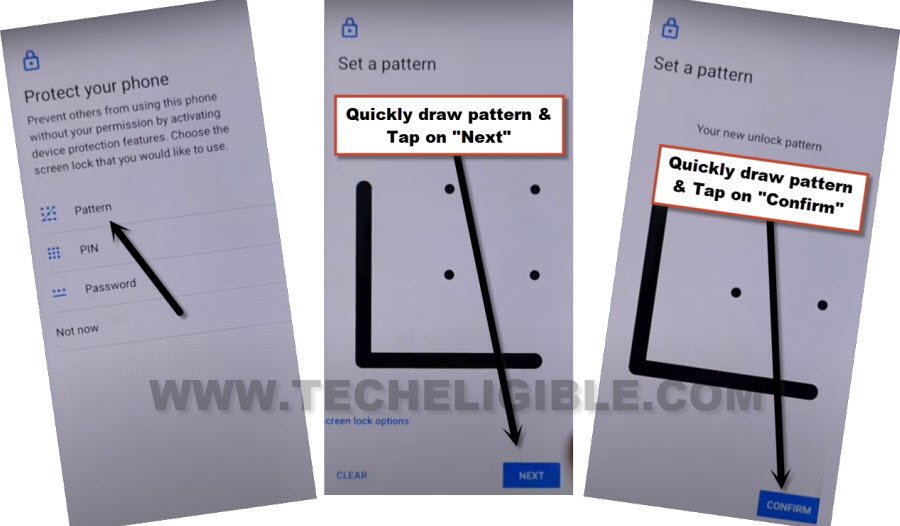
-Tap to > Pattern > Quickly draw pattern > Next > Quickly draw pattern > Confirm.
Note: If you don’t get (Keep your device unlocked while its on you) screen, that means, you are failed in setup pattern lock, let’s try other way to setup pattern.
Change Language to Hindi to Setup Pattern easily:
-Go back on (FRP Tools) page, from there, tap to “Access Device Settings” to reach in your device settings directly, so that, we could easily change our device language.
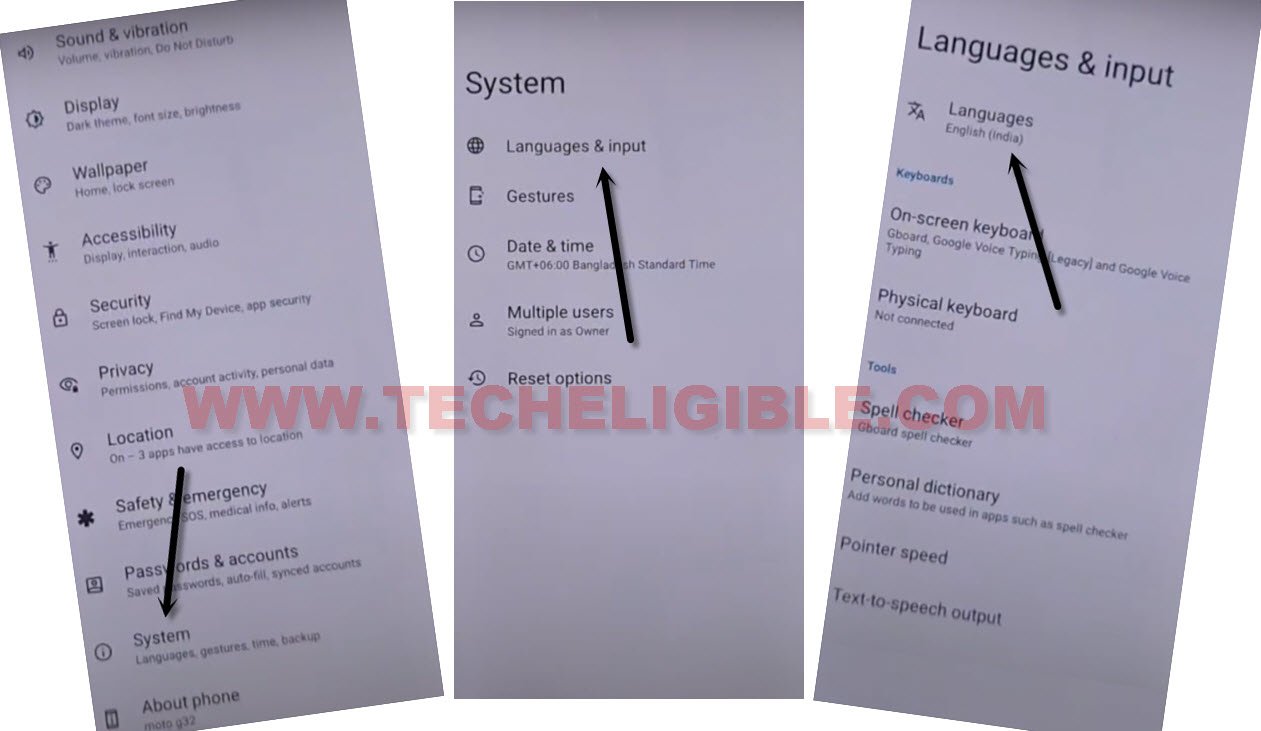
-Go to > System > Language & Input > Languages.
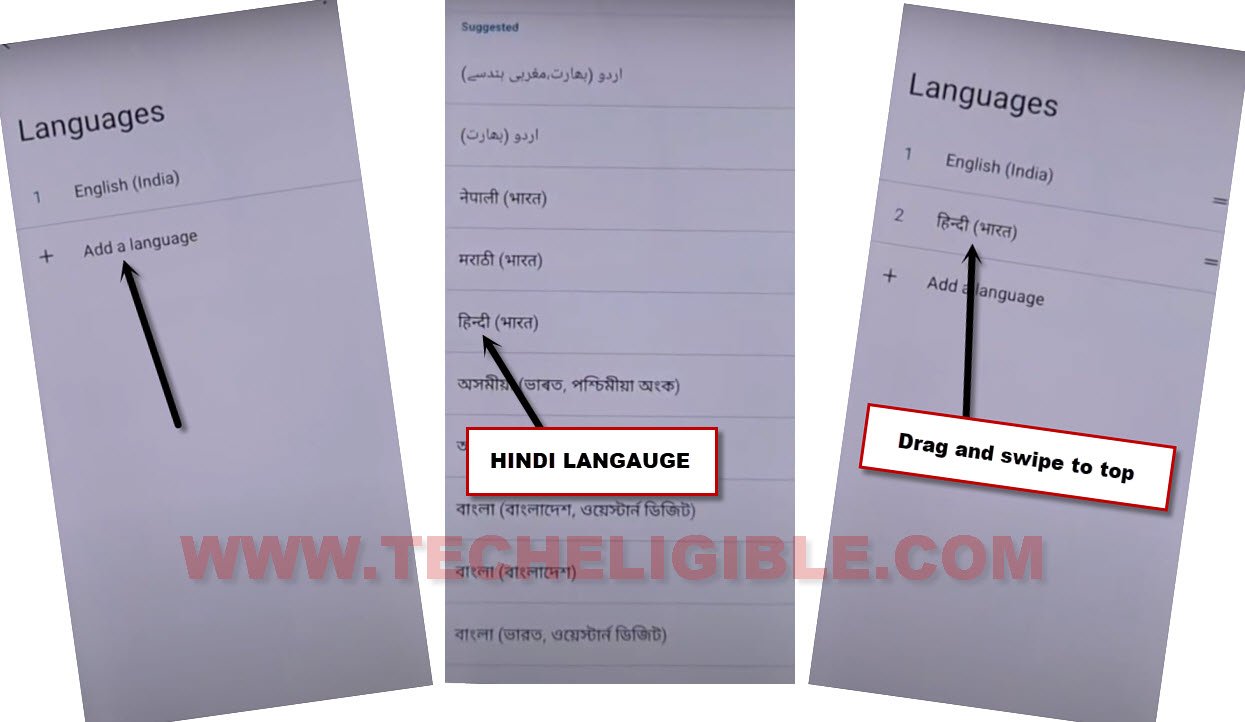
-After that, tap to “Add a language”, and select “Hindi Language” same as shown in below image.
-Swipe Hindi language to top to change language successfully from English to Hindi.
-Let’s get back to (FRP Tools) page again by tapping on back arrow few times.
-Hit again on “Set Pattern Lock” option from there to reach on setup pattern page.
-Repeat to setup pattern again for about (7-10) times. We hope, this time, you will be able to setup pattern successfully.
-Go to > Pattern > Quickly draw pattern > Next > Quickly draw pattern > Confirm.
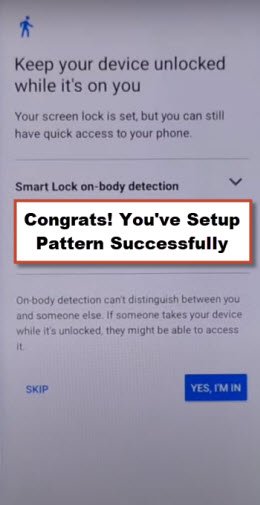
-As soon as you see (Keep your device unlocked while its on you), that means, you have successfully setup new pattern lock to Remove FRP Account Moto G32, now we just have to tap over “Skip” option.
-Go all the way back on “Hello” startup screen.
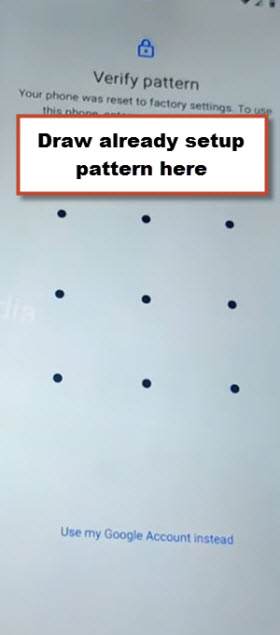
-Finish all steps on your own, while finishing setup wizard, you will be displayed a screen of (Verify your pattern), just draw recently setup new pattern lock there to go for next.
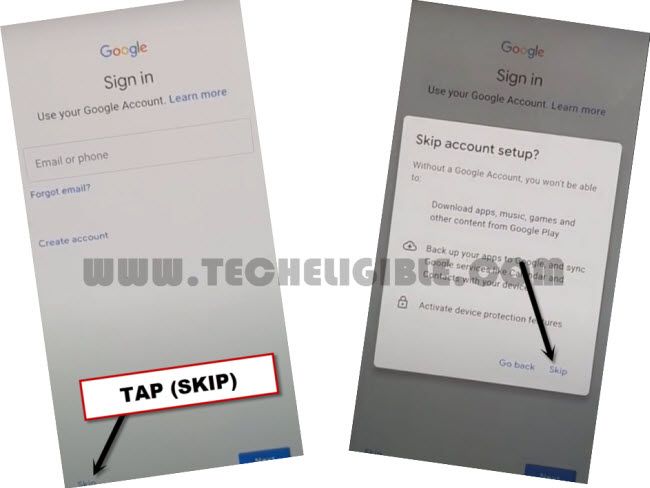
-If you see (Google Sign in) screen, just hit over > Skip > Skip.
-You can easily complete all setup wizard steps on your own, because, you are all done from bypass frp on MOTO G32. Thanks for visiting us.
