
Bypass FRP VIVO Y20 Android 12, 11 Without PC [Updated]
If you have forgotten current google account of your VIVO Y20 device. That means, you will not be able to use your device, if you hard reset it. To gain access, you have to Bypass FRP VIVO Y20 Android 12, 11. We have 3 methods in this single post, you can apply any method according to your device (Android version). Follow our guideline from below to get back your VIVO device and setup new google account.
Note: We highly recommend you to apply this method only on your own device, if you are not owner of this VIVO Y20 device, or you found this from some where, you must return this device to its real owner.
| Method 1: Remove Google FRP VIVO Y20 [ANDROID 12] |
| Method 2: Remove Google FRP VIVO Y20 [ANDROID 11] |
| Method 3: Remove Google FRP VIVO Y20 [OLD] |
Method 1: Bypass FRP VIVO Y20 [Android 12]
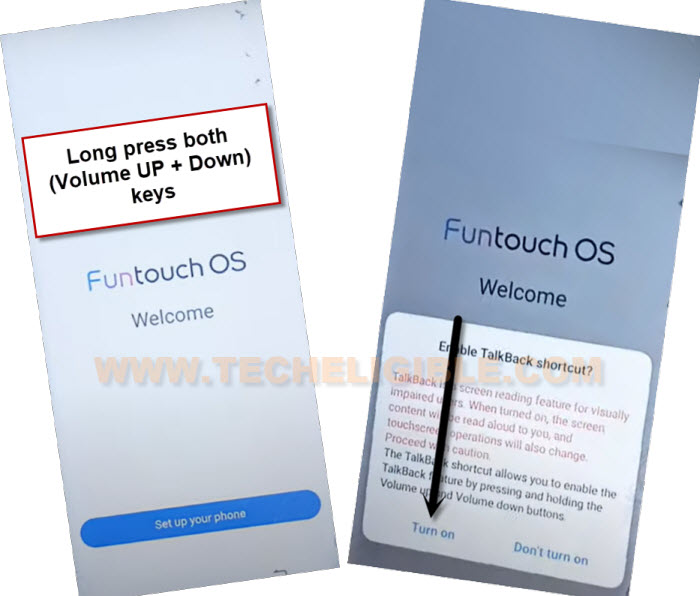
-Long Press both (Volume UP + Down) keys together, and you will have (Turn on talkback) popup, just tap on “Turn on”.
-Firstly, turn on your device & Connect WiFi.
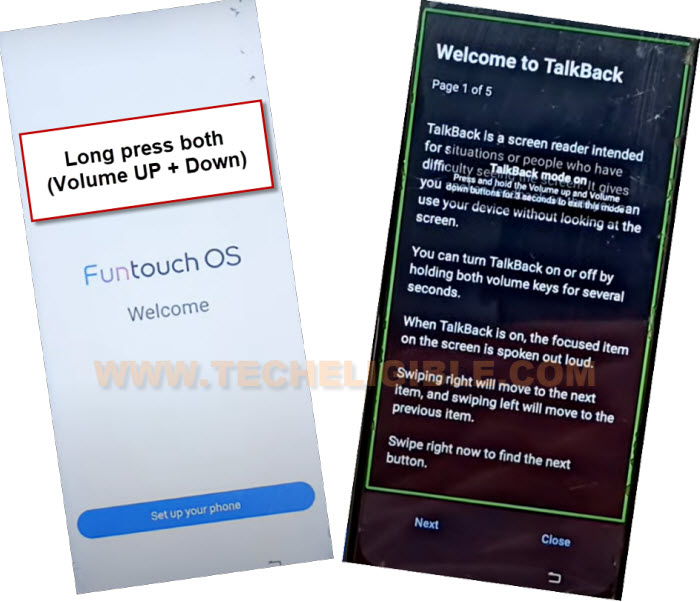
-Go all the way back to first (Funtouch OS) screen enable talkback feature.
-Long press both buttons (Volume UP + Down) simultaneously. After that, from popup window, tap to “Turn on” option.
-Long press again both buttons (Volume UP + Down) simultaneously. After that, the talkback feature will be enabled.
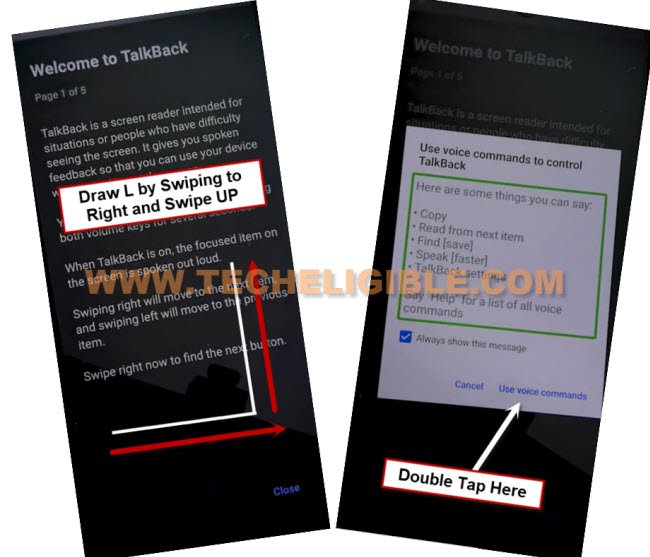
-You are now inside the talkback screen (Welcome to Talkback). From there, make a reverse _| shape by swiping right to up. (See below image). From popup window, hit on (While using the app).
-Go to “Use voice command” option from next popup window.
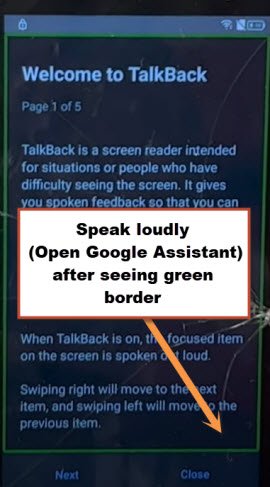
-After that, you will have a (Green colored boarder) on scree, say loudly “Open Google Assistant” as soon as you see green colored border.
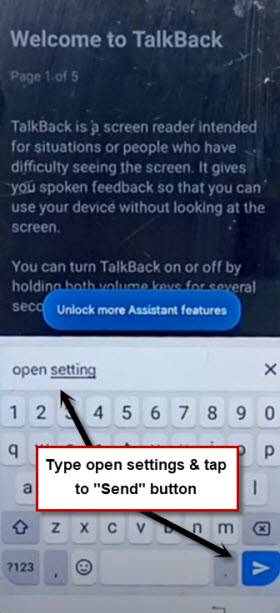
-After saying loudly open google assistant, the (Try Saying) popup window will appear up same as shown in below image, just double tap over “Keyboard” icon from there.
![]()
-Its all done from talkback feature side now, we have to disable this feature now just by long press both buttons (Volume UP + Down).
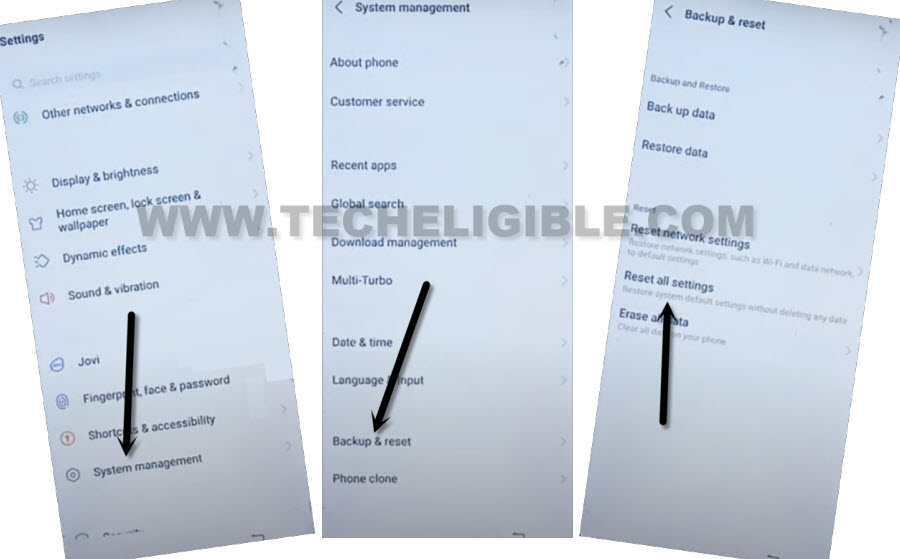
-Type “Open Settings” there, after that, tap to “Send or Search” button from bottom right side of the keyboard. By doing this, you will be taken into your device main settings page.
-From there, go to > System Management > Back up & Reset > Reset all settings > Reset.
-The device will auto restart.
Repeat Below Steps to reach Youtube wbesite:
-We will enable back talkback feature, and will access to (Youtube website). From there, we will download and install “Activity Launcher” app. After that, we will reset this device completely.
-Reconnect WiFi. After that, go back to first (Funtouch OS) page.
-From there, long press both keys (Volume UP + Down) to turn on talkback, from popup window, tap to “Turn on”‘ option.
-Long press again both buttons (Volume UP + Down) simultaneously. After that, the talkback feature will be enabled.
-From talkback screen, make a reverse _| shape by swiping right to up.
-From popup window, hit on (While using the app). After that, hit on “Use voice command” option.
-After that, you will have a (Green colored boarder) on scree, say loudly “Open Google Assistant” as soon as you see green colored border.
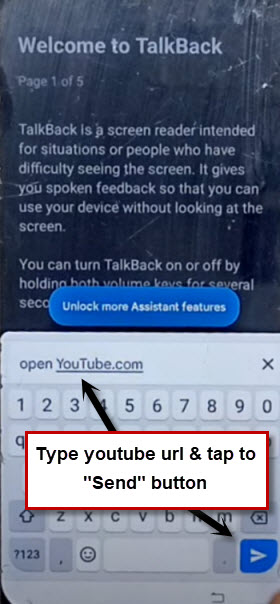
-After saying loudly open google assistant, the (Try Saying) popup window will appear up same as shown in below image, just tap over “Keyboard” icon from there.
![]()
-Let’s just disable this feature now just by long press both buttons (Volume UP + Down) buttons.
| Note: If you see a popup window after pressing both volume buttons, just tap to “Turn on” option from there, after that, long press again both (Volume keys). This time, the talkback will be off. |
-Type “Open youtube.com” there, after that, tap to “Send” button from keyboard. You will be redirected to the youtube official website.
-The youtube website will be launched in (VIVO Browser). From there, you can directly search and download (Activity Launcher) from there.
-Search “Activity Launcher” from top address bar, after that, tap to “Download” option.
-After that, tap to “Agree” from popup window.
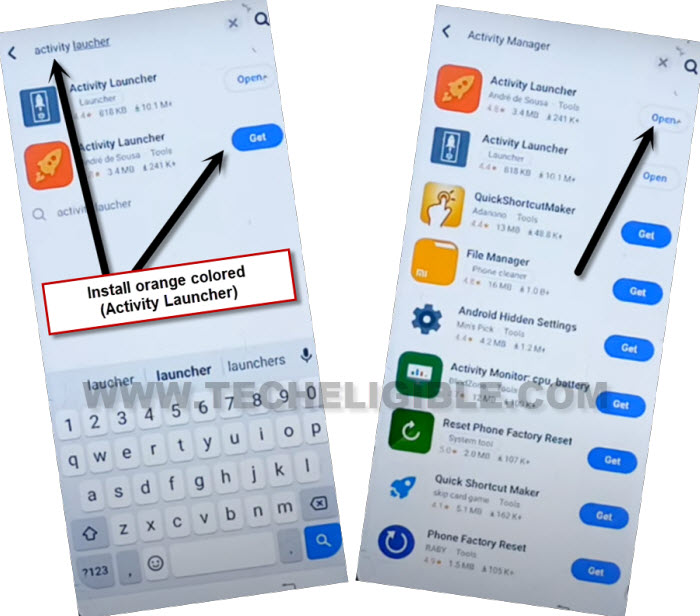
-Tap to “Search” icon from top right corner.
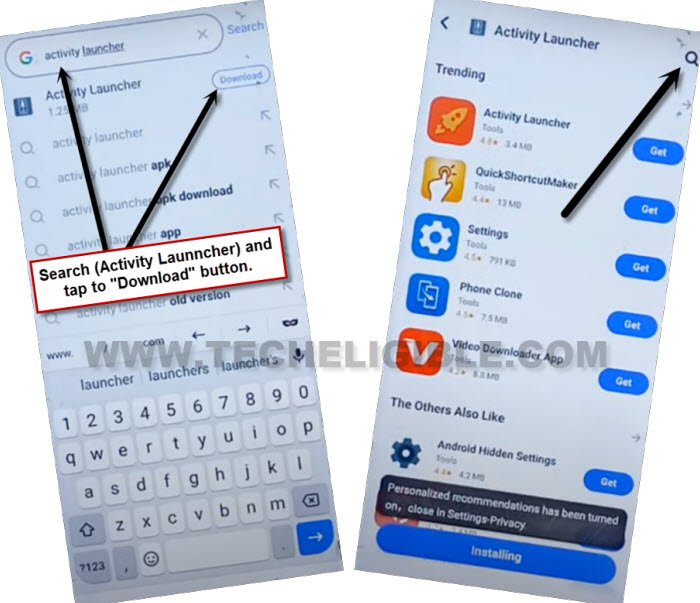
-Search again “Activity”, and tap to “Get” option from “Orange colored activity Launcher” app. See below image.
-Once the app is installed, just tap to “Open” from there.
-Tap again over “Search” icon from bottom from activity launcher application.
-Search there “Factory test”, and go to “com.Iqoo.engineermode.EngineerTestTabActivity“.
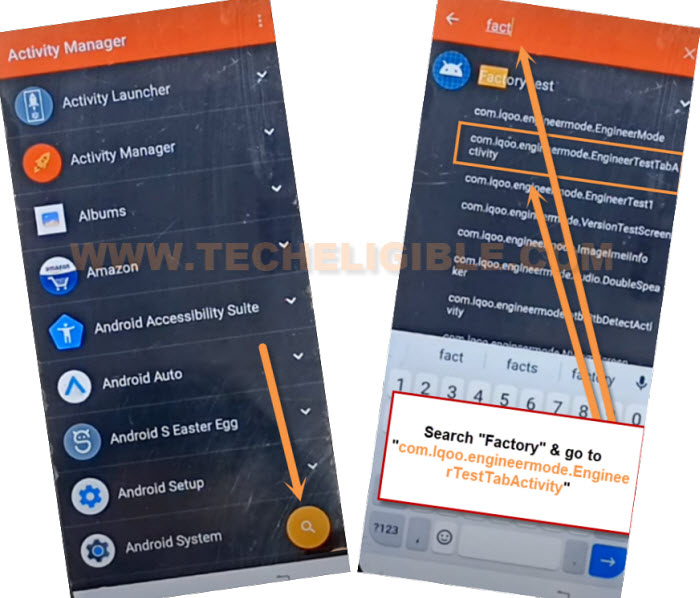
-Hit over 3rd “Engineering Test3” from top right side. After that, tap to “Back to Home” from there.
-Go to “Initialize to English”.

-Congrats, its all done from bypass google frp. You are now inside the device main home-screen. Don’t forget to setup new google account + Security Lock. Thanks for visiting us.
Method 2: Bypass FRP VIVO Y20 Android 11
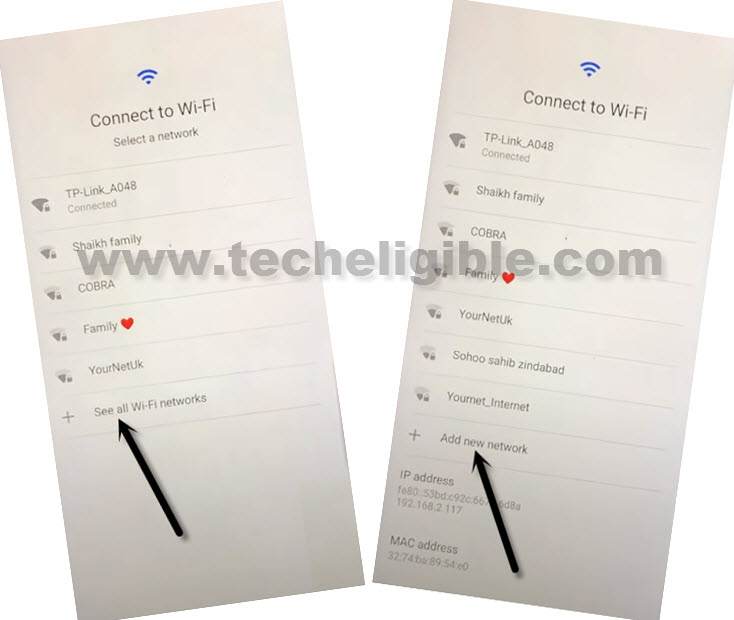
-Turn on device & Connect WiFi, go to (Connect to WiFi) screen, from there, tap to > See All WiFi Network > Add New Network.
–Tap to > Mic icon > Deny.
![]()
–Tap to > Mic icon > Deny & Don’t Ask Again.
![]()
–Tap to > Mic icon > Allow.
![]()
–Go to “Permission”, and hit over “Search icon” from top corner.
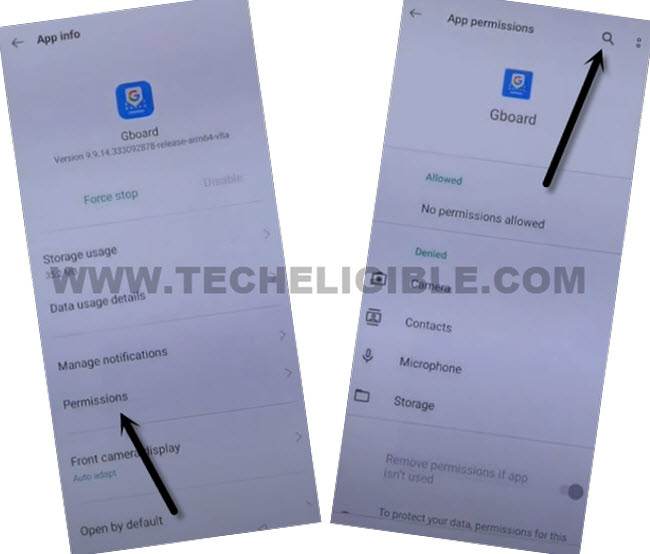
-There you will have app list, just go all the way down, and tap to > Youtube > Notification.
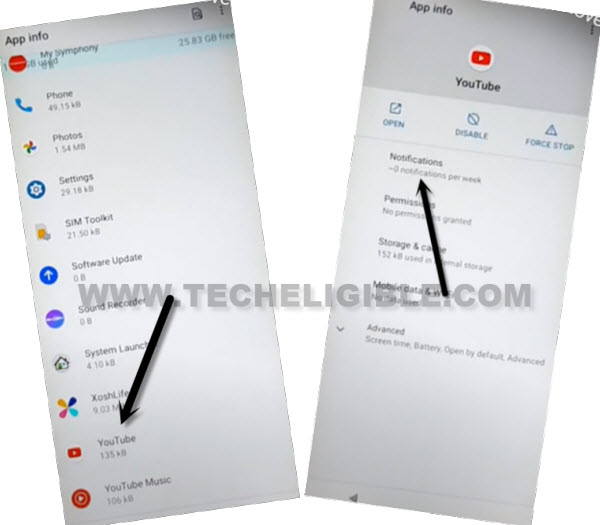
– Afterwards, hit on “Additional Settings in the app”.
-Tap o > About > Youtube Terms of service.

Let’s Reach to Settings from Chrome:
-There you will have a chrome window, just tap to > Accept & Continue > No Thanks.
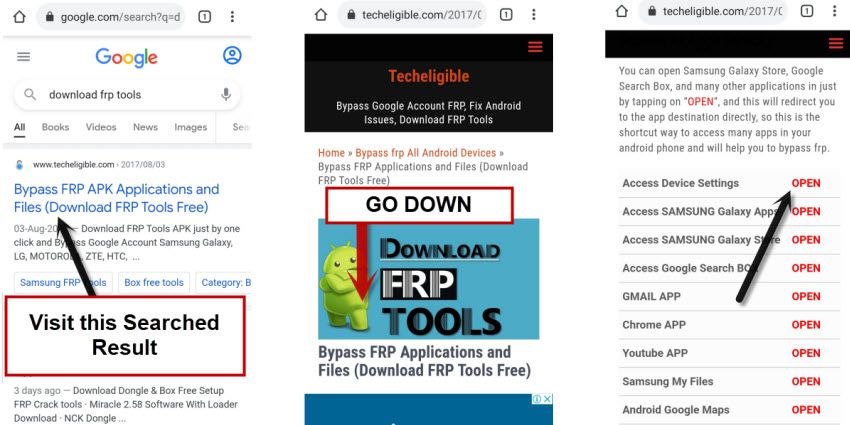
-Search in browser “Download FRP Tools“, and go to our website searched result, from there hit on “Access device settings“.
-Go to > System > Phone Clone.
-Check mark option “i have read and agree…”, and then tap to “Agree”.
-Select > New Phone > Android > OK.

-From popup box, select option “While Using the app”, now you will have scanning code screen on your device screen.
Install Apps in Other Android Device:
-Use your any other android device, and open (Play Store).
-Download & Install both below apps in other android device.
1- EasyShare.
2- Quick Shortcut Maker.
-Once installation process done of both above apps from (Google Play Store).
-Open (EasyShare) app in other device.
-Finish initial setup wizard to startup this app.
-Hit on > Phone Clone > Old Phone > Settings > Allow Permission.
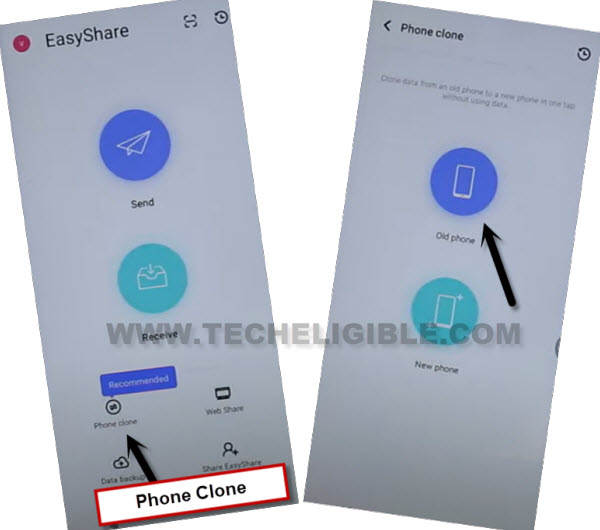
-Go back, again hit on > Phone Clone > Ok, i’ve got it > While Using the app.
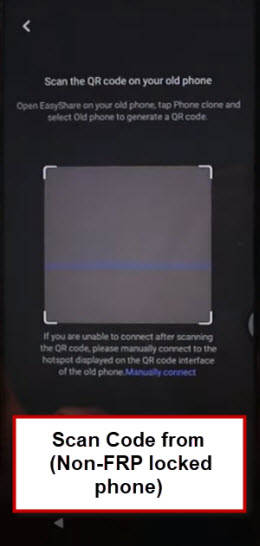
-Now you will have (QR Code) on your other device screen.
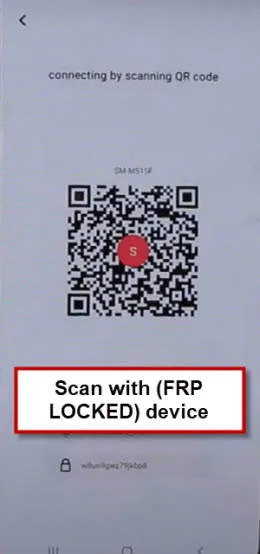
-Scan code with your FRP locked device to connect both device each other with (Easy Share) app.
-Once both devices are connected, you will see a popup window in non-frp locked other android device, from there, tap to > Settings > Easy Share > Allow access to all files.
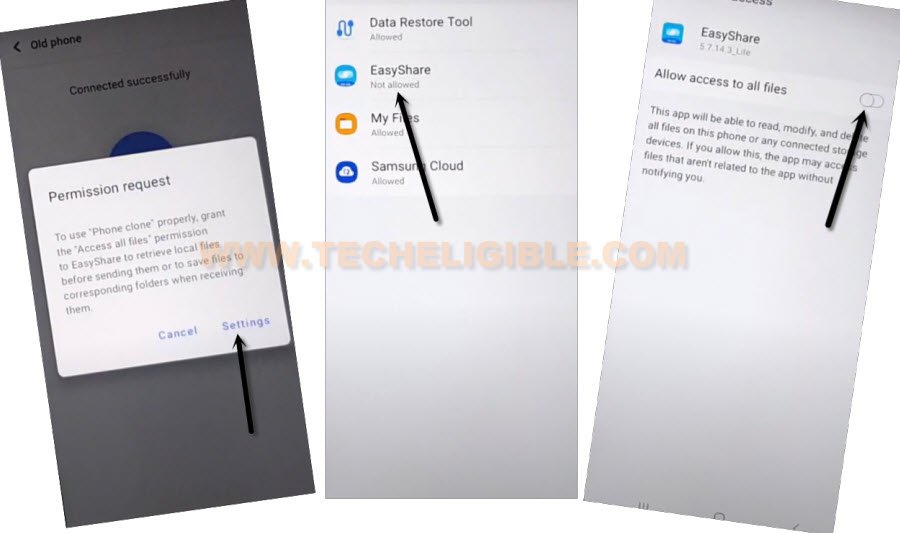
-Tap to “Back Arrow” 2 times, and hit on “Ok Got it”, after that tap to “Allow” option for many times.
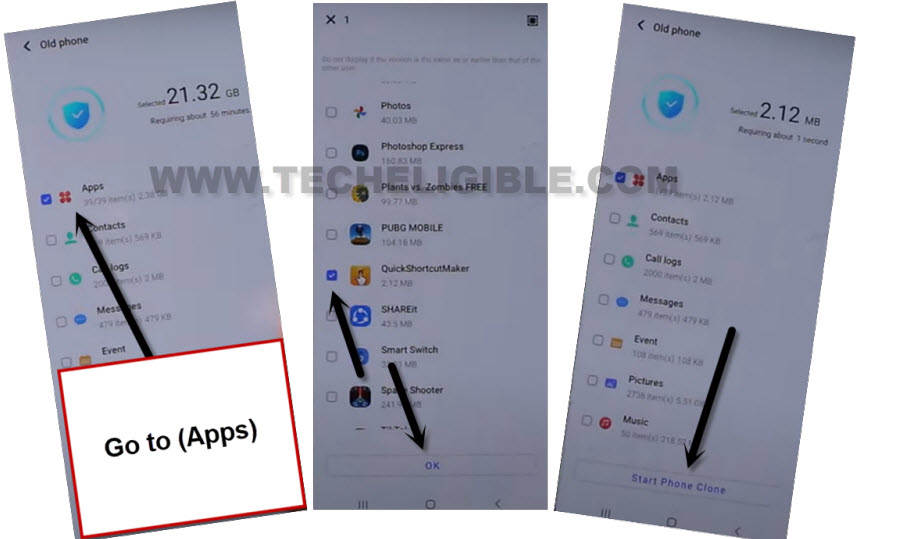
-Un-check all options, and go to “Applications”, and then select only “Quick Shortcut Maker” app.
-Tap to > OK > Start Phone Clone.
-Tap to “OK” from VIVO Y20 device, and then tap to “Allow”.
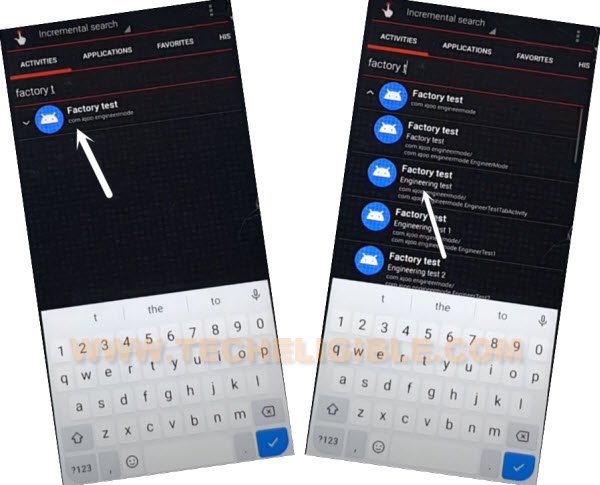
-Search “Factory”, and then tap on “Factory Test” to expand it.
-From the list, select 3rd number “Factory Test”, which has (com.iqoo.engineermode EngineerTestTabActivity), now tap to “Try”.
-Select top right corner option > Engineering Test 3 > back TO home > Initialize to English.
-In few seconds, you will be redirected into your device (Home-Screen), congrats, you are all done from bypassing frp account.
-Just go to device settings, and add your new PIN Code, add new Google Account.
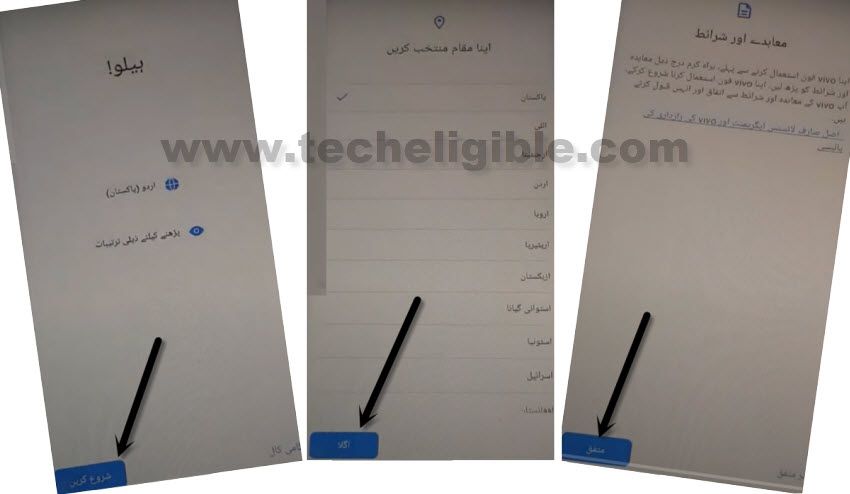
Method 3: Bypass FRP VIVO Y20 [Old Method]
This latest way is for Bypass FRP VIVO Y20 through language change to URDU, after that we can easily access to chrome browser to download easy and free frp removal apps, through this way, you can easily use your own VIVO device and can have your new Gmail account as frp lock.
This method has successfully been applied on VIVO Y20 (V2043), you can try this on any VIVO Y20.
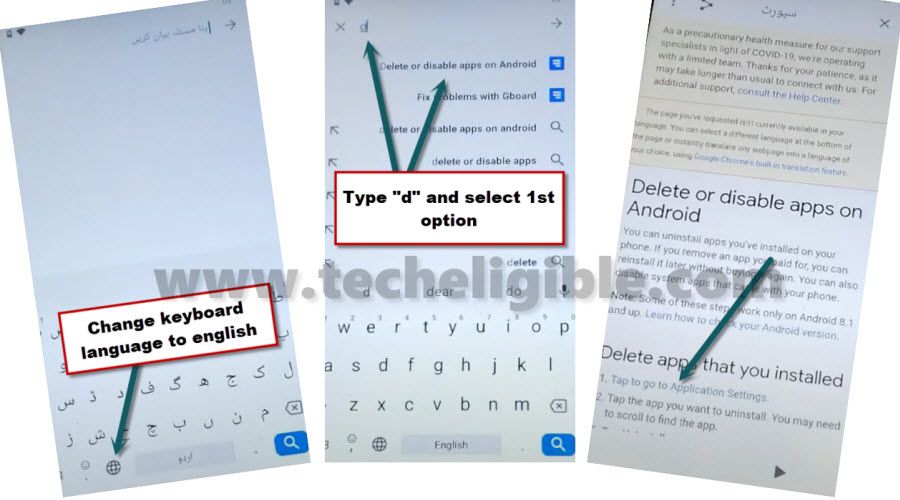
-Turn on device, and change language to URDU “اردو (پاکستان)”.
-Go to wifi screen by following below image.
-Tap on “+” symbol option to get into add wifi network screen, and then tap on any WiFi SSID Name to get password popup window.
-Long tap “World icon” from the keyboard, and tap to “Last Option” popup window same as shown in below image.
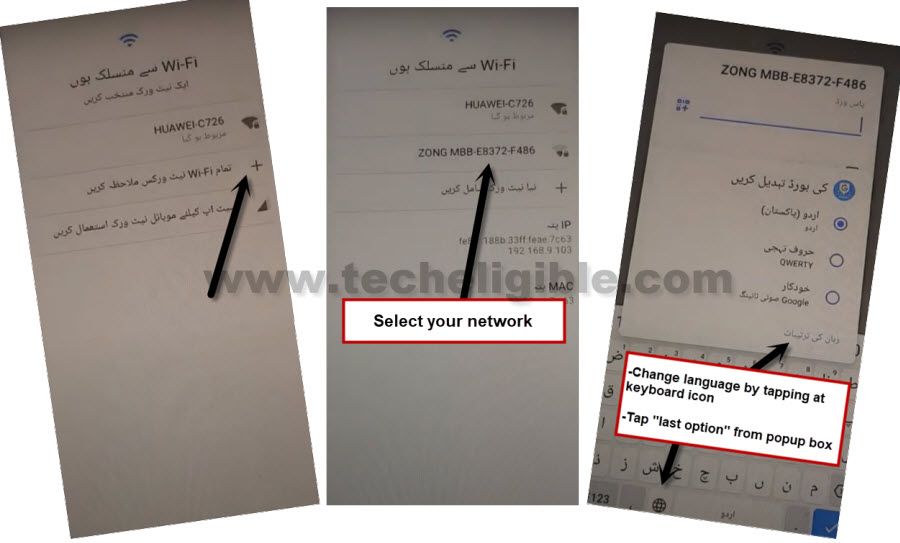
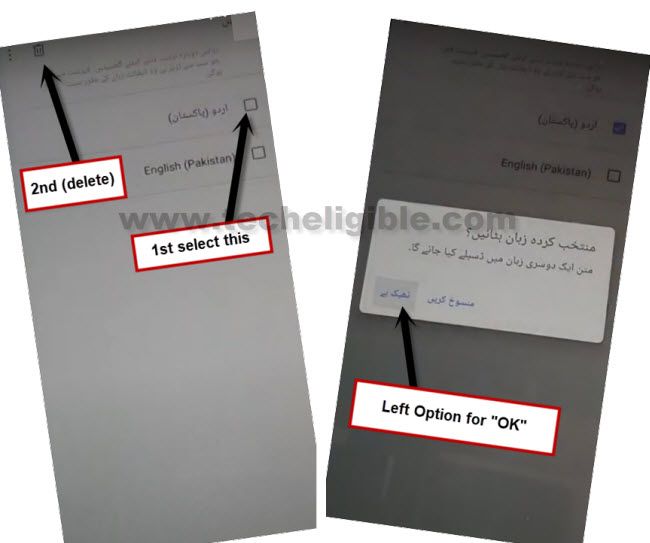
-Tap on “Blue button”, and go down, and tap on URDU “اردو” language which has arrow symbol.
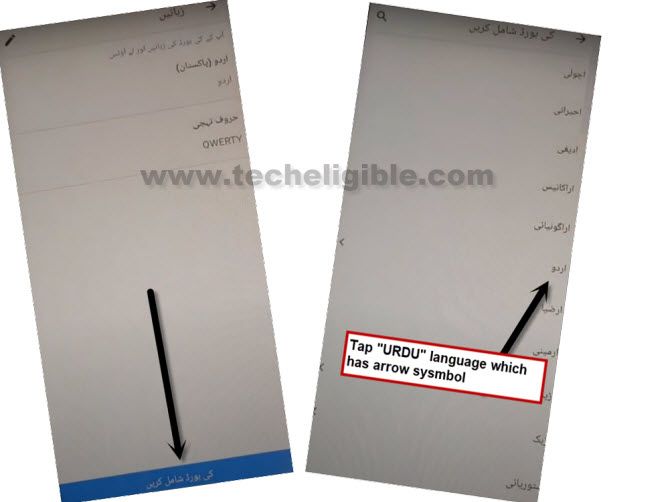
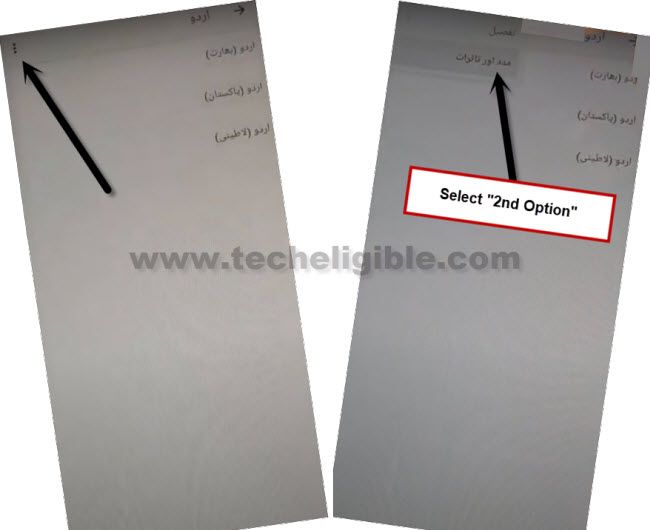
-Tap “3 dots” from top right corner, and select “2nd option”.
-Now tap on “Search box”.
-Change language to (English) by tapping on “World icon” from the keyboard.
-Type there “delete or disabled apps on android”, and then hit on “Tap to go to Applications Settings”.
-Go all the way down, and tap on “Youtube” icon, and hit on “1st” option.
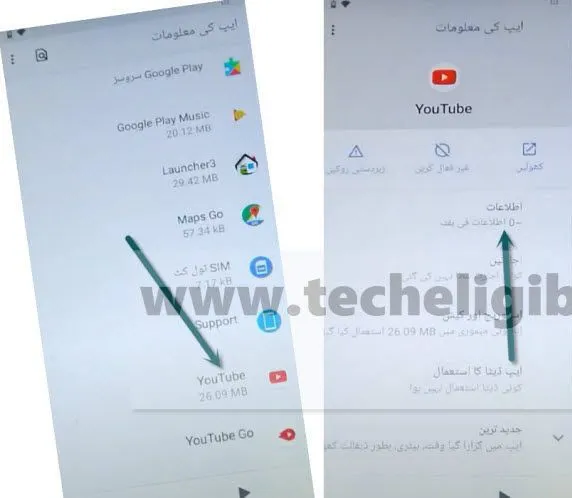
-Go down, and tap very “Last Option”.
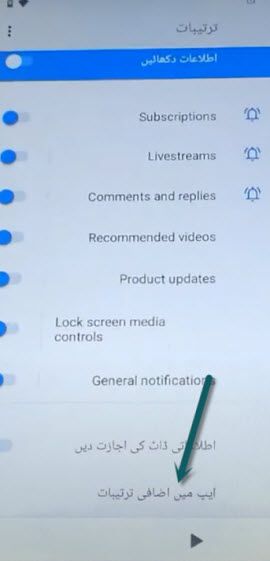
-Tap > About > Youtube option to access youtube.com.
-Now you will have (Welcome to chrome) window, just tap > Accept & Continue > Next > No Thanks.
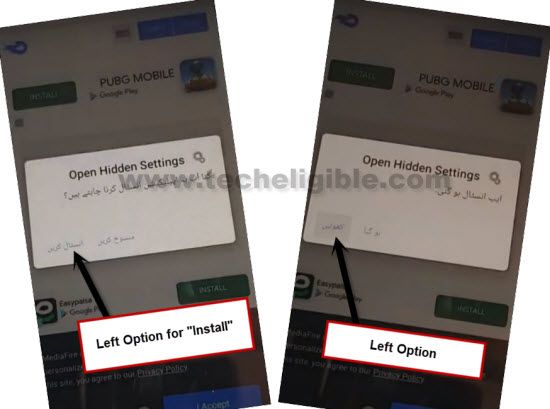
Download Open Hidden Settings App.
-Type in search box “Download FRP Tools“.
-Go our website (techeligible) searched result.
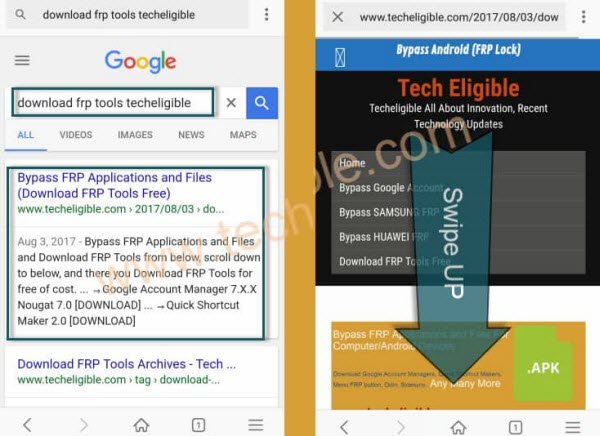
-Download “Open Hidden Settings” app from there.
-You will see notification popup bottom of the screen after finishing download process, just tap to “OPEN” from there.
-From popup window in URDU language, just hit > left option > turn on the disabled option.
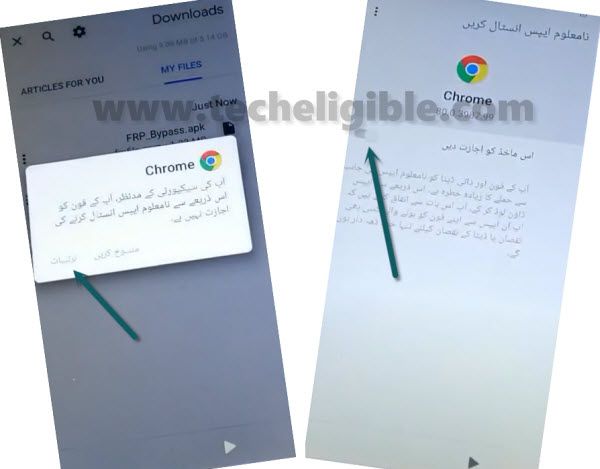
-Tap on “Back Arrow” to go back, and tap to > Left Option > Left Option.
-Afterwards, tap “Open Settings and not show this again”, Congrats, you have got accessed into your device settings.
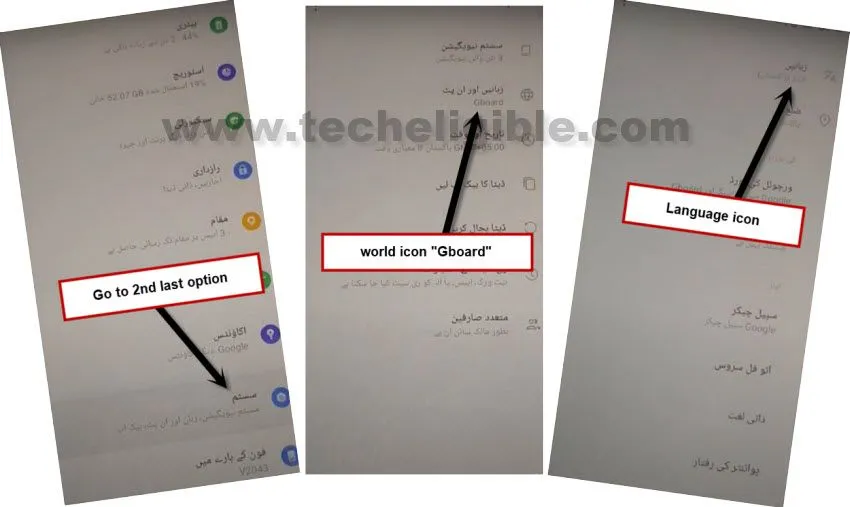
Let’s Change Language to English:
-Go all the way down, and hit on 2nd last option “سسٹم”.
-Tap on “World icon gboard” option.
-Tap very first “Language icon”.
-Now tap to “+” symbol option, and then select “English” language.
-Go to “3 dots” from top right corner, and select “1st” option.
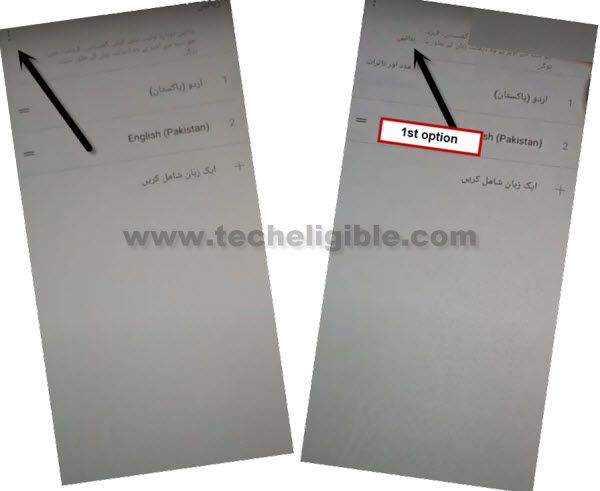
-Check mark the language “اردو (پاکستان)”, and hit on “Delete icon”, and then tap to “Left” option from popup window.
-Now you have successfully changed language to English to bypass frp VIVO Y20.
Download Google Play Services App:
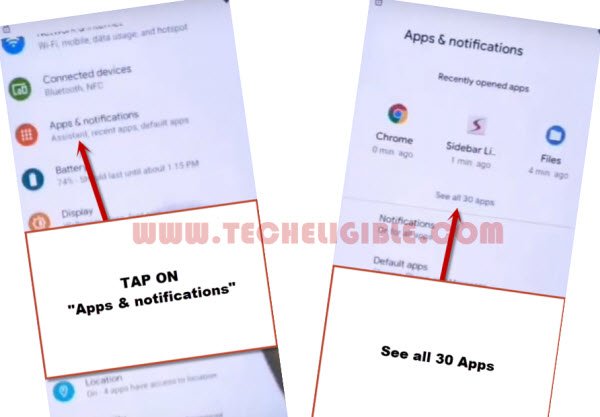
-We are going to launch chrome browser, for that, go back to > Settings > Apps & Notifications > See All Apps > Chrome > Open.
-After accessing to chrome browser successfully, you are supposed to download this app “Google Play Services“.
-Once downloading process done, go to top of the page, and tap “3 dots/download icon” from top right corner of the browser, and then hit on “Downloads” options.
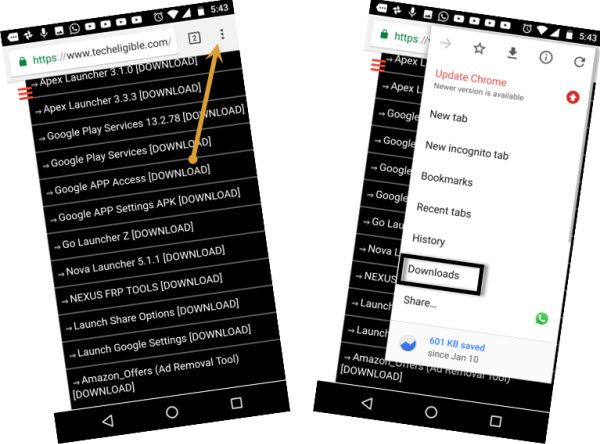
-There you will have “Google Play Services” app, tap on > Google Play Services > Install > Done.
-Install & Open again “Open Hidden Settings” app to access back to settings.
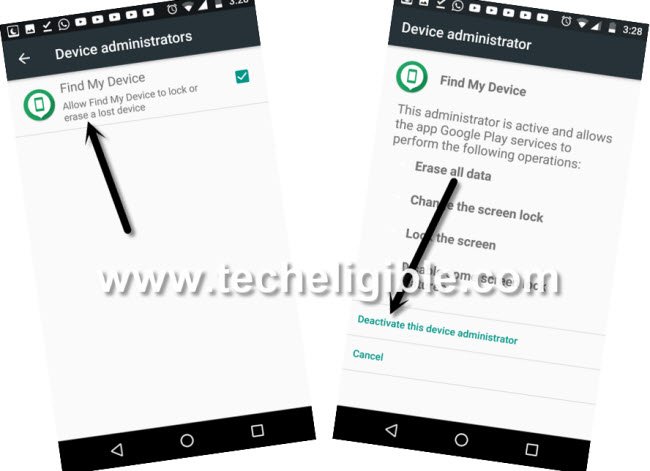
-From “Settings”, just tap on > Security > Device Admin App > Find My Device > Deactivate.
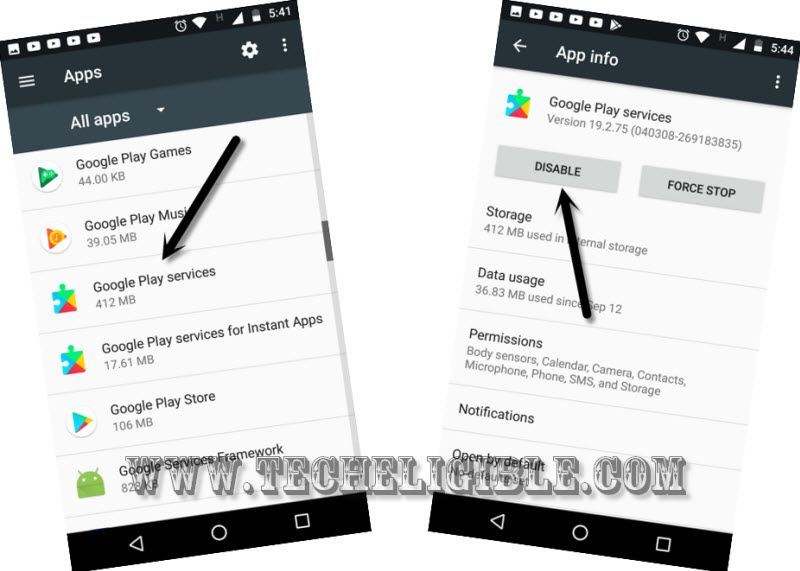
-Go back to > Settings > Apps & Notifications > See All Apps.
-From the list of app, go to > Google Play Services > Disable > Disable App.
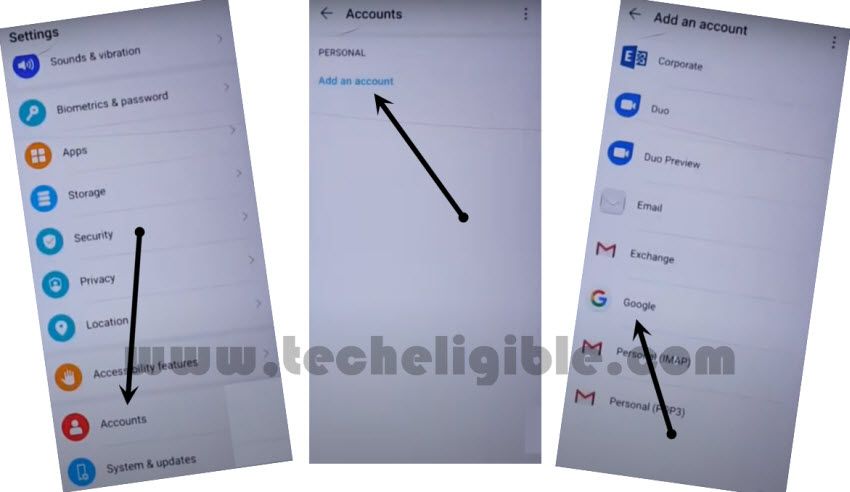
-Go back to > Settings > Accounts > Add Accounts > Google > Continue.
Enable Google Play Services:
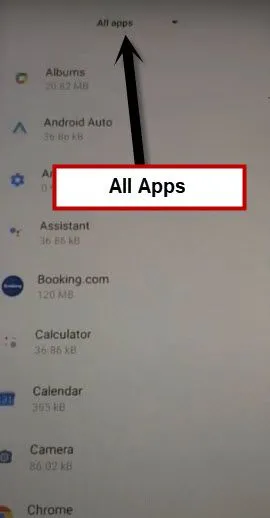
-You have to get back to > Settings > Apps & Notifications > See All Apps.
-From the top, just tap on > All Apps > Disabled Apps > Google Play Services > Enable.
You are all done from bypass frp vivo Y20, just get back to first welcome screen by tapping at back arrow several times, and then finish up your initial setup to access the device normally. Your new Gmail signed in ID will be used for future frp lock protection.
Thanks for visiting us, if you have any question regarding this process, you can comment us in below comment box.