
Remove FRP IIIF 150 Air1 Ultra By Talkback Function
We are going to use talkback function here to access to the main home-screen and Remove FRP IIIF 150 Air1 Ultra without using any paid tool. If you have lost access to your device due to forgetting Gmail ID. Don’t worry, follow up this guideline to gain access and setup new google account on your own device.
Note: This method is only for Device Owner and for educational purpose only, if you are not owner of this device, kindly do not follow this process. Otherwise you will be jailed.
Let’s Start Remove FRP IIIF 150 Air1 Ultra:
-Start process by connecting WiFi first.
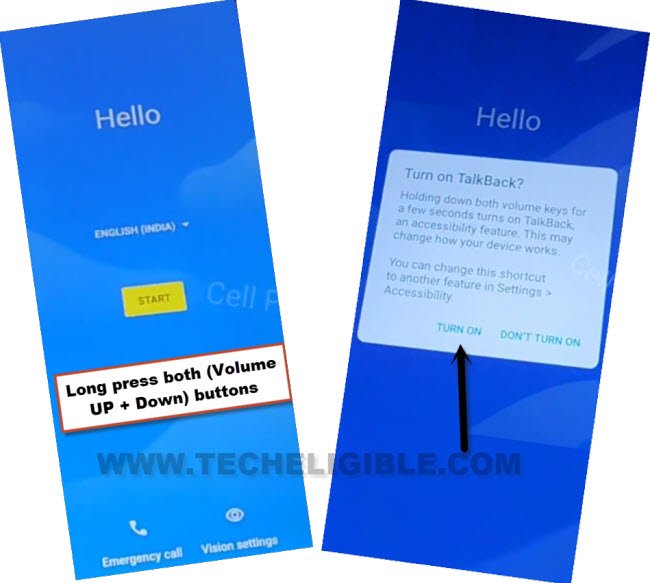
-Put your device back to first (Hello) homepage. Enable talkback feature now juts through long press both keys (Volume UP + Down).
-You will be displayed a popup window after pressing both keys, just tap to “Turn on” option.
-Long press again both keys (Volume UP + Down).
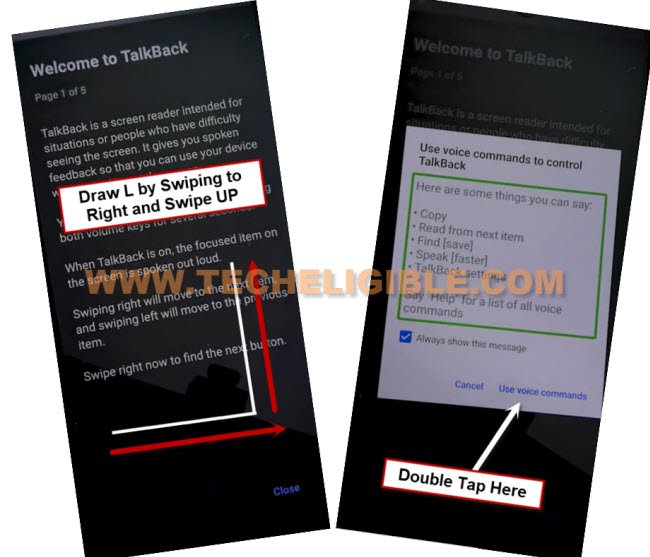
-The talkback function has been fully enabled. Let’s make this shape _| by swipe right and swipe up.
-Afterwards, from popup window, double tap to > While using the app > Use voice commands.
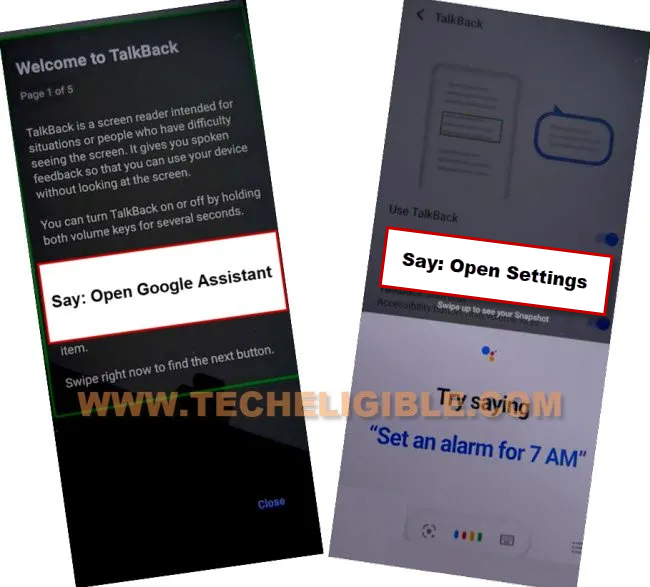
-Speak loudly “Open Google Assistant” after seeing (Green colored boarder) there.
-You will have a (Try Saying) window on screen. Say loudly “Open Settings”.
-After that tap to “Settings gear icon” from there to access to your device main settings page.
-After access inside the device main settings page, we no longer require (Talkback function). Let’s turn this function off by long press again both (Volume UP + Down) buttons.
Enable Accessibility Shortcut Function:
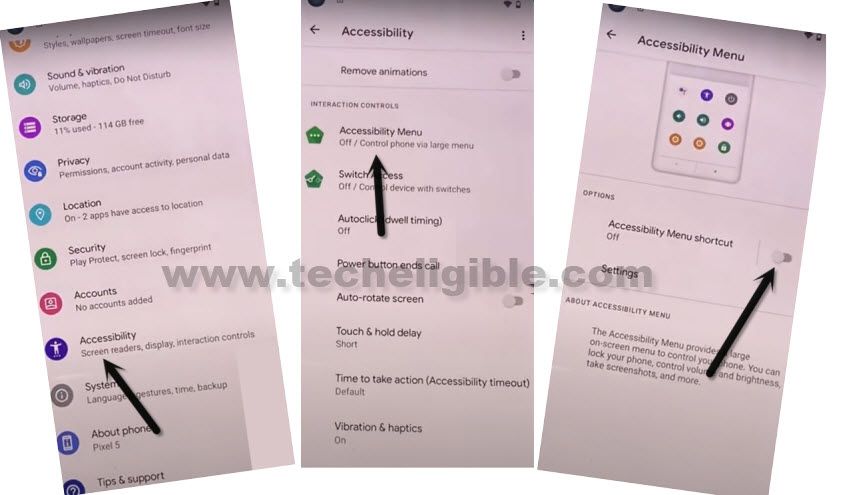
-From settings page, scroll down little bit, and tap to > Accessibility > Accessibility MENU.
-Toggle on button of (Accessibility Menu shortcut).
-From another popup screen, tap over > Allow > Got it.
-After that, you will see small green colored (3 dots) icon at the right edge of the screen. That means, the function has been turned on successfully to Remove FRP IIIF 150 Air1 Ultra.
Force Stop & Disable Google App:
-Get back to main “Settings” screen by hitting back arrow icon from top left corner.
-Tap to > Apps & Notifications > See All Apps.
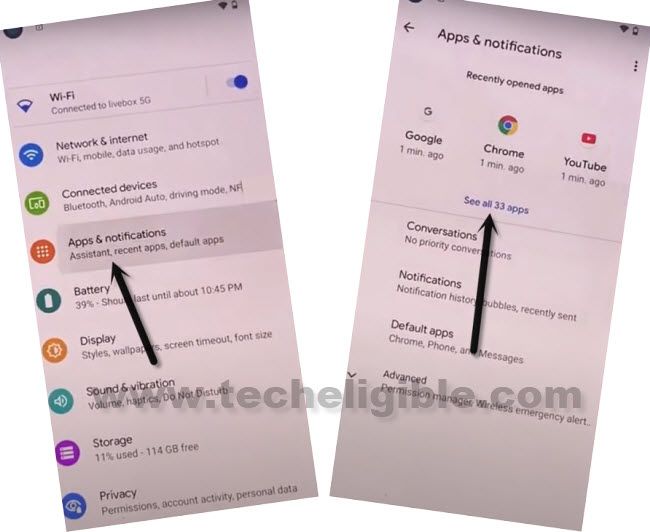
-Tap to “3 dots” icon from top corner, and tap on “Show system”.
-After that, from app list page, find out and go to “Android Setup” app.
-Tap to > Force Stop > Ok.
![]()
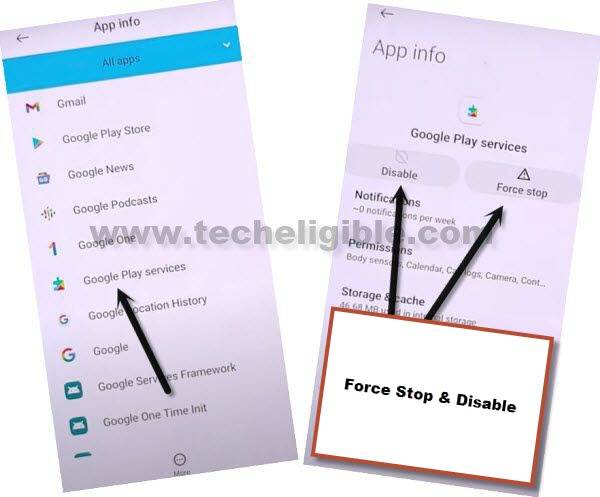
-Go back again on (App info) page, from there, find and tap over > Google Play Services > Force Stop > Ok. After that, tap on also > Disable > Disable this app.
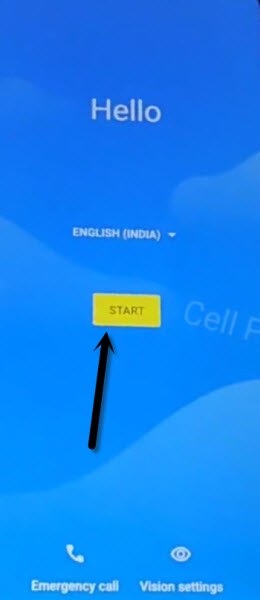
-Everting is going on perfectly till here. You have to restart your device and we will finish up setup wizard steps using (3 dots) icon. Which we recently enabled through (Accessibility function).
-After restarting the device, the first screen will be of (Hello). From there, tap to > Start > Skip > Don’t Copy.
-You will stuck on (Checking for update..) page or on a loading page. Follow up below steps carefully with full of patience
Follow Below 3 Step Very Fast & Repeatedly:
-Keep tapping on quickly > 3 dots icon > Assistant. If yo don’t see (Settings) option, repeat steps, tap again > 3 dots > Assistant. keep doing this until you see (Settings) option and you successfully hit on (Settings) option before it disappear.
| Note: This will happen many times, that after hitting on > 3 dots > assistant, you will not see any (Settings) option there, in this case, tap again on > 3 dots > assistant. After few tries, you will see (Settings) option will appear up there for mini seconds only. You have to quickly tap on (Settings) option before it disappear. If you did not hit on (Settings) at the right time, don’t worry. Keep repeating steps, after 10-20 tries, you will be able to successfully hit on (Settings) and go to (Google Play Services) page. |
-Let’s quickly tap to > 3 Dots > Assistant > Settings.
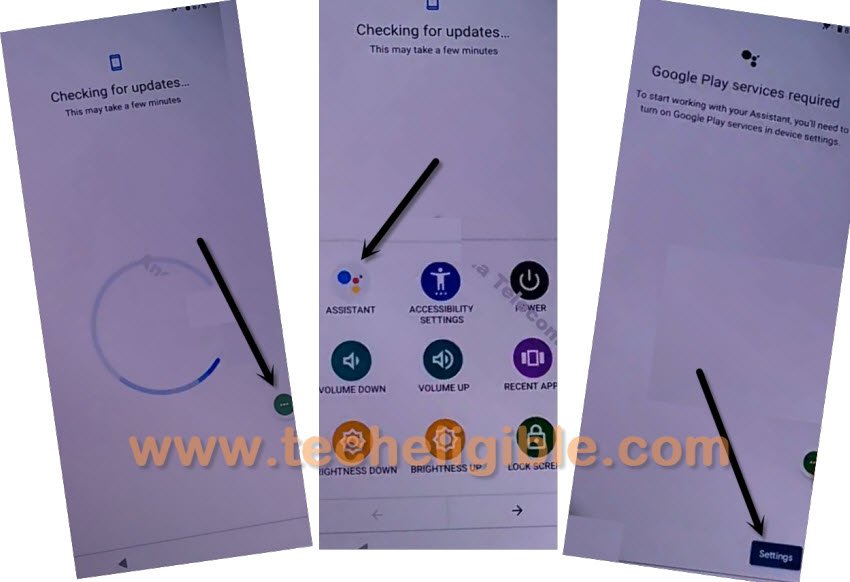
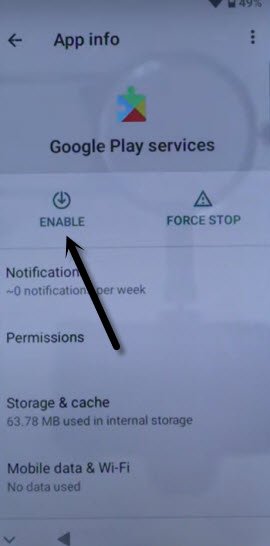
-After hitting on (Settings) successfully, you will be redirected to the (Google Play Services) app info page.
-Enable this app by hitting on “Enable” button from there.
-You are all done now from Remove FRP IIIF 150 Air1 Ultra. Just go back to (Checking for update or loading) screen by hitting 1-2 times on back arrow.
-The loading screen will complete, and you will be taken to the next page. You can now easily finish up setup wizard on your own without facing google verification page again. Thanks for visiting us.