Remove FRP Account Hisense T5 Pro Without PC
Have you lost your already synced Google account of Hisense F22 phone? If this is the case, and you have hard reset your device too. That means, you won’t be allowed to access the device main home-screen until you login again with already synced Gmail account. We will access google google app settings page. From there, we will turn on feed option to easily Remove FRP Account Hisense T5 Pro.
Note: This method is just for device owner. In some cases, people just forget their device Gmail account along with pattern of PIN lock and they just hard reset that device. After that, they are asked to login back with previous account to gain access. To resolve this accessing issue, we created this helping post for you only for educational purpose.
Let’s Start to Remove FRP Account Hisense T5 Pro:
-Turn on Hisense phone & Connect WiFi.
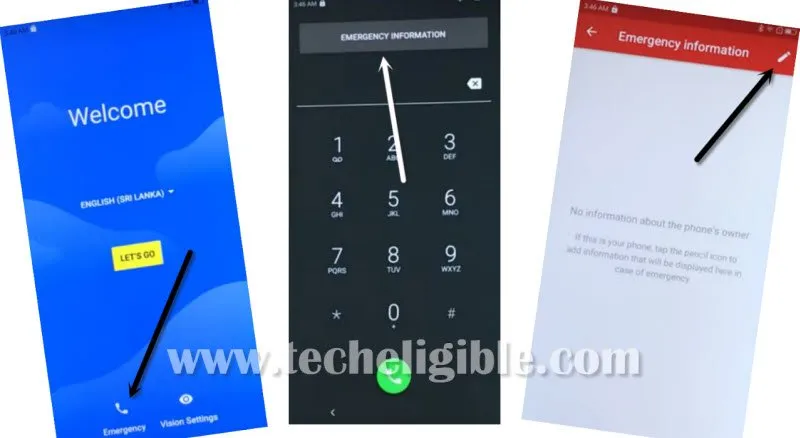
-Get back again on (Welcome) page. From there, go to “Emergency” option from bottom.
-Tap two times on “Emergency information”. After that, tap on “Edit” icon from top corner.
Note: Do make sure, there is sim card is inserted already. Because, we have to access to our sim card contact list page.
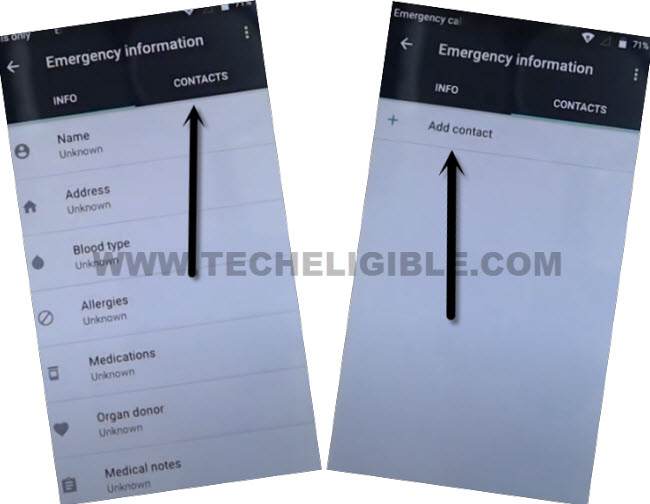
-You will be taken to the (Emergency information) screen. From there, hit on a > Contacts > Add contact.
-You will be displayed all your device saved contact list, you have to tap at any random contact name from there.
-Tap again on same contact name.
-You may face a popup window, just tap few times on “Allow”.
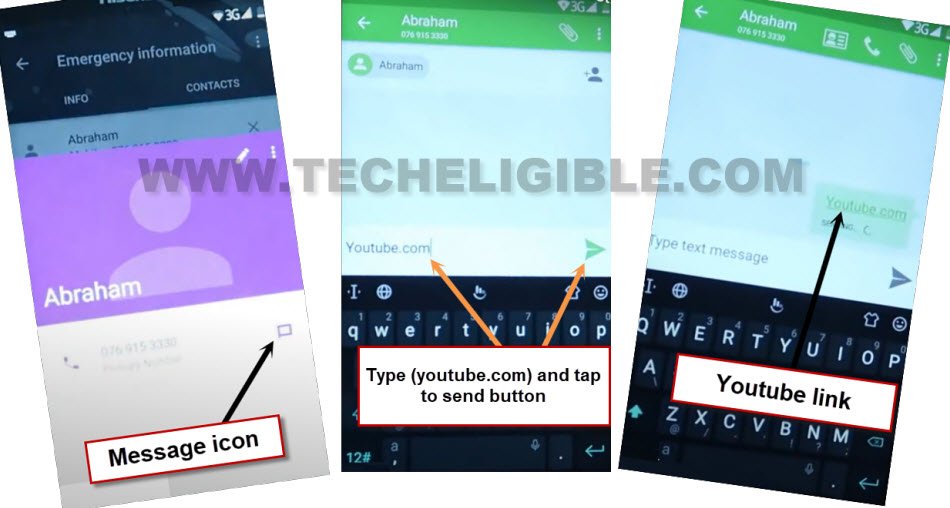
-Tap to “Message” icon which is right next to contact name.
-Type www.youtube.com url in text message and send this message to any random contact number.
-After that, tap on youtube link to access youtube webpage directly.
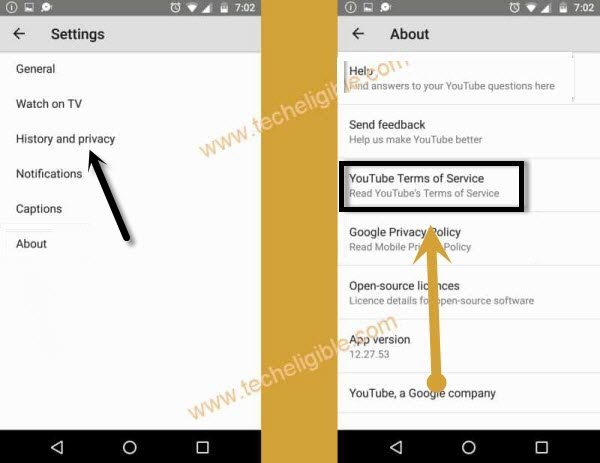
-Hit on a “Account” icon from top corner of the youtube page and tap to “Settings”.
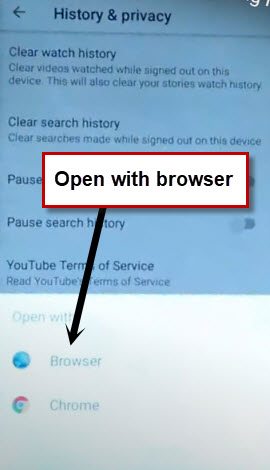
-We have to hit on > History & Privacy > Youtube terms of service.
-You may see a popup window asking you to open with your desire browser. Just tap twice on “Browser” from there.
-We can easily download some frp removal apps in our hisense devices to Remove FRP Account Hisense T5 Pro.
Download Hisense T5 Pro FRP Tools:
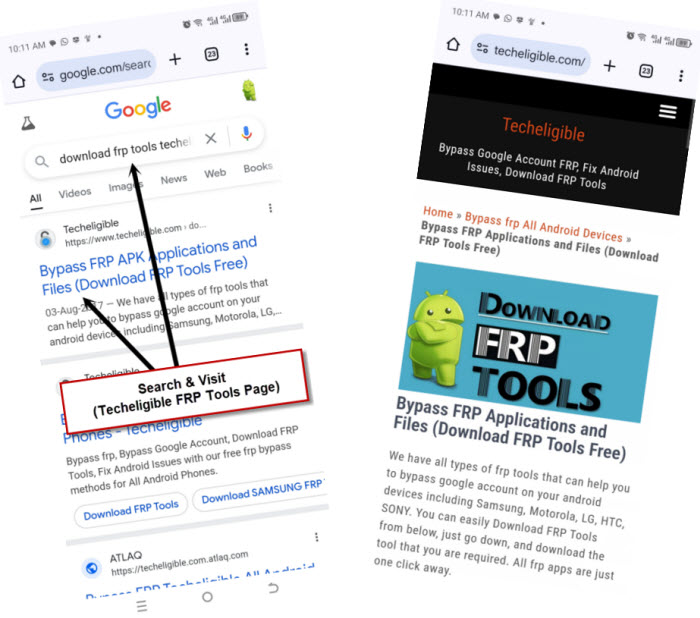
-Search in browser with “Download frp tools techeligible“. After that, tap to 1st searched result as shown below.
-Scroll down from frp tools page, and download “Google Play Services” application.
-Once the downloading is done, you will be redirected to the download folder page. You have to get back to frp tools page again by hitting on back arrow.
-Download one more app in your hisense device, the app is “Quick Shortcut Maker 2.4.0“.
-After downloading is done, you will be prompt download folder automatically. You will see your both downloaded apps there.
-Tap on “Google Play Services” app.
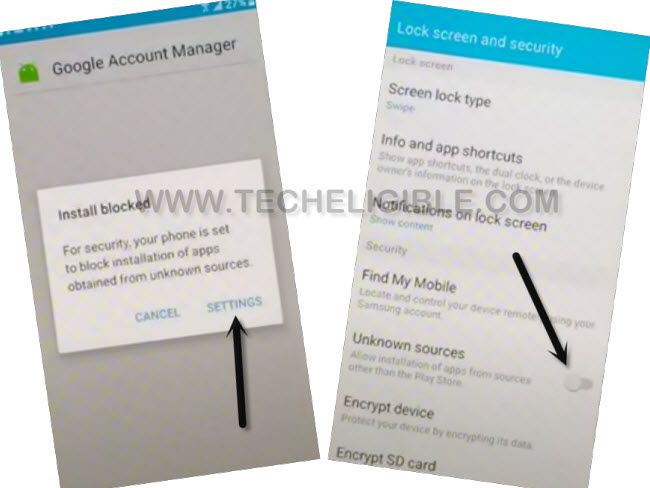
-You will see installation blocked popup window, just tap to “Settings” option.
-After that, turn on “Unknown Sources” option.
-Go back to download folder again by hitting on back arrow from bottom.
-Tap again on > Google Play Service > Next > Install > Done.
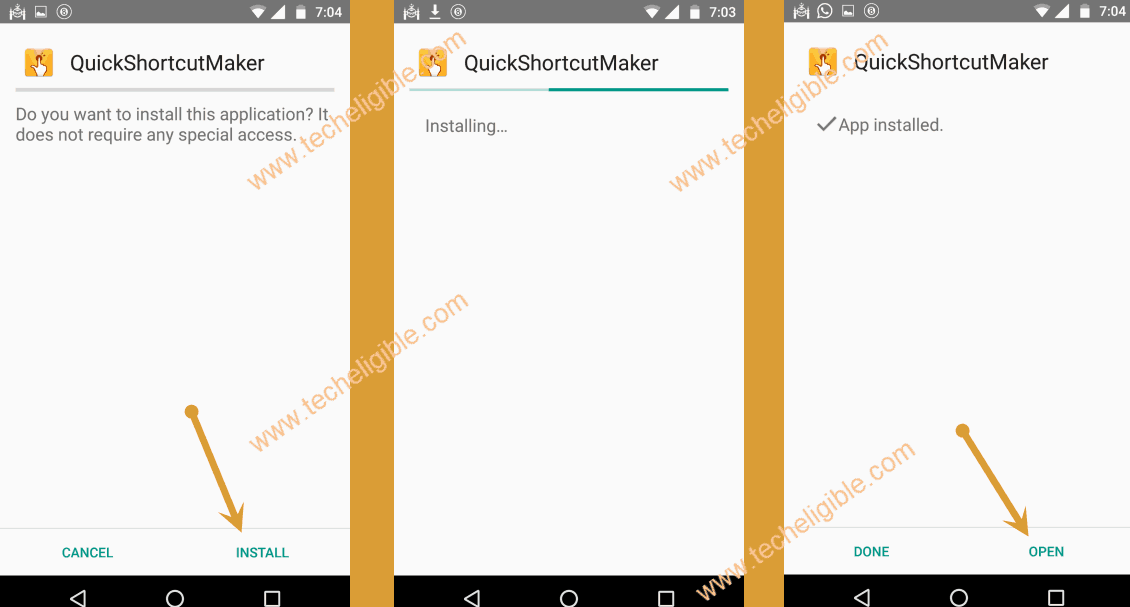
-Tap on > Quick Shortcut Maker 2.4.0 > Install > Open.
Reach to Main Settings Page:
-Hit over the “Application” from top center.
-Find and tap to > Settings > Try.
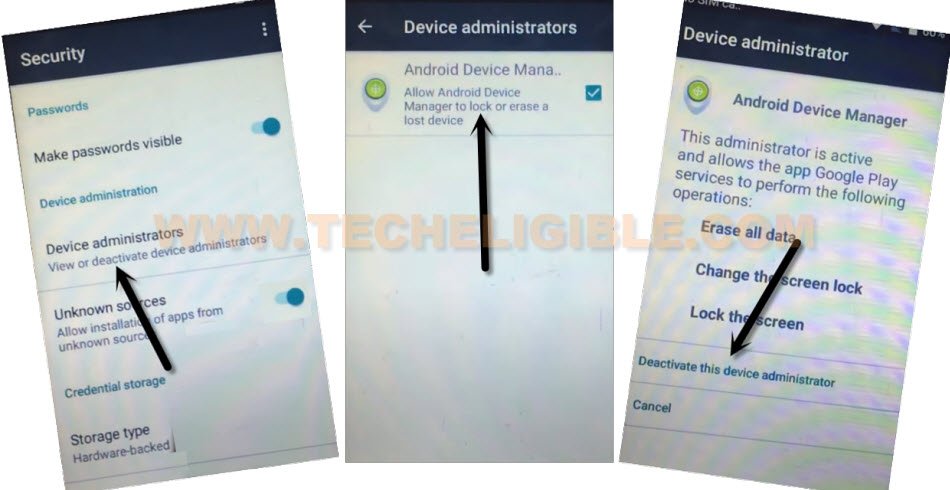
-Go to > Security > Device Administrator > Android Device Manager > Deactivate this device administrator.
Disable Google Play Service App:
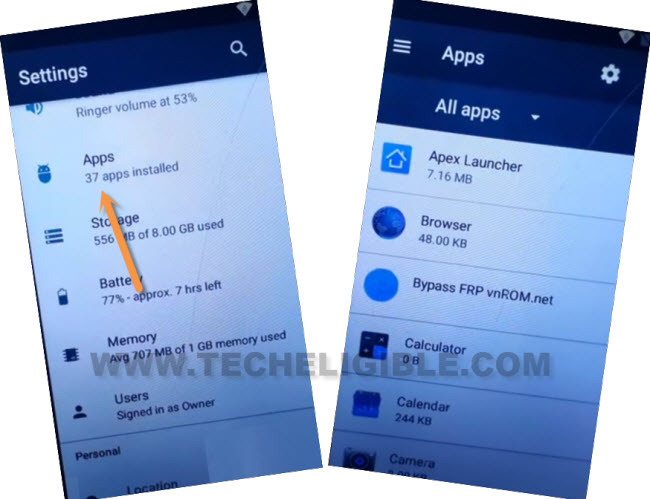
-Let’s tap on back arrow to get back to “Settings” page again.
-After that, tap on “Apps” to reach app list screen.
-We are gonna get displayed all hidden apps just by tapping on > 3 dots > show system.
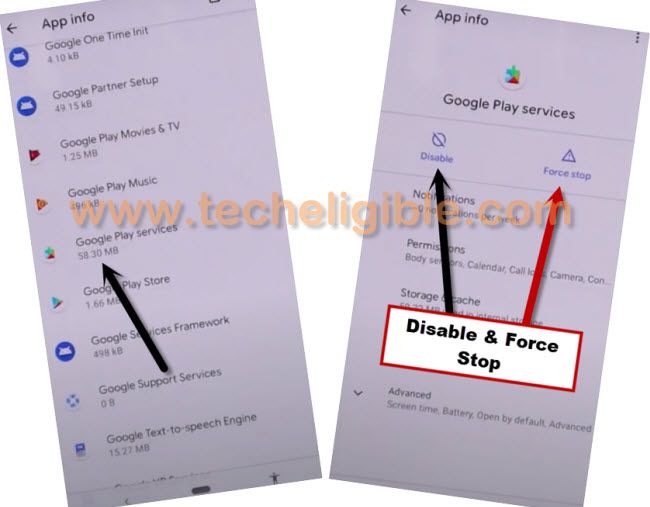
-Fid and go to > Google Play Services > Disable > Disable this app.
-You have to hit on also > Force Stop > Ok.
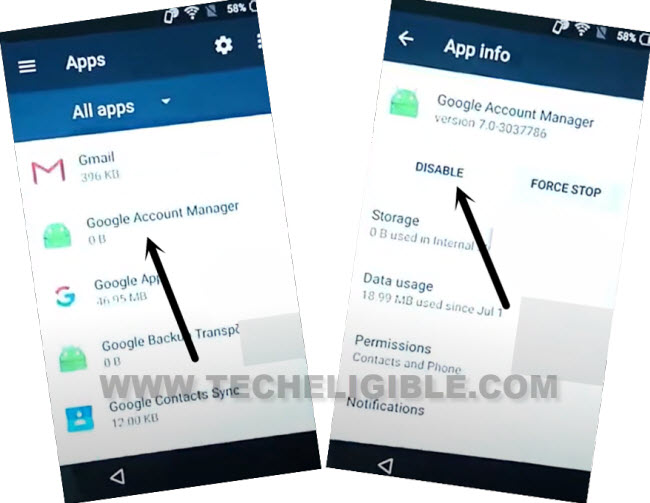
-After that, go back to app list page again. Tap to > Google Account Manager > Disable > Disable this app.
-Find and tap to “Google Account Manager”.
-Hit on > Disable > Disable this app.
-We can easily setup new account in our device to Remove FRP Account Hisense T5 Pro without facing any issue.
Setup with new Google Account:
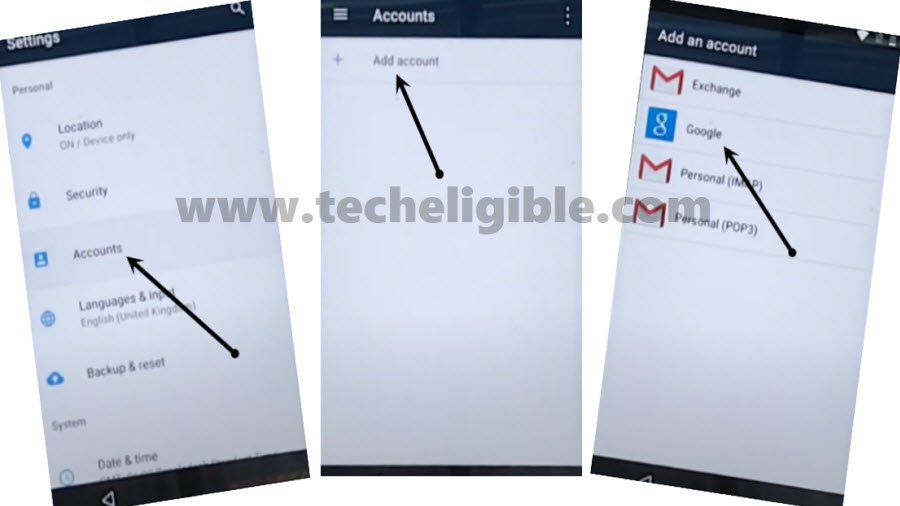
-Let’s get back on main “Settings” page again. From there, go down and tap on > Accounts > Add account > Google.
-We are almost done now. We just have to enable back disabled applications. Go back on “Settings” page.
-After that, tap again on “Apps”.
-Hit again on “3 dots” icon and tap to “Show system”.
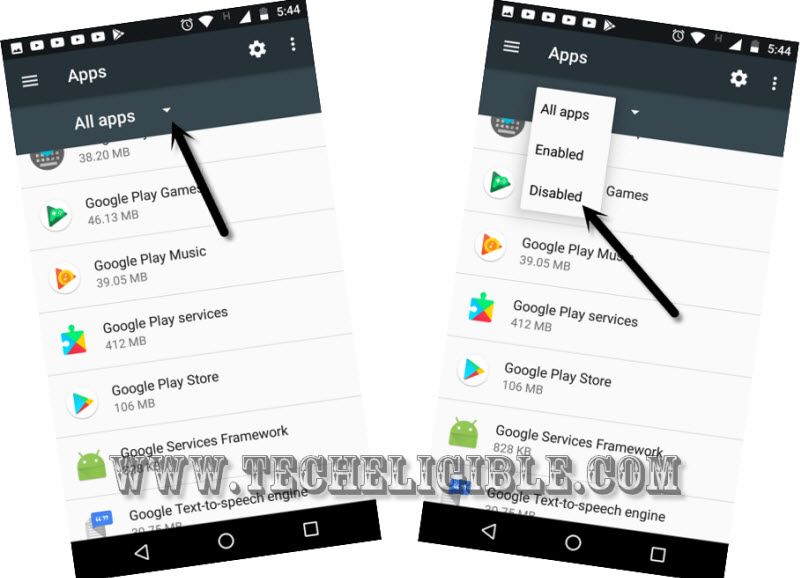
-Hit on a “All app” from there and choose “Disabled”.
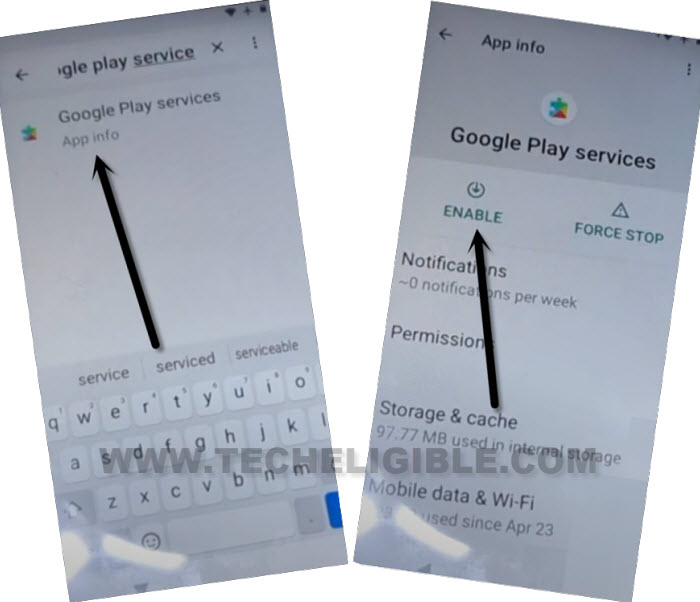
-Tap to > Google Play Services > Enable.
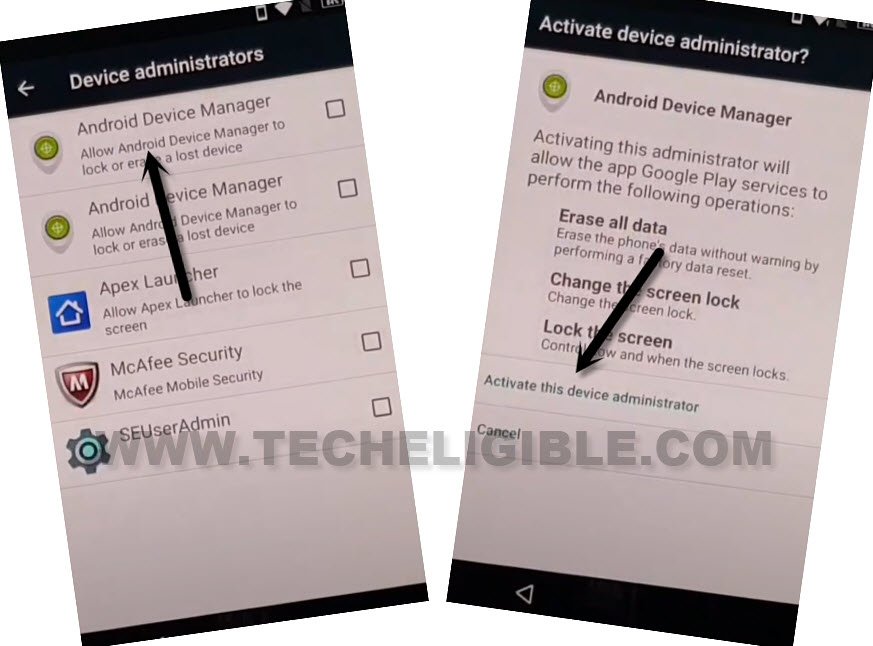
-Get back to main settings screen. activate also (Android device manager).
-Go to > Security > Device Administrator.
-Tap to > Android device manager > Activate this device administrator.
-Everything is done now from FRP bypass side. You can restart and complete setup wizard steps on your own without any extra help.

