
Remove FRP Account Tecno Spark 30C By Accessibility Option
Get back your lost access tecno device after hard reset. If you are google account is not being accepted by google, that might be, you have forgotten your recently setup Gmail account. To fix this issue and Remove FRP Account Tecno Spark 30C. We will use (Accessibility Function) from this phone. Follow up steps from below.
Disclaimer: We highly recommend you to apply this method only on your own device, if you are not owner of this device, or you found this from some where, you must return to its real owner. This method is for educational purpose only to assist device owner only in setup another google account.
Let’s Start to Remove FRP Account Tecno Spark 30C:
-Firstly, switch on tecno phone. After that, connect WiFi.
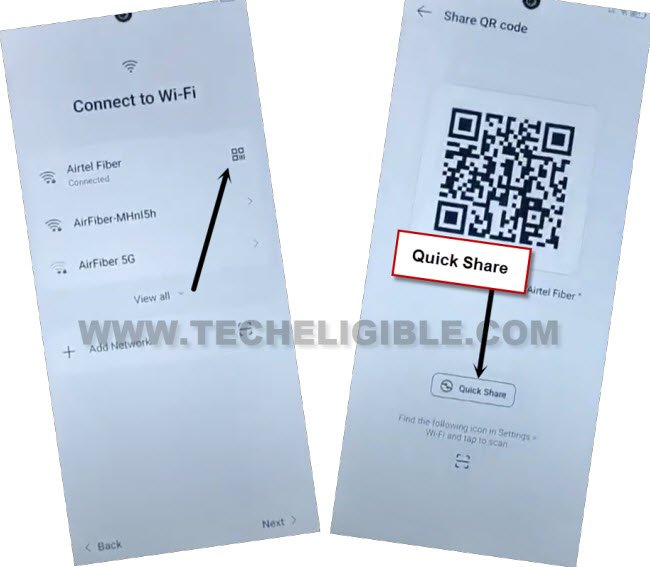
-Once the WiFi is connected, from the same WiFi page. Go to “QR Code” icon that is aside your connected WiFi name.
-Tap on “Quick Share” option.
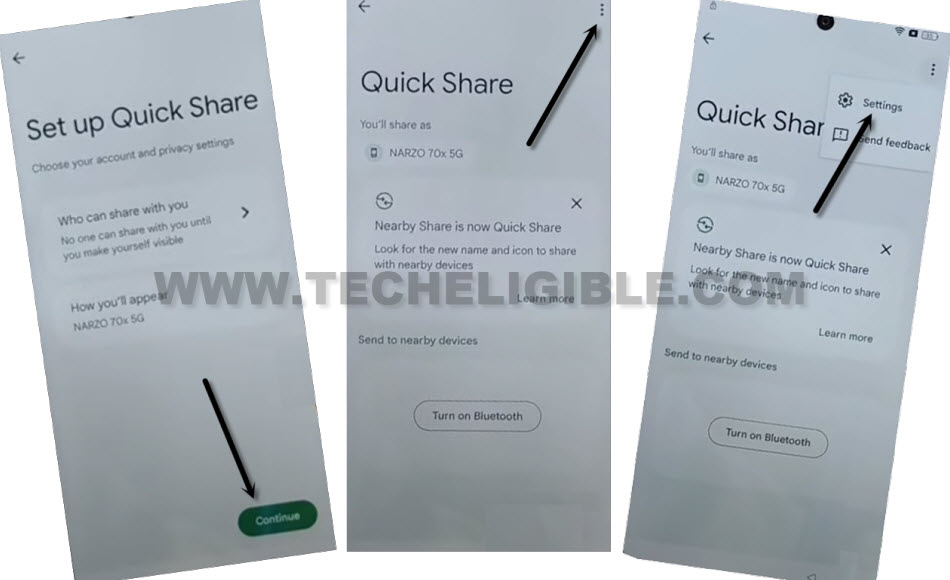
-Hit over a “Continue” option from next screen. After that, tap over a > 3 dots > Settings.
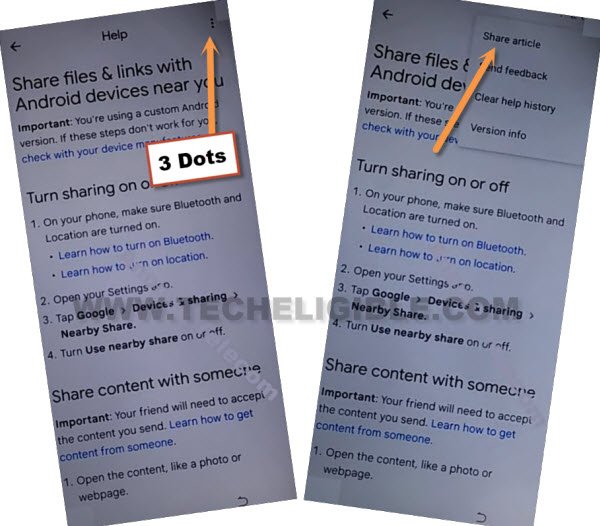
-Hit on a hyperlink “Learn about Quick share”. You will be redirected to the help page. From there, tap again on “3 dots” icon an go with “Share article”.
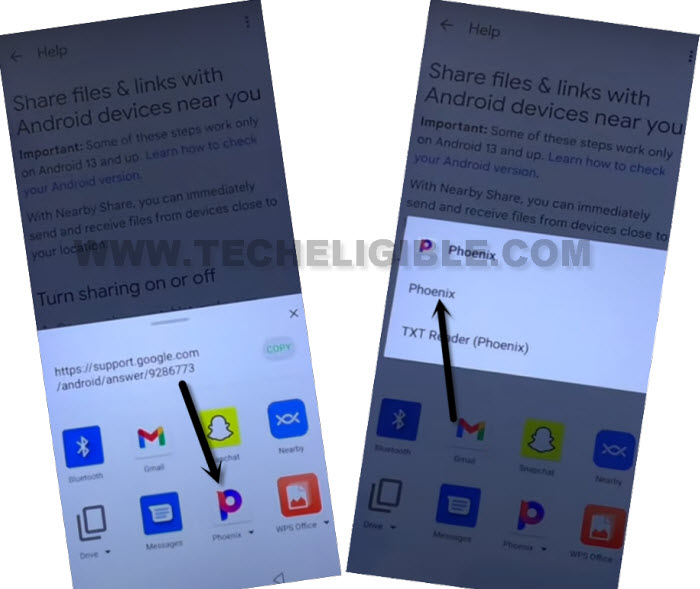
-From popup screen, tap to “Phoenix” browser app.
-You will be shown another popup screen, just tap again on > Phoenix > Agree & Start.
Get Help of Accessibility Shortcut Function:
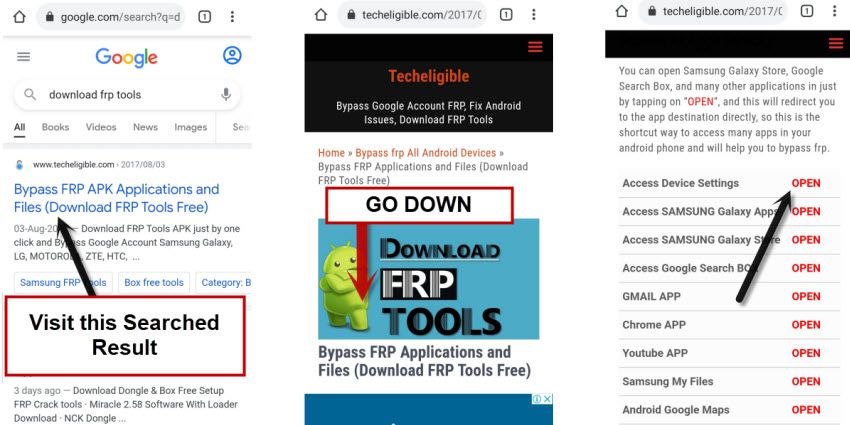
-From browser screen, make search with “Download frp tools Techeligible“. After that, go to 1st searched result same as below.
-Go to “Access Device Settings“.
-We have to turn on accessibility function from there by going to > Special Function > Accessibility > Accessibility MENU.
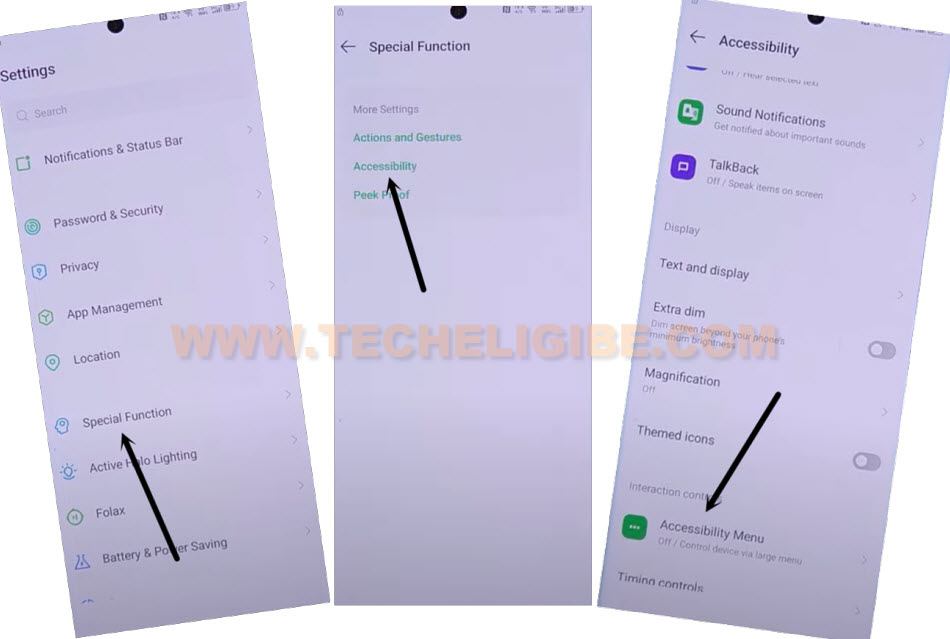
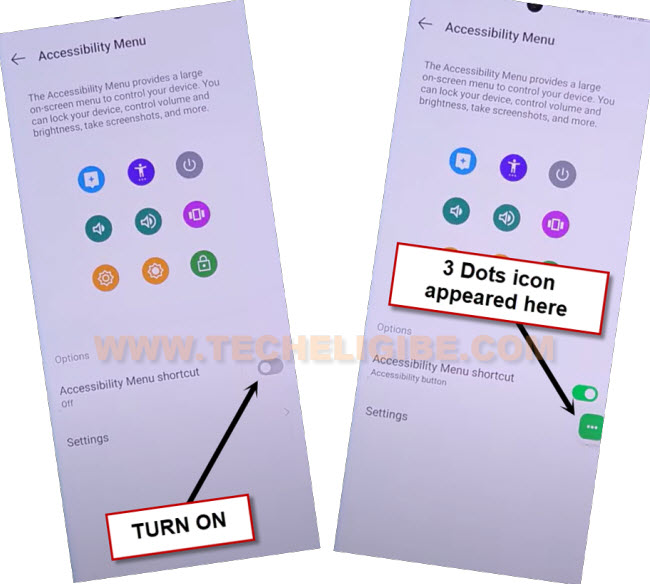
-Let’s toggle on “Accessibility Menu Shortcut” function from there to Remove FRP Account Tecno Spark 30C.
-You may have a popup window, just go to > Allow > Got it.
-After doing everything according to the steps, you will be able to see (3 green colored) icon will stick at the right edge of your device screen.
Access to App List Page to Disable Apps:
-Access back to your device main settings page by hitting once on the back arrow icon from bottom.
-From there, tap on “App Management”. After that, hit on “App list” option.
-Hit on “3 dots” icon from extreme top right corner.
-After that, go to “Show system”.
![]()
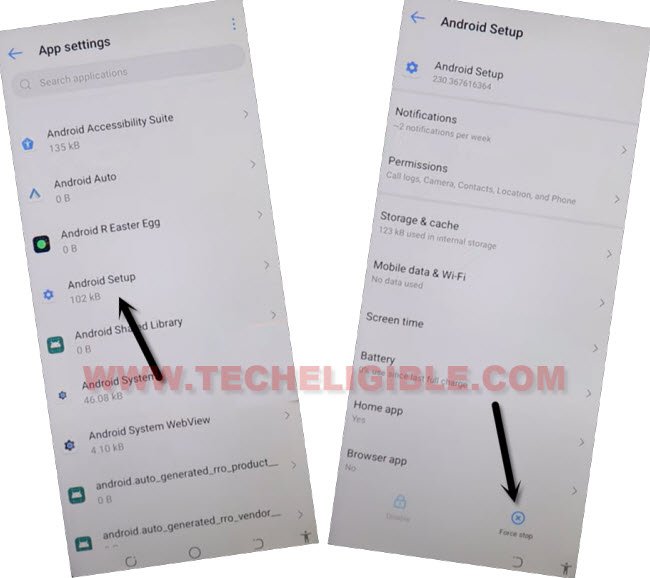
-Firstly, force stop android setup application.
-From app list page, search & tap on “Android Setup” app same as shown below.
-Afterwards, hit on > Force Stop > OK.
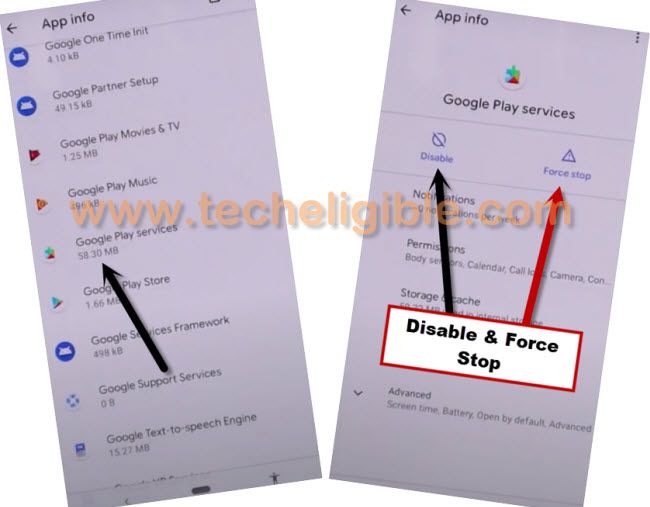
-Go back to app list page again. From there, find and tap on “Google Play Services”.
-Tap to “Disable > Disable App”.
-After that, tap to “Force Stop > Ok”.
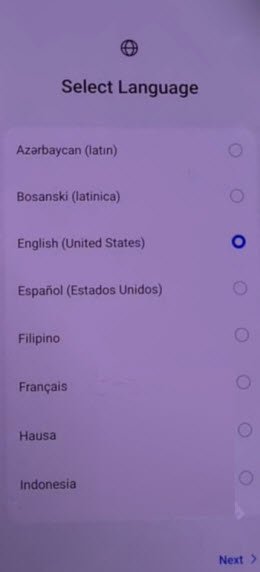
Go All the way back on (Select Language) Screen:
-You have to keep tapping over a “Back Arrow” icon several times until you reach back to (Select Language) page same as shown below.
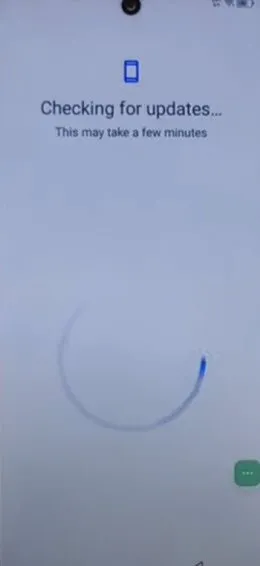
-Go to (Checking for update) page by hitting few times on > Next > Next > Skip > Next > Next > Don’t copy.
-Your device will stuck on (Checking for update…) page.
We’re going to Enable Google Play Services App:
-Without enabling google play services app, you won’t be able to complete setup wizard steps.
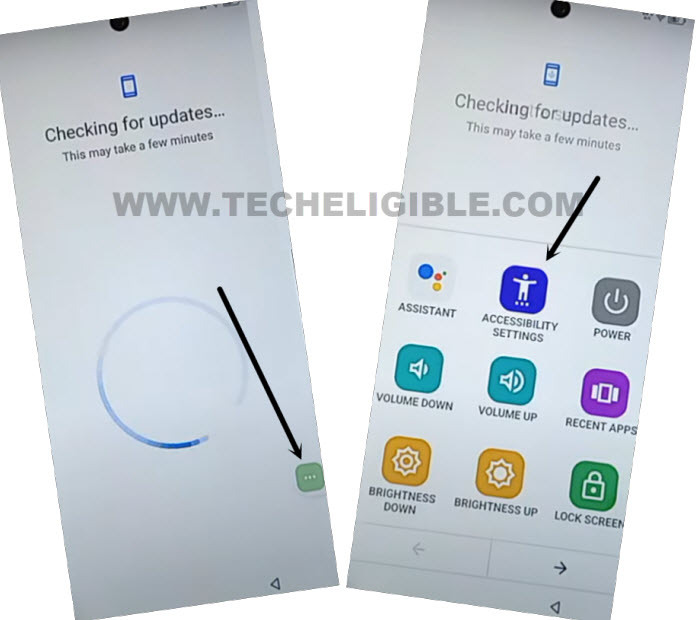
-You are right now on a (Checking for updates…) page. From there, tap to > 3 dots > Accessibility Settings.
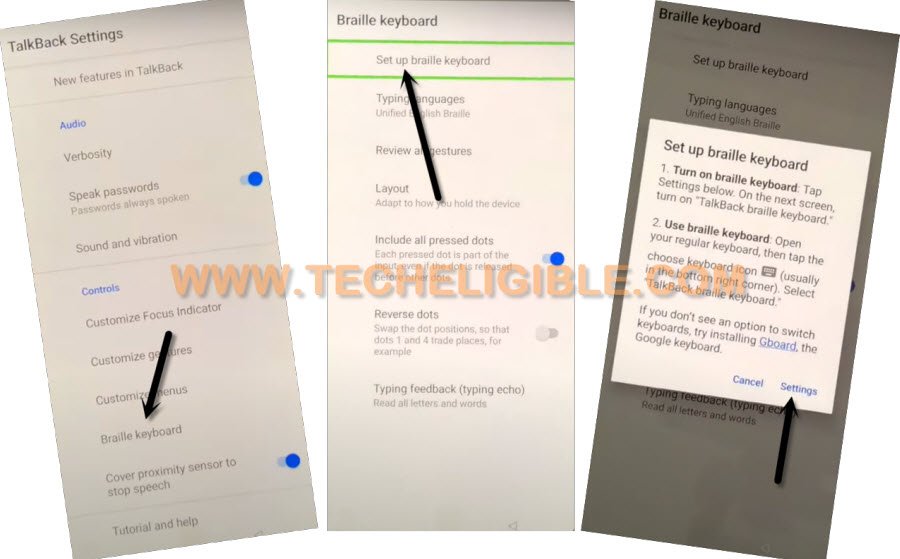
-We are going to access back to our device main settings page using (Braille Keyboard) function.
-Firstly, tap over > Talkback > Settings.
-Let’s hit on a > Braille keyboard > Set up braille keyboard.
-Go o “Settings” option.
-Tap to > Gboard > Share Gboard > Share.
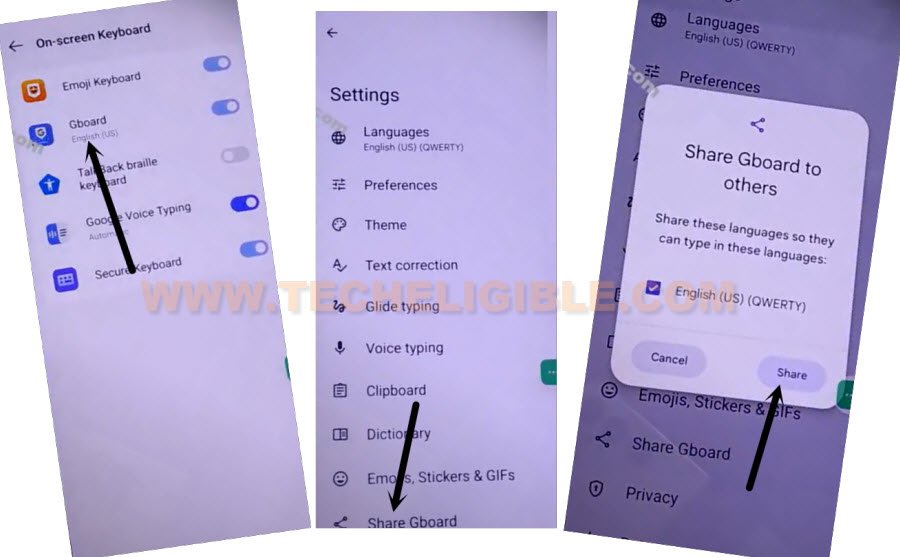
-From popup screen, go to “Phoenix” browser app.
-Tap again on “Phoenix”.
-You may reach to google play sign in screen. Go back by hitting on “Back Arrow” icon from bottom.
-Go to frp tools page by searching with “Download FRP Tools Techeligible“. Go to same searched result as shown below to Remove FRP Account Tecno Spark 30C.
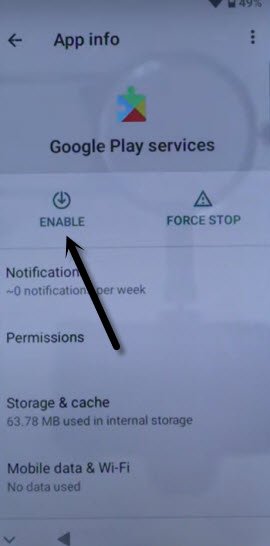
-Access to app list page by tapping at “Apps Management”. Afterwards, go to “App list”.
-Let’s get displayed all hidden apps too by going to > 3 dots > Show systems.
![]()
-Go to > Google Play Services > Enable.
-Keep tapping back arrow option until you reach back on (checking for update….) screen. After that, this screen will complete within few seconds and will take you to the (Google Services) screen. All remaining setup wizard steps can be done without any further help.