Remove FRP HTC Desire 10 Pro By Setup Latest ID
You can follow up steps from below to fix your HTC device FRP problem after forgetting your already signed in google account? This is the best and easiest way to get back your device just through Remove FRP HTC Desire 10 Pro. We will open chrome browser and access to techeligible frp tools page to download frp app in free. After that, we will be able to login back with our other google account.
Disclaimer: We highly recommend you to apply this method only on your own device, if you are not owner of this device, or you found this from some where, you must return to its real owner. This method is for educational purpose only.
| Method 1: Bypass FRP HTC Desire 10 Pro [Latest] |
| Method 2: Bypass FRP HTC Desire 10 Pro [By Talkback] |
Method 1: Remove FRP HTC Desire 10 Pro
-Start up this HTC frp removal method by connecting WiFi. From same WiFi page, go to “Add another network” option.
-After that, type any on a popup window of (Add network). Long hold on your typed text and go to “Share” option.
-You will be shown a popup window from bottom, just long tap again on “Gmail” application.

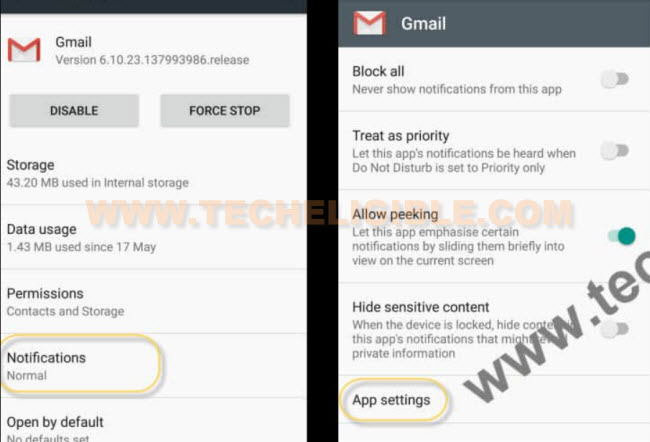
-Let’s access Gmail app settings page by going to > Notifications > App Settings.
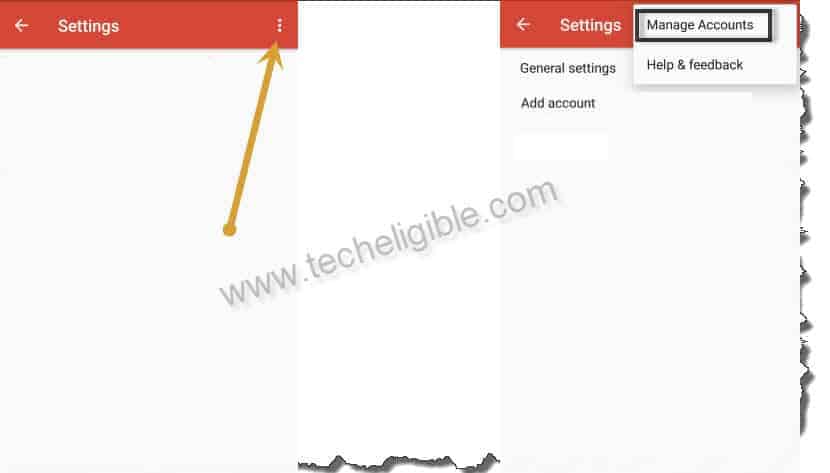
-After accessing to settings page, just go to “3 dots” icon from top corner and tap to “Manage Account” option.
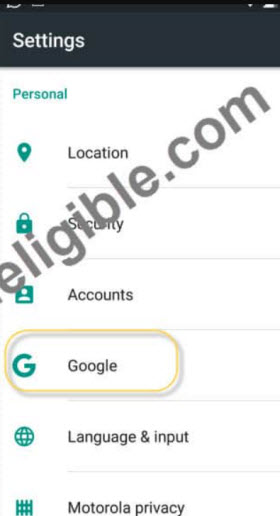
-From your device settings page, you have to hit on a “Google “option.
-We have to tap on a “Search & Now” option.
-Let’s reach to now cards screen by tapping on an option of “Now cards”.
-Turn on “Show cards” from top of the page and hit on “No Thanks”.
-Let’s search and access to google chrome browser application (See below image).

-You may also see a (Welcome to Chrome) screen. Just go to > Accept & Continue > Next > No Thanks.
Download FRP Tools:
-You have to type in chrome browse search bar “Download FRP Tools Techeligible“.
-Go to same searched result as shown in below image to access official frp tools page of techeligible.
| Note: You can also reach directly to the official frp tools download page of techeligible just by opening techeligible website directly and hit on a “Download FRP Tools” tab top right side menu bar. |

-After that, find and download this app “Account Login“.
-Wait until downloading process is done. After that, go back to (Now cars) screen by hitting 2-3 times on back arrow icon from bottom. Do this cautiously.
-Turn on again “‘Show cards” function from top and tap to “No Thanks”.

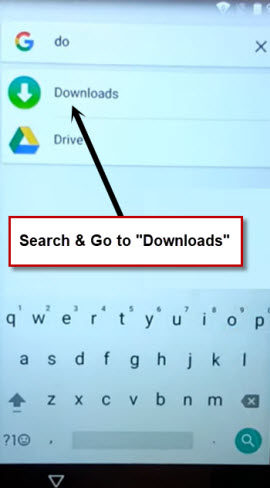
-Type in google app search bar “Download” and go to “Downloads” app from searched result.
Install Downloaded App Now:
-You will have your downloaded app in download folder. Just, tap to “Account Login” app.
-You may face a notification screen, just select “Package Installer” option and tap to “Just once”.
| Note: You may also face a (Installation blocked) popup before the installation process start, just tap to “Settings” and turn on “Unknown Sources” option from there. |
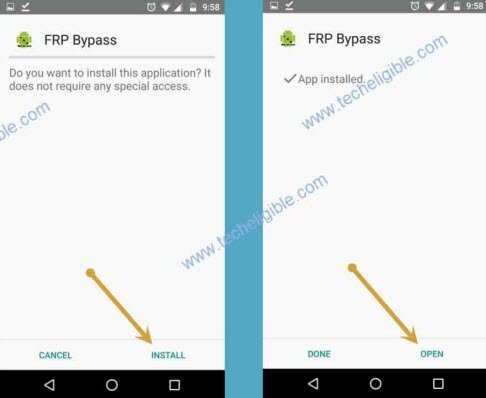
-We have to install this app now to sign in with other google account for easily Remove FRP HTC Desire 10 Pro.
-Go to > Account Login > Install > Open.
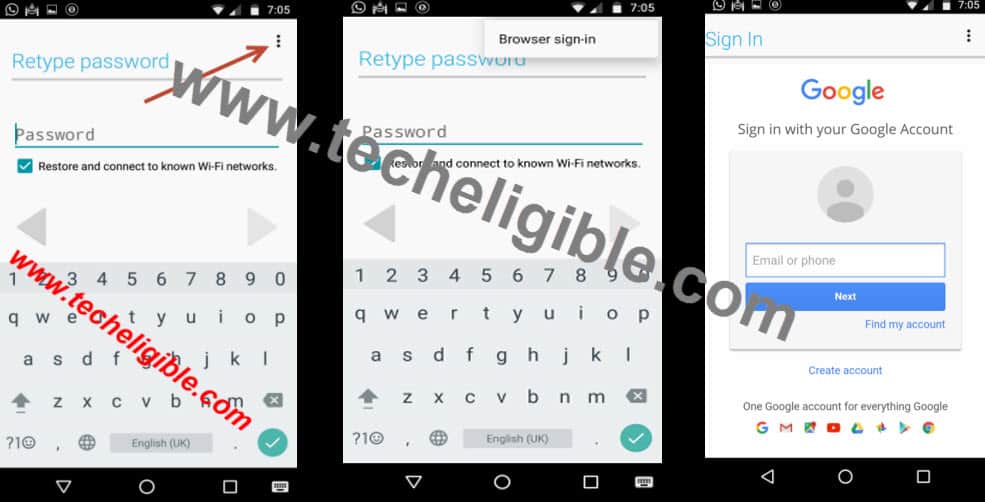
-You will be taken to the (Retype password) screen. Let’s tap on a “3 dots” menu from top corner and hit on a “Browser Sign-in” from there.
-Sign in now with your any valid google account. This will be used for future frp protection on this device.
-After login successfully, you can complete your device setup wizard steps easily without any help. Thanks for visiting us.
Method 2: Remove FRP HTC Desire 10 Pro [By Talkback]
-Switch on HTC Desire 10 device and Connect WiFi first. After that, put your device back to first startup (Welcome) page.
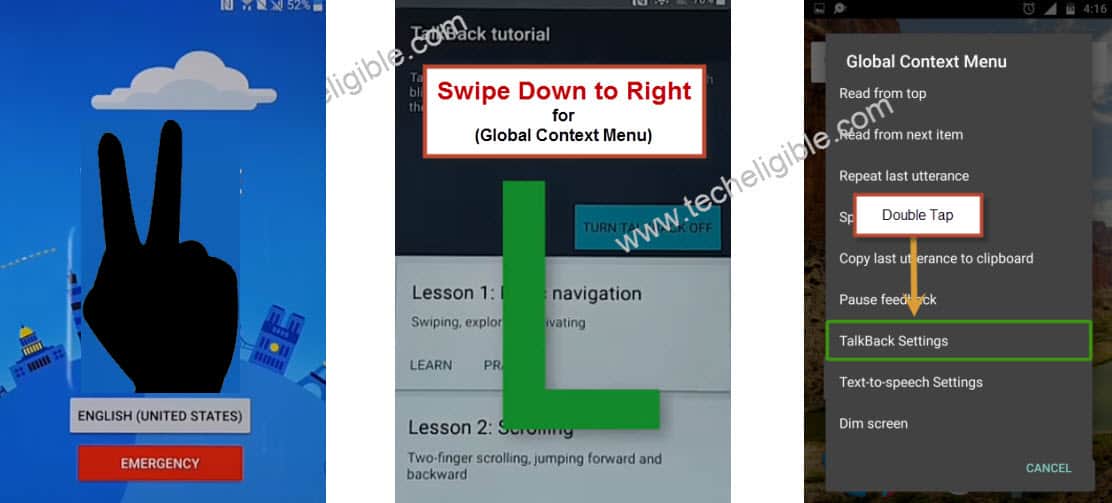
-Long hold with your 2 fingers together on screen, after a 30-60 seconds holding, you will see another window of (Talkback Tutorial). That means the talkback has been enabled successfully.
-Tap two times quickly on a “Use Talkback” option.
-Let’s make “L” shape on screen by swiping down to right same as shown below. From another global context menu screen, double tap to “Talkback Settings” option.
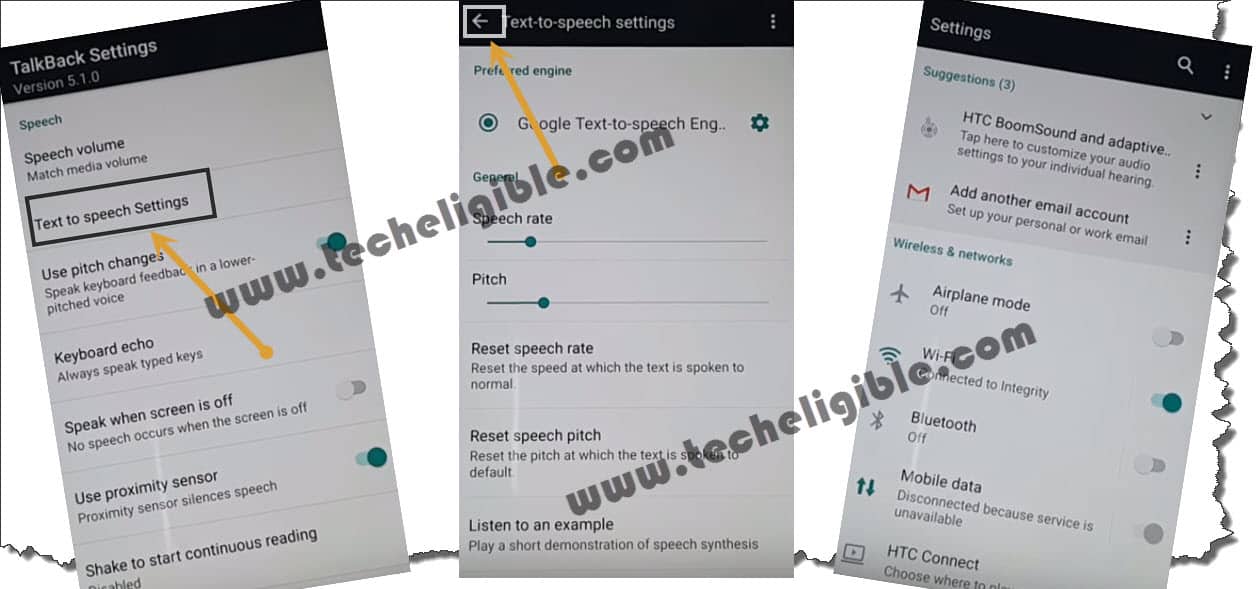
-We have to turn off talkback now. Long press both buttons (Volume UP + Down) at the same time. After that, you will be shown (suspend talkback) screen. Just double hit on “Ok” from there.

-Go to “Text-to-speech Settings”. After that, hit on a “Back Arrow” icon from extreme top left corner.
-You will be taken inside your device main settings page.
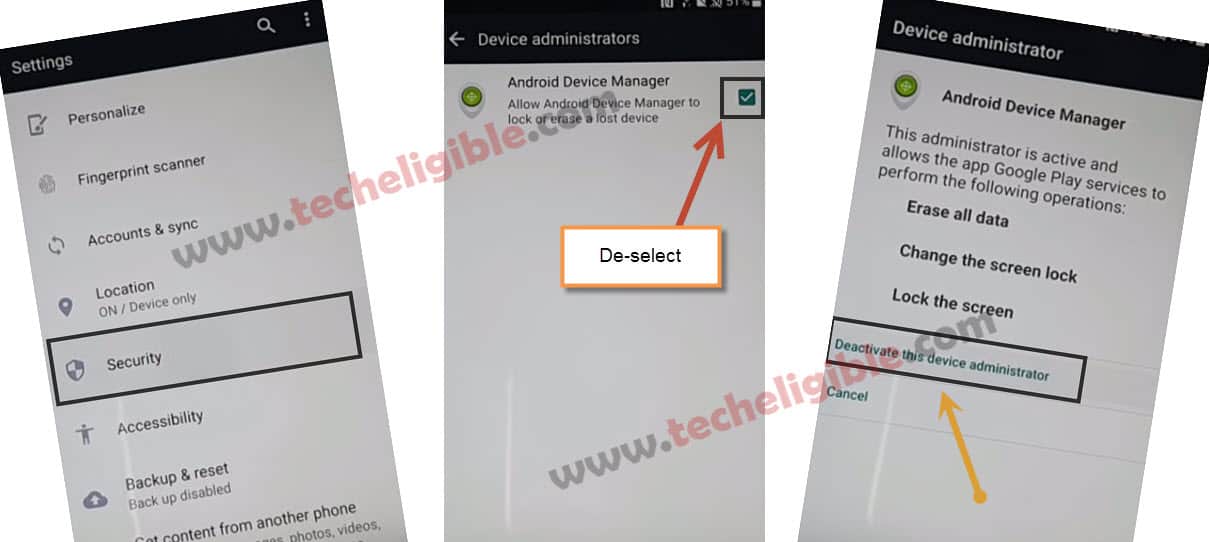
-From settings screen, simply, tap to > Security > Device Administrator > Android Device Manager > Deactivate this device administrator.
-Let’s get back to main (Settings) screen again by hitting on a back arrow icon.
-Go back to your device main (Settings) display. We are gonna disable (Google Play Services) app from there.
Disable & Clear Cache of Google Play Services:
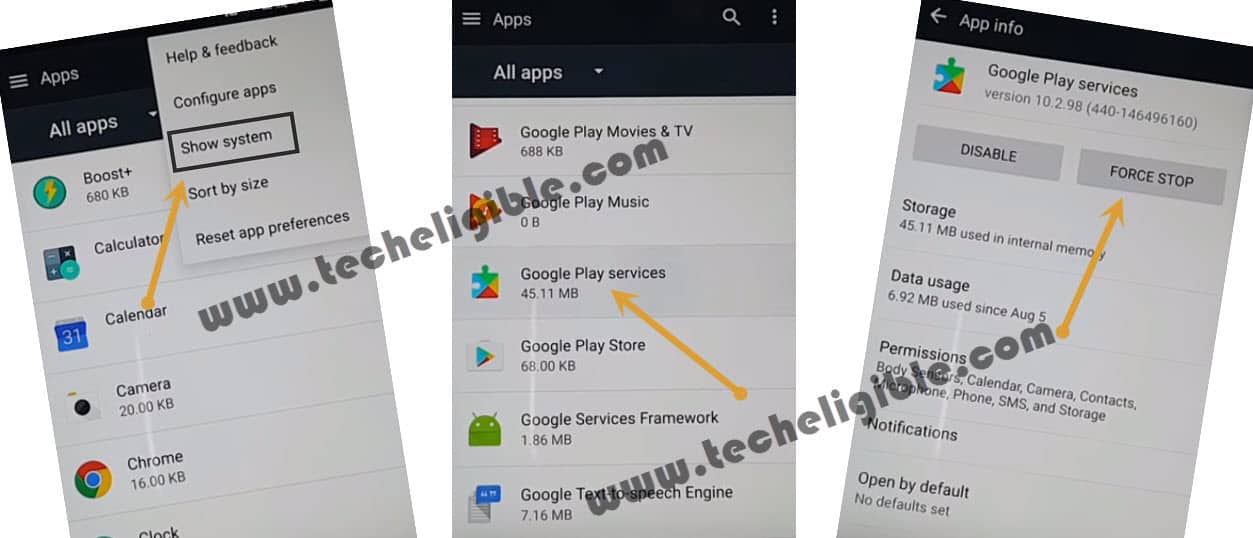
-Firstly, hit on a “Apps” option from settings screen.

-You have to get all list of hidden apps by tapping on “3 dots” icon from top corner and tap to “Show system” option.
-From app list page. Find and hit on > Google Play Services > Force Stop > Ok.
-After hitting on (Force Stop) option, you may get back app list page again.
-From there, tap again on a “Google Play Services” app.
-This time, tap to > Disable > Disable this app to Remove FRP HTC Desire 10 Pro.
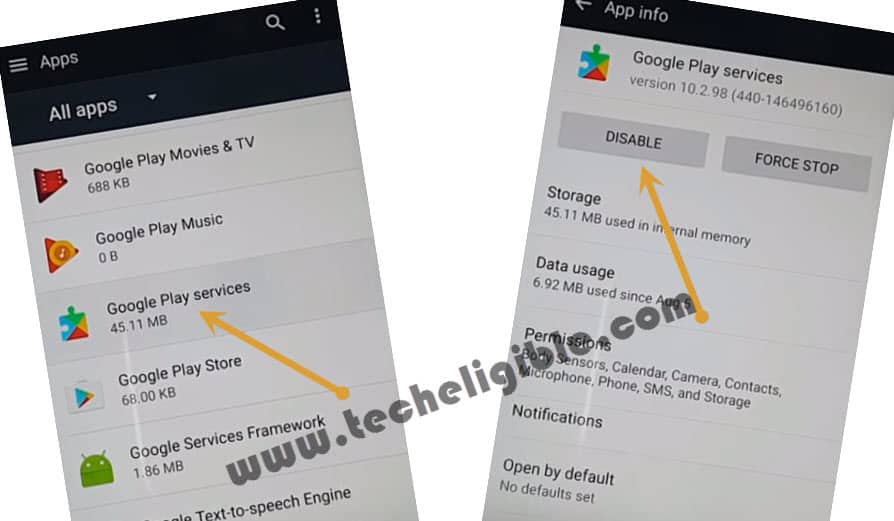
-Do make sure, you have successfully disabled google play services app and this is showing in app list page as well same as shown in below screen shot.

-We have to delete data and cache as well from this same recently disabled app. Let’s tap again on “Google Play Services”.
-From there, go to “Storage” option.
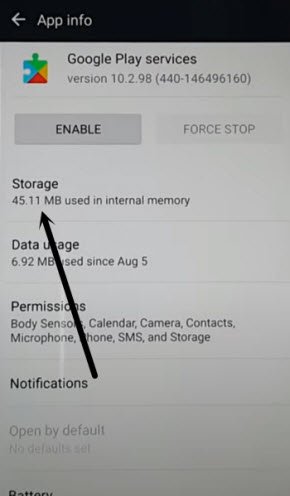
-Let’s scroll down from next page and hit on “Clear Cache” option.
-Go to also on a “Manage Space” option and tap to “Ok” from popup window.
-Go back again on a “app list” page.
-From there, find and hit on an app “Setup” same as shown below.
-Hit on a > Force Stop > Ok.
-Afterwards, tap to “Storage” option too. Scroll down from next page and hit on a “Clear Cache” option.

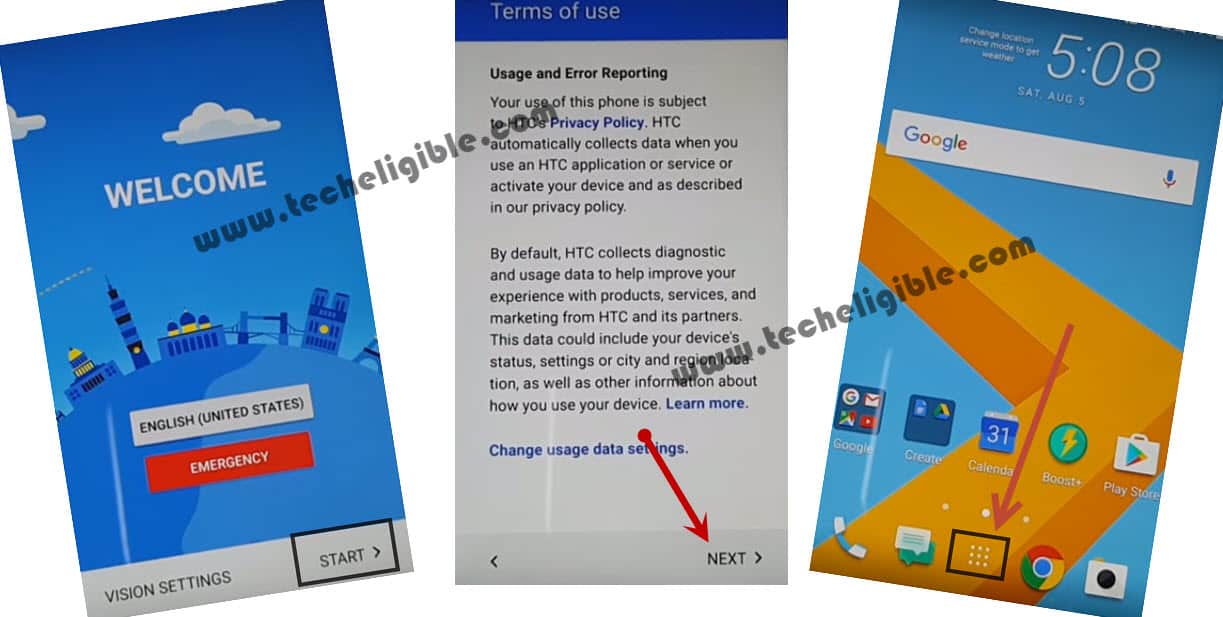
-Let’s go all the way back on first screen (Welcome).
-Complete setup wizards steps now by going to > Start > Next > Next > OK > NEXT > SKIP FOR NOW.
-Tap twice on a “Down Arrow” option from there. Finally, hit on a “Finish” option.
-You may be displayed a popup window of (Not Sign in). From there, tap to > Setup Phone > Close.
Factory Reset HTC Desire 10:
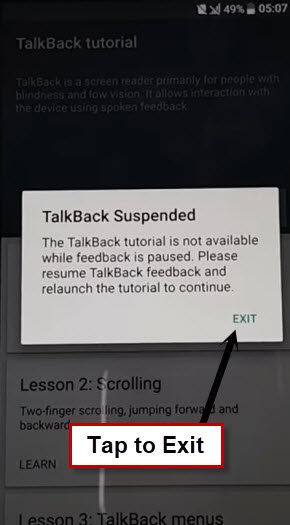
-Restart your device now. After restarting is done, you will have a (Talkback Suspended). Just tap twice on a “Exit” option.
-You have to restart your device again. After that, disable talkback by long holding both buttons (Volume UP + Down) .
-From popup window, tap on “Ok”.
-We can easily access to our device main home-screen by tapping on > Start > Next.
-From your device, just open up device menu hitting on a “Menu” icon.
-From there, tap on a “Settings” icon.
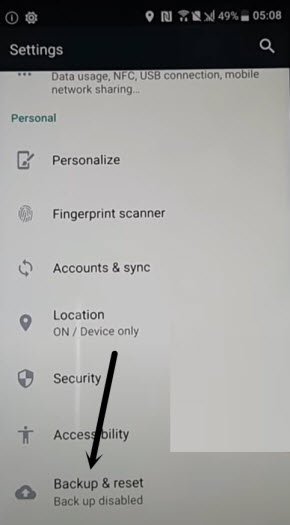
-After that, factory reset your device manually again by hitting on > Backup & Reset > Factory Data Reset > Reset Phone > OK.
| Note: Do not “Connect Wi-Fi” while completing initial setup. |
-Its all done now from Remove FRP HTC Desire 10 Pro without any pc and paid service.